通过前面介绍过activemq的文章的时候我们了解到activemq有queue和topic的具体实现,但是在rabbitmq中只有queue的具体实现,是没有具体topic这种说法的,但是虽然没有提供topic的概念,但是却通过交换器exchange、路由routingkey等进行了交换实现,下面我们就来介绍下在rabbitmq中生产者是如何把消息发送到队列中的。
在介绍消息传递之前我们还得介绍下下面的几个概念:
vhost:在前面的一篇文章《RabbitMQ的配置文件说明》中提到过一个关于vhost的默认配置为default_vhost = /,它代表一个mini的rabbitmq虚拟主机,除了与其他rabbitmq虚拟主机共享相同的身份认证和加密环境外,它拥有自己独立的queue,exchange,routingkey,binding及权限机制,它可以通过命令行rabbitmqctl add_vhost qa1和在管理界面添加

channel:通道,是由connection创建的,而connection又是通过ConnectionFactory创建的,在channel中我们可以定义queue、exchange、queuebind、消息发布、消息消费等操作。
routingkey:路由key,用来路由消息到queue,明确exchange通过routingkey转发到哪个queue上面,用于指定路由的规则。
exchange:交换器,用于生产者将消息发送到exchange,然后exchange将消息路由给对应的queue,如果无法路由到queue,则消息将会返回给生产者,或者直接丢弃。
queue:消息队列,用于存储生产者发送的消息。
binding:用于绑定exchange和routingkey。
broker:rabbitmq消息节点。在broker上可以定义任意个vhost。
介绍完上面的一些概念后回到消息传递,在rabbitmq中我们有下面一些应用场景:
1.一个生产者和一个消费者

在这种情况下我们可以直接进行消息的发送
原生生产者代码:
public class Send {

    private final static String QUEUE_NAME = "hello";

    public static void main(String[] argv) throws Exception {
        ConnectionFactory factory = new ConnectionFactory();
        factory.setHost("localhost");
        try (Connection connection = factory.newConnection();
             Channel channel = connection.createChannel()) {
            // 定义queue
            channel.queueDeclare(QUEUE_NAME, false, false, false, null);
            // 发送的消息
            String message = "Hello World!";
            // 定义路由key为hello的发送消息
            channel.basicPublish("", QUEUE_NAME, null, message.getBytes(StandardCharsets.UTF_8));
            System.out.println(" [x] Sent '" + message + "'");
        }
    }
}
原生消费者代码:
private final static String QUEUE_NAME = "hello";

    public static void main(String[] argv) throws Exception {
        ConnectionFactory factory = new ConnectionFactory();
        factory.setHost("localhost");
        Connection connection = factory.newConnection();
        Channel channel = connection.createChannel();

        // 定义消息队列
        channel.queueDeclare(QUEUE_NAME, false, false, false, null);
        System.out.println(" [*] Waiting for messages. To exit press CTRL+C");

        // 定义消息回调处理
        DeliverCallback deliverCallback = (consumerTag, delivery) -> {
            String message = new String(delivery.getBody(), "UTF-8");
            System.out.println(" [x] Received '" + message + "'");
        };
        // 消费者定义路由key为hello的消费路径,消息队列也为hello
        channel.basicConsume(QUEUE_NAME, true, deliverCallback, consumerTag -> { });
    }
springboot配置:
spring:
  rabbitmq:
    host: localhost
    port: 5672
springboot生产者代码:
@SpringBootApplication
@EnableScheduling
public class HelloWorldProducer {

	@Bean
	public Queue hello() {
		return new Queue("hello");
	}

	@Autowired
	private RabbitTemplate template;

	@Autowired
	private Queue queue;

    // 定时多次发送消息
	@Scheduled(fixedDelay = 1000)
	public void send() {
		String message = "Hello World!";
		this.template.convertAndSend(queue.getName(), message);
		System.out.println(" [x] Sent '" + message + "'");
	}

	public static void main(String[] args) throws Exception {
		SpringApplication.run(HelloWorldProducer.class, args);
	}
}
springboot消费者代码:
@RabbitListener(queues = "hello")
public void receive(String in) {
    System.out.println(" [x] Received '" + in + "'");
}
2.一个生产者多个消费者

针对这种一个生产者多个消费者的情况时,队列一般是按照顺序依次把消息发送到每一个消费者上面,但是这样会出现一种情况就是当其中一个消费者处理消息的速度过慢,然而queue还是会按照顺序依次把消息发送到该队列上面,这样就会造成消息的积累,而同时生产者产生的消息非常快,这就有可能最终导致内存的溢出,因此我们可以通过设置qos来每次消费多少消息,同时在进消息消费确认完成后才发送新消息到对应的消费者上面,这样就可以避免上面所述的情况出现。
原生的消费者代码:
private static final String TASK_QUEUE_NAME = "task_queue";

  public static void main(String[] argv) throws Exception {
    ......
    // 进行消息预取
    channel.basicQos(1);

    DeliverCallback deliverCallback = (consumerTag, delivery) -> {
        String message = new String(delivery.getBody(), "UTF-8");

        System.out.println(" [x] Received '" + message + "'");
        try {
            doWork(message);
        } finally {
            System.out.println(" [x] Done");
            // 消息确认
            channel.basicAck(delivery.getEnvelope().getDeliveryTag(), false);
        }
    };
    channel.basicConsume(TASK_QUEUE_NAME, false, deliverCallback, consumerTag -> { });
  }
springboot代码:一些其他相同配置和前面的一样,不再写出
@Bean
public SimpleRabbitListenerContainerFactory myFactory(SimpleRabbitListenerContainerFactoryConfigurer configurer,
			ConnectionFactory connectionFactory) {
    SimpleRabbitListenerContainerFactory factory = new SimpleRabbitListenerContainerFactory();
    configurer.configure(factory, connectionFactory);
		// factory.setMessageConverter(myMessageConverter());
    factory.setPrefetchCount(1);
    return factory;
}
// 并发2到5个消费者
@RabbitListener(queues = "hello", concurrency = "2-5", containerFactory = "myFactory")
public void receive(Channel channel, String in) {
    System.out.println("Channel-" + channel.getChannelNumber() + " Received '" + in + "'");
}
3.一个生产者同时发送到多个队列

这种方式是通过交换器来实现的,说到这里就必须知道交换器exchange的四种类型:fanout、direct、topic、header。我们先说下fanout类型,其他3种后面一次介绍。通过fanout定义的交换器,只要有队列queue与该交换器exchange进行了绑定操作,那么所有发送到该交换器exchange的消息都会被与该exchange绑定的queue所接收,这个与队列的名称绑定无关,队列名称的绑定只是用于消费者而已。
原生生产者代码:
 private static final String EXCHANGE_NAME = "logs";

  public static void main(String[] argv) throws Exception {
    ......
    // 定义交换器类型
    channel.exchangeDeclare(EXCHANGE_NAME, "fanout");

    String message = argv.length < 1 ? "info: Hello World!" :
                            String.join(" ", argv);

    channel.basicPublish(EXCHANGE_NAME, "", null, message.getBytes("UTF-8"));
    System.out.println(" [x] Sent '" + message + "'");
    ......
  }
原生消费者代码:
private static final String EXCHANGE_NAME = "logs";

  public static void main(String[] argv) throws Exception {
    ......

    // 定义交换器类型
    channel.exchangeDeclare(EXCHANGE_NAME, "fanout");
    String queueName = channel.queueDeclare().getQueue();
    // 绑定队列与交换器
    channel.queueBind(queueName, EXCHANGE_NAME, "");

    System.out.println(" [*] Waiting for messages. To exit press CTRL+C");

    DeliverCallback deliverCallback = (consumerTag, delivery) -> {
        String message = new String(delivery.getBody(), "UTF-8");
        System.out.println(" [x] Received '" + message + "'");
    };
    channel.basicConsume(queueName, true, deliverCallback, consumerTag -> { });
  }
springboot代码,先定义交换器等bean信息:
@Bean
public FanoutExchange fanout() {
    return new FanoutExchange("spring-logs");
}

@Configuration
public static class ReceiverConfig {
    @Bean
    public Queue autoDeleteQueue() {
        return new AnonymousQueue();
    }

    @Bean
    public Binding binding1(FanoutExchange fanout, Queue autoDeleteQueue) {
        return BindingBuilder.bind(autoDeleteQueue).to(fanout);
    }
}
生产者代码:
@Autowired
private RabbitTemplate template;

@Autowired
private FanoutExchange fanout;

AtomicInteger count = new AtomicInteger(0);

@Scheduled(fixedDelay = 1000)
public void send() {
    String message = "pub/sub message-" + count.incrementAndGet();
    template.convertAndSend(fanout.getName(), "", message);
    System.out.println(" [x] Sent '" + message + "'");
}

public static void main(String[] args) throws Exception {
    SpringApplication.run(Publisher.class, args);
}
消费者代码:
@RabbitListener(queues = "#{autoDeleteQueue.name}")
public void receive1(Channel channel, String in) {
    System.out.println("Channel-" + channel.getChannelNumber() + " Received '" + in + "'");
}
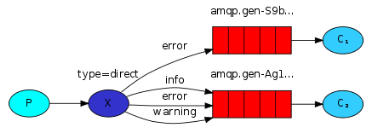
4.一个生产者到多个特定的消费者

从上图可以看出通过生产者产生消息发送到交换器exchange上,然后在路由到特定的队列queue上面,这个交换器的类型需要设置为direct,然后在绑定交换器exchange和路由routingkey及队列queue,然后就可以队列就可以进行消息的接收了,这个与队列的名称绑定无关,队列名称的绑定只是用于消费者而已。
原生生产者代码:
private static final String EXCHANGE_NAME = "direct_logs";

public static void main(String[] argv) throws Exception {
    ......
    // 定义交换器类型为direct
    channel.exchangeDeclare(EXCHANGE_NAME, "direct");
    String severity = getSeverity(argv);
    String message = getMessage(argv);

    channel.basicPublish(EXCHANGE_NAME, severity, null, message.getBytes("UTF-8"));
    System.out.println(" [x] Sent '" + severity + "':'" + message + "'");
    ......
}
原生消费者代码:
private static final String EXCHANGE_NAME = "direct_logs";

public static void main(String[] argv) throws Exception {
    ......

    // 定义交换器类型
    channel.exchangeDeclare(EXCHANGE_NAME, "direct");
    // 定义queue
    String queueName = channel.queueDeclare().getQueue();
    ......

    for (String severity : argv) {
        // 绑定queue,exchange,路由
        channel.queueBind(queueName, EXCHANGE_NAME, severity);
    }
    System.out.println(" [*] Waiting for messages. To exit press CTRL+C");

    DeliverCallback deliverCallback = (consumerTag, delivery) -> {
        String message = new String(delivery.getBody(), "UTF-8");
        System.out.println(" [x] Received '" +
            delivery.getEnvelope().getRoutingKey() + "':'" + message + "'");
    };
    channel.basicConsume(queueName, true, deliverCallback, consumerTag -> { });
  }
springboot代码,先定义交换器等bean信息:
/**
* 定义direct类型的交换器
*/
@Bean
public DirectExchange direct() {
    return new DirectExchange("spring.routing");
}

@Configuration
public static class ReceiverConfig {

    @Bean
    public Queue autoDeleteQueue1() {
        return new AnonymousQueue();
    }

    @Bean
    public Queue autoDeleteQueue2() {
        return new AnonymousQueue();
    }

   /**
   * 绑定交换器,queue和路由关系
   */
    @Bean
    public Binding binding1a(DirectExchange direct, Queue autoDeleteQueue1) {
        return BindingBuilder.bind(autoDeleteQueue1).to(direct).with("orange");
    }

    @Bean
    public Binding binding1b(DirectExchange direct, Queue autoDeleteQueue1) {
        return BindingBuilder.bind(autoDeleteQueue1).to(direct).with("black");
    }

    @Bean
    public Binding binding2a(DirectExchange direct, Queue autoDeleteQueue2) {
        return BindingBuilder.bind(autoDeleteQueue2).to(direct).with("green");
    }

    @Bean
    public Binding binding2b(DirectExchange direct, Queue autoDeleteQueue2) {
        return BindingBuilder.bind(autoDeleteQueue2).to(direct).with("black");
    }
}
生产者代码:
@Autowired
private RabbitTemplate template;

@Autowired
private DirectExchange direct;

AtomicInteger count = new AtomicInteger(0);

String[] routingKeys = { "orange", "black", "green" };

@Scheduled(fixedDelay = 1000)
public void send() {
    int i = count.incrementAndGet();
    String message = "routing message-" + i + " routingKey=" + routingKeys[i % 3];
    // 随机发送到路由上面
    template.convertAndSend(direct.getName(), routingKeys[i % 3], message);
    System.out.println(" [x] Sent '" + message + "'");
}

public static void main(String[] args) throws Exception {
    SpringApplication.run(Producer.class, args);
}
消费者代码:
@RabbitListener(queues = "#{autoDeleteQueue1.name}")
public void receive1(Channel channel, String in) {
    System.out.println("Channel-" + channel.getChannelNumber() + " Received '" + in + "'");
}

@RabbitListener(queues = "#{autoDeleteQueue2.name}")
public void receive2(Channel channel, String in) {
    System.out.println("Channel-" + channel.getChannelNumber() + " Received '" + in + "'");
}
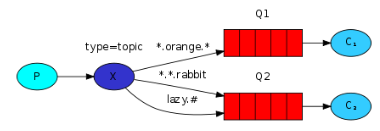
5.一个生产者发送消息到相关的队列

通过上面的图片我们可以知道,交换器exchange的类型是topic,路由key这次也不再是直接指定的了,而是通过模糊匹配来对应到队列queue的,*表示一个字符串,#表示任意多个字符串, 只要在exchange上面能匹配上对应的路由key就能将消息发送到相应的队列上面。
原生生产者代码:
private static final String EXCHANGE_NAME = "topic_logs";

public static void main(String[] argv) throws Exception {
    ......
    // 定义类型为topic的exchange
    channel.exchangeDeclare(EXCHANGE_NAME, "topic");

    // 获取路由key
    String routingKey = getRouting(argv);
    String message = getMessage(argv);
    // 发送消息
    channel.basicPublish(EXCHANGE_NAME, routingKey, null, message.getBytes("UTF-8"));
    System.out.println(" [x] Sent '" + routingKey + "':'" + message + "'");
  }
原生消费者代码:
private static final String EXCHANGE_NAME = "topic_logs";

public static void main(String[] argv) throws Exception {
    ......
    // 定义exchange的类型为topic
    channel.exchangeDeclare(EXCHANGE_NAME, "topic");
    String queueName = channel.queueDeclare().getQueue();

    if (argv.length < 1) {
        System.err.println("Usage: ReceiveLogsTopic [binding_key]...");
        System.exit(1);
    }

    for (String bindingKey : argv) {
        // 绑定queue、exchange和路由key的关系
        channel.queueBind(queueName, EXCHANGE_NAME, bindingKey);
    }

    System.out.println(" [*] Waiting for messages. To exit press CTRL+C");

    DeliverCallback deliverCallback = (consumerTag, delivery) -> {
        String message = new String(delivery.getBody(), "UTF-8");
        System.out.println(" [x] Received '" +
            delivery.getEnvelope().getRoutingKey() + "':'" + message + "'");
    };
    channel.basicConsume(queueName, true, deliverCallback, consumerTag -> { });
  }
springboot代码,先定义交换器等bean信息:
/**
* 定义类型为topic的交换器exchange
*/
@Bean
public TopicExchange topic() {
    return new TopicExchange("spring.topic");
}

@Configuration
public static class ReceiverConfig {

    @Bean
    public Queue autoDeleteQueue1() {
       return new AnonymousQueue();
    }

    @Bean
    public Queue autoDeleteQueue2() {
       return new AnonymousQueue();
    }

    /**
    * 绑定queue、exchange和routingkey匹配的关系
    */
    @Bean
    public Binding binding1a(TopicExchange topic, Queue autoDeleteQueue1) {
        return BindingBuilder.bind(autoDeleteQueue1).to(topic).with("*.orange.*");
    }

    @Bean
    public Binding binding2a(TopicExchange topic, Queue autoDeleteQueue2) {
        return BindingBuilder.bind(autoDeleteQueue2).to(topic).with("*.*.rabbit");
    }

    @Bean
    public Binding binding2b(TopicExchange topic, Queue autoDeleteQueue2) {
        return BindingBuilder.bind(autoDeleteQueue2).to(topic).with("lazy.#");
    }
}
生产者代码:
@Autowired
private RabbitTemplate template;

@Autowired
private TopicExchange topic;

AtomicInteger count = new AtomicInteger(0);

Random random = new Random();
String[] speeds = { "higher", "middle", "lazy" };
String[] colours = { "red", "orange", "blue", "black", "yellow", "green" };
String[] species = { "pig", "rabbit", "monkey", "dog", "cat" };

@Scheduled(fixedDelay = 3000)
public void send() {
    // 随机组装routingkey来继续消息路由
    String routingKey = speeds[random.nextInt(100) % speeds.length] + "."
				+ colours[random.nextInt(100) % colours.length] + "." + species[random.nextInt(100) % species.length];

    int i = count.incrementAndGet();

    String message = "topic message-" + i + " routingKey=" + routingKey;

    // 发送消息到exchange对应的路由key上
    template.convertAndSend(topic.getName(), routingKey, message);

    System.out.println(" [x] Sent '" + message + "'");
}

public static void main(String[] args) throws Exception {
    SpringApplication.run(Producer.class, args);
}
消费者代码:
@RabbitListener(queues = "#{autoDeleteQueue1.name}")
public void receive1(Channel channel, String in) {
    System.out.println("Channel-" + channel.getChannelNumber() + " Received '" + in + "'");
}

@RabbitListener(queues = "#{autoDeleteQueue2.name}")
public void receive2(Channel channel, String in) {
    System.out.println("Channel-" + channel.getChannelNumber() + " Received '" + in + "'");
}
6.header类型的exchange
它不依赖于路由规则来进行消息的发送,它是根据发送的消息内容中的headers属性进行匹配的,因此它的性能非常差,而且也不实用,因此一般都不使用这个交换器类型。
更多的内容可以参考官网https://www.rabbitmq.com/getstarted.html。代码上面参考了官网及一些其他文档。
来源:CSDN
作者:玉&心
链接:https://blog.csdn.net/XinhuaShuDiao/article/details/104062730