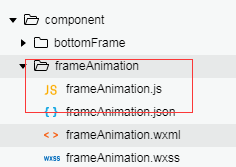
纯属练习组件化

组件wxml页面代码如下
<view class='shade' hidden='{{popup}}' ></view>
<view class='shade_box popup {{frameAnimate}}' hidden='{{popup}}'>
    <view class='content'>{{ title }}</view>
     <!-- 内容 -->
     <view style='min-height:100rpx;'> {{ content }}</view>
   <view class='bottom-btn'>
   <view   bindtap='_hideEvent' wx:if='{{ cancelBtn }}'>{{ cancelBtn }}</view> //这一块是因为有时候弹框可能只需要一个按钮,
    <view  bindtap='_confirmEvent'>{{ confirmBtn }}</view>
   </view>
</view>
wxss页面代码如下
/* pages/middleAnimation/middleAnimation.wxss */

/* 遮罩 */

.shade {
  position: fixed;
  top: 0;
  right: 0;
  bottom: 0;
  left: 0;
  background-color: rgba(0, 0, 0, 0.3);
  z-index: 10;
}

.shade_box {
  position: fixed;
  top: 0;
  right: 0;
  bottom: 0;
  left: 0;
  margin: auto;
  z-index: 11;
  min-width: 200rpx;
  min-height: 200rpx;
  font-size: 28rpx;
  box-sizing: border-box;
  color: #333;
  font-family: Helvetica, "Helvetica Neue", Arial, sans-serif;
  letter-spacing: 0;
  word-wrap: break-word;
}

.frameAnimate {
  animation-name: popup;
  animation-duration: 0.2s;
  animation-timing-function: linear;
  animation-delay: 0;
  animation-iteration-count: 1;
  animation-direction: normal;
}

@keyframes popup {
  from {
    opacity: 0;
    transform: scale(0.3, 0.3);
  }

  to {
    opacity: 1;
    transform: scale(1, 1);
  }
}

/* 当前弹窗样式 */

.popup {
  width: 600rpx;
  height: 314rpx;
  background-color: #fff;
  border-radius: 30rpx;
  padding: 0 40rpx;
  padding-top: 60rpx;
  box-sizing: border-box;
}

.popup .content {
  font-family: PingFangSC-Semibold, PingFang SC;
  font-weight: 600;
  font-size: 40rpx;
  color: #11141A
}
.bottom-btn{
  display: flex;
  align-items: center;
  border-top: 1rpx solid #ececec;
  height: 100rpx;
  text-align: center
}
.bottom-btn view{
 flex: 1
}
逻辑层代码如下
// component/frameAnimation/frameAnimation.js
Component({
  /**
   * 组件的属性列表
   */
  properties: {
    content:{
      type:String,
      value:''
    },
    title: {
      type: String,
      value: '我是一个动画的特效动画'
    },
    cancelBtn: {
      type: String,
      value: ''
    },
    confirmBtn: {
      type: String,
      value: '确认'
    }
  },

  /**
   * 组件的初始数据
   */
  data: {
    popup:true,
  },

  /**
   * 组件的方法列表
   */
  methods: {
    showFrame:function(){
      this.setData({
        popup: false,
        frameAnimate: 'frameAnimate'
      })
    },
    hideFrame() {
      this.setData({
        popup: true,
        frameAnimate: ''
      })
    },
    _confirmEvent() {
      this.triggerEvent("confirmEvent");
    },
    _hideEvent() {
      this.triggerEvent("hideEvent"); //将事件传递到调用组件的页面去操作
    }
  }
})
在使用页面 引入组件 “frameAnimation”: “/component/frameAnimation/frameAnimation”,
<view  style='margin:20rpx 50rpx;'>
    <button type='primary' bindtap='showPopup2'>打开弹窗</button>
</view>

<view  style='margin:20rpx 50rpx;'>
    <button type='primary' bindtap='showPopup3'>打开弹窗2</button>
</view>

  <frameAnimation id='frameAnimation'
   content=''
   title='动画'
   cancelBtn='取消'
   bind:confirmEvent='_confirmEvent'
   bind:hideEvent='_hideEvent'
   >

  </frameAnimation>


  <frameAnimation id='frameAnimation1'
   content='拨打司机电话,联系司机'
   title='动画'
   bind:confirmEvent='_confirmEvent1'
   bind:hideEvent='_hideEvent1'
   >

  </frameAnimation>
逻辑层
  // 以下部分是有动画的弹框方法
  showPopup2:function(){
    this.selectComponent("#frameAnimation").showFrame();
  },
  // 以下部分是有动画的弹框方法
  showPopup3: function () {
    this.selectComponent("#frameAnimation1").showFrame();
  },
  // 公用弹框确认方法
  _confirmEvent:function(){
    console.log('点击了确认按钮')
    this.selectComponent("#frameAnimation").hideFrame();
  },
  _hideEvent:function(){
    this.selectComponent("#frameAnimation").hideFrame();
  },
  _confirmEvent1: function () {
    console.log('点击了确认按钮')
    this.selectComponent("#frameAnimation1").hideFrame();
  },
    _hideEvent1: function () {
    this.selectComponent("#frameAnimation1").hideFrame();
  },
来源:CSDN
作者:weixin_43831302
链接:https://blog.csdn.net/weixin_43831302/article/details/103920246