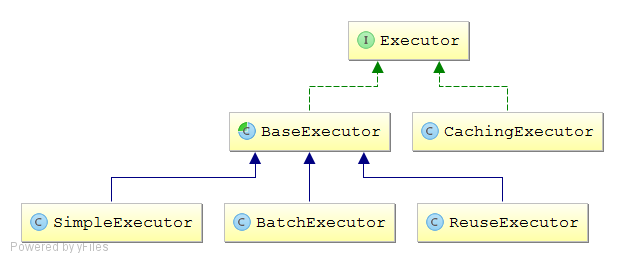
以上是之前的分析,在mybatis源码分析之事务管理器里分析到了事务管理器
SqlSession session = sqlSessionFactory.openSession();

//DefaultSqlSessionFactory里的openSession
public SqlSession openSession() {
  return openSessionFromDataSource(configuration.getDefaultExecutorType(), null, false);
}

private SqlSession openSessionFromDataSource(ExecutorType execType, TransactionIsolationLevel level, boolean autoCommit) {
  Transaction tx = null;
  try {
    //根据配置获取环境
    final Environment environment = configuration.getEnvironment();
    //构建事务工厂
    final TransactionFactory transactionFactory = getTransactionFactoryFromEnvironment(environment);
    //通过事务工厂创建事务Transaction对象
    tx = transactionFactory.newTransaction(environment.getDataSource(), level, autoCommit);
    //创建执行器Executor对象
    final Executor executor = configuration.newExecutor(tx, execType);
    //根据configuration,executor创建DefaultSqlSession对象
    return new DefaultSqlSession(configuration, executor, autoCommit);
  } catch (Exception e) {
    closeTransaction(tx); // may have fetched a connection so lets call close()
    throw ExceptionFactory.wrapException("Error opening session.  Cause: " + e, e);
  } finally {
    ErrorContext.instance().reset();
  }
}
之前已经分析过事务管理器,下面分析执行器Executor

public enum ExecutorType {
  SIMPLE, REUSE, BATCH
}
执行器类型只有三种
SIMPLE:普通的执行器;
REUSE:执行器会重用预处理语句(prepared statements);
BATCH:执行器将重用语句并执行批量更新。
configuration.newExecutor(tx, execType);

//默认执行器类型
protected ExecutorType defaultExecutorType = ExecutorType.SIMPLE;
//二级缓存的全局开关,默认开启缓存
protected boolean cacheEnabled = true;

public Executor newExecutor(Transaction transaction, ExecutorType executorType) {
  //executorType为null时executorType=ExecutorType.SIMPLE
  executorType = executorType == null ? defaultExecutorType : executorType;
  executorType = executorType == null ? ExecutorType.SIMPLE : executorType;
  Executor executor;
  //根据执行器类型创建执行器
  if (ExecutorType.BATCH == executorType) {
    executor = new BatchExecutor(this, transaction);
  } else if (ExecutorType.REUSE == executorType) {
    executor = new ReuseExecutor(this, transaction);
  } else {
    executor = new SimpleExecutor(this, transaction);
  }
  //当cacheEnabled为true时创建CachingExecutor对象
  if (cacheEnabled) {
    executor = new CachingExecutor(executor);
  }
  executor = (Executor) interceptorChain.pluginAll(executor);
  return executor;
}
二级缓存开关配置示例
<settings>
  <setting name="cacheEnabled" value="true"/>
</settings>
执行器创建后
new DefaultSqlSession(configuration, executor, autoCommit);

//DefaultSqlSession构造方法
public DefaultSqlSession(Configuration configuration, Executor executor, boolean autoCommit) {
  this.configuration = configuration;
  this.executor = executor;
  this.dirty = false;
  this.autoCommit = autoCommit;
}至此SqlSession创建完成,从之前的几篇和这篇能清晰的看到从读取配置文件到SqlSession创建的整个过程.需要注意的是SqlSession 的实例不是线程安全的,是不能被共享的,所以它的最佳的范围是请求或方法范围.每个线程都应该有自己的 SqlSession 实例.
来源:oschina
链接:https://my.oschina.net/u/657390/blog/663991