目录结构

第一步:在pom.xml文件中添加依赖
<!--模板依赖-->
        <dependency>
            <groupId>org.springframework.boot</groupId>
            <artifactId>spring-boot-starter-freemarker</artifactId>
        </dependency>
<!-- springBoot JPA的起步依赖 -->
        <dependency>
            <groupId>org.springframework.boot</groupId>
            <artifactId>spring-boot-starter-data-jpa</artifactId>
        </dependency>

        <dependency>
            <groupId>mysql</groupId>
            <artifactId>mysql-connector-java</artifactId>
        </dependency>
第二步:在application.properties中配置数据源
#DB Configation
spring.datasource.driver-class-name=com.mysql.jdbc.Driver
spring.datasource.url=jdbc:mysql://127.0.0.1:3306/springboot?serverTimezone=UTC
spring.datasource.username=root
spring.datasource.password=root
#JPAConfiguration
spring.jpa.database=MySQL
spring.jpa.show-sql=true
spring.jpa.generate-ddl=true
注意:需提前创建好数据库
第三步:在resources/templates 目录下 创建freemarker模板文件 文件格式:文件后缀名.ftl
用于接收数据
<html>
<head>
    <title>spring boot</title>
</head>
<body>
    <table border="1px">
        <thead>
            <tr>
                <th>id</th>
                <th>用户名</th>
                <th>密码</th>
                <th>姓名</th>
            </tr>
        </thead>
        <tbody>
        <#list userList as user>
            <tr>
                <th>${user.id}</th>
                <th>${user.username}</th>
                <th>${user.password}</th>
                <th>${user.name}</th>
            </tr>
        </#list>
        </tbody>
    </table>
</body>
</html>
第四步:创建实体类
import javax.persistence.*;

@Entity
@Table(name="user")
public class User {
    @Id
    @GeneratedValue(strategy = GenerationType.IDENTITY)
    private int id;
    private String username;
    private String password;
    private String name;

    public int getId() {
        return id;
    }

    public void setId(int id) {
        this.id = id;
    }

    public String getUsername() {
        return username;
    }

    public void setUsername(String username) {
        this.username = username;
    }

    public String getPassword() {
        return password;
    }

    public void setPassword(String password) {
        this.password = password;
    }

    public String getName() {
        return name;
    }

    public void setName(String name) {
        this.name = name;
    }

    @Override
    public String toString() {
        return "User{" +
                "id=" + id +
                ", username='" + username + '\'' +
                ", password='" + password + '\'' +
                ", name='" + name + '\'' +
                '}';
    }
}
第五步:在dao层创建一个接口
import org.springframework.data.jpa.repository.JpaRepository;
public interface UserDao extends JpaRepository<User,Integer> {
}
第六步:创建controller层用于给.ftl文件传递数据
import org.springframework.beans.factory.annotation.Autowired;
import org.springframework.beans.factory.annotation.Value;
import org.springframework.stereotype.Controller;
import org.springframework.ui.Model;
import org.springframework.web.bind.annotation.RequestMapping;
import org.springframework.web.bind.annotation.ResponseBody;

import java.util.HashMap;
import java.util.List;
import java.util.Map;

@Controller
public class PageController {
    @Autowired
    private UserDao userDao;
    @RequestMapping("/page/user/list")
    public String showUserList(Model model){
        List<User> userList=userDao.findAll();
        model.addAttribute("userList",userList);
        return "user";
    }
}
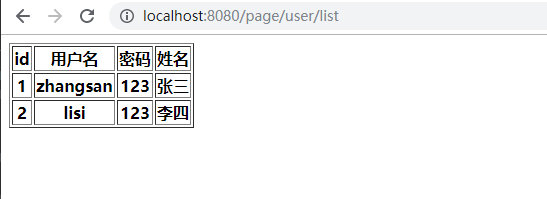
第七步:启动项目,访问地址 http://localhost:8080/page/user/list
