自己闲着没事,在小黑上虚拟了 4 个 centos 64 的系统,用来安装分布式 fastdfs 、 nginx 负载均衡,过程一路艰辛,搞了一个通宵都没弄好,终于在第二天的傍晚终于弄好了,记录一下过程。
有时候看书会犯糊涂,看完了都不知道将了啥,只有动手坐坐,啥玩意都明白差不多了。
有时候太懒了,哎,这是病,得治。
- FastDFS安装:
FastDFS是一个国产开源的轻量级分布式文件系统,它对文件进行管理,功能包括:文件存储、文件同步、文件访问(文件上传、文件下载)等,解决了大容量存储和负载均衡的问题.特别适合以文件为载体的在线服务,如相册网站、视频网站等等.FastDFS服务端有两个角色:跟踪器(tracker)和存储节点(storage).跟踪器主要做调度工作,在访问上起负载均衡的作用.
什么是FastDFS:
FastDFS是一个国产开源的轻量级分布式文件系统,它对文件进行管理,功能包括:文件存储、文件同步、文件访问(文件上传、文件下载)等,解决了大容量存储和负载均衡的问题.特别适合以文件为载体的在线服务,如相册网站、视频网站等等.
FastDFS原理:
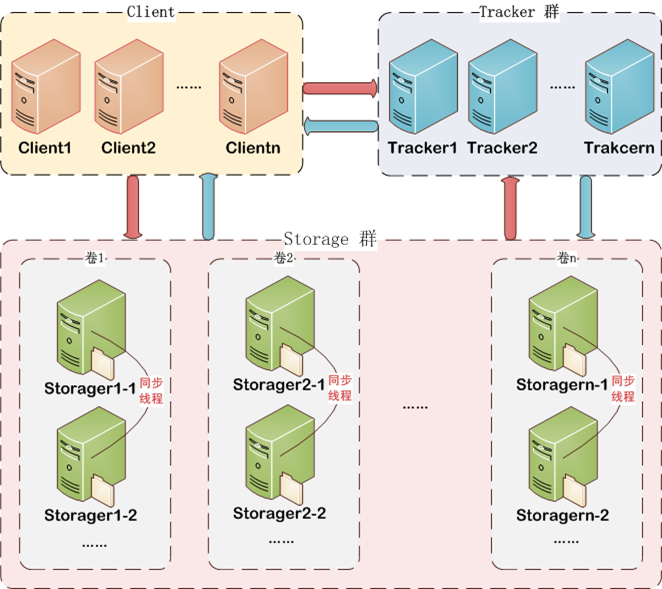
存储节点采用了分组(group)的方式。存储系统由一个或多个group组成,group与group之间的文件是相互独立的,所有group的文件容量累加就是整个存储系统中的文件容量。一个group可以由一台或多台存储服务器组成,一个group下的存储服务器中的文件都是相同的,group中的多台存储服务器起到了冗余备份和负载均衡的作用(一个组的存储容量为该组内存储服务器容量最小的那个,不同组的Storage server之间不会相互通信,同组内的Storage server之间会相互连接进行文件同步)。在group中增加服务器时,同步已有的文件由系统自动完成,同步完成后,系统自动将新增服务器切换到线上提供服务。当存储空间不足或即将耗尽时,可以动态添加group。只需要增加一台或多台服务器,并将它们配置为一个新的group,这样就扩大了存储系统的容量。
FastDFS只有两个角色:Tracker server和Storage server。Tracker server作为中心结点,其主要作用是负载均衡和调度。Tracker server在内存中记录分组和Storage server的状态等信息,不记录文件索引信息,占用的内存量很少。另外,客户端(应用)和Storage server访问Tracker server时,Tracker server扫描内存中的分组和Storage server信息,然后给出应答。由此可以看出Tracker server非常轻量化,不会成为系统瓶颈。
FastDFS中的Storage server在其他文件系统中通常称作Trunk server或Data server。Storage server直接利用OS的文件系统存储文件。FastDFS不会对文件进行分块存储,客户端上传的文件和Storage server上的文件一一对应(FastDFS中的文件标识分为两个部分:组名和文件名,二者缺一不可)
FastDFS架构:
FastDFS服务端有三个角色:跟踪服务器(tracker server)、存储服务器(storage server)和客户端(client)。
tracker server:跟踪服务器,主要做调度工作,起负载均衡的作用。在内存中记录集群中所有存储组和存储服务器的状态信息,是客户端和数据服务器交互的枢纽。相比GFS中的master更为精简,不记录文件索引信息,占用的内存量很少。
storage server:存储服务器(又称:存储节点或数据服务器),文件和文件属性(meta data)都保存到存储服务器上。Storage server直接利用OS的文件系统调用管理文件。
client:客户端,作为业务请求的发起方,通过专有接口,使用TCP/IP协议与跟踪器服务器或存储节点进行数据交互。

FastDFS协议:
FastDFS角色间是基于TCP/IP协议进行通信,协议包格式为:header + body。具体结构如图:
上传机制:
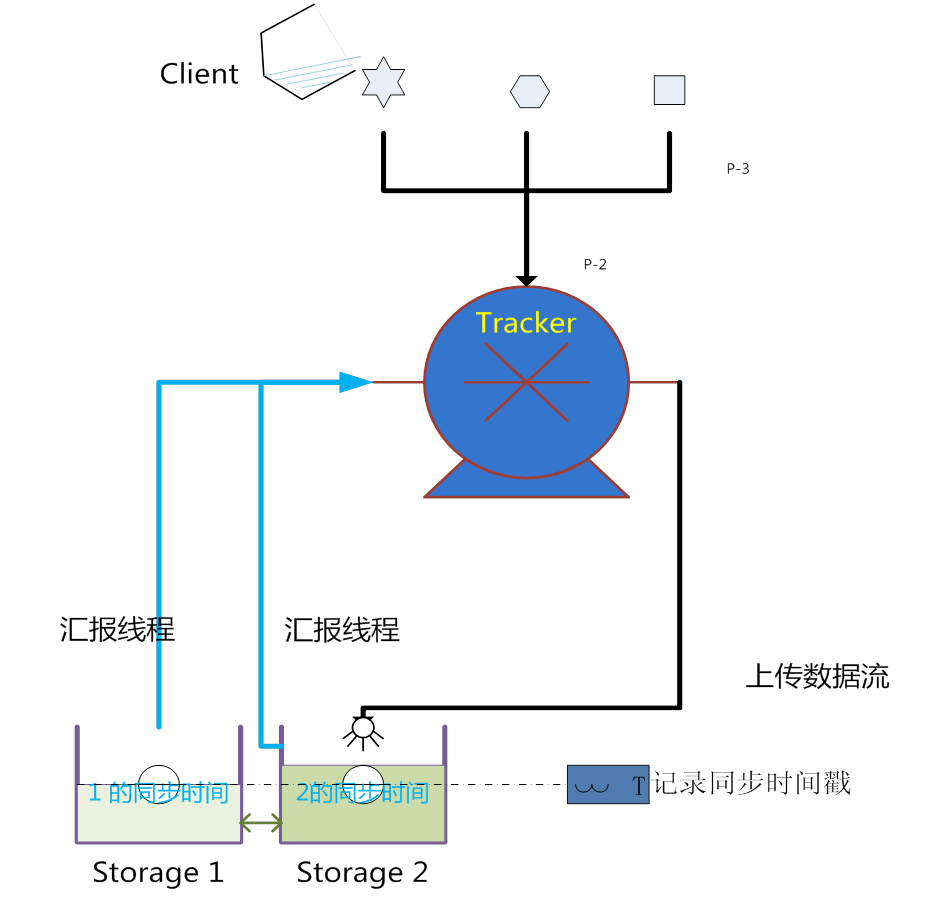
同步时间管理:
当一个文件上传成功后,客户端马上发起对该文件下载请求(或删除请求)时,tracker是如何选定一个适用的存储服务器呢?其实每个存储服务器都需要定时将自身的信息上报给tracker,这些信息就包括了本地同步时间(即,同步到的最新文件的时间戳)。而tracker根据各个存储服务器的上报情况,就能够知道刚刚上传的文件,在该存储组中是否已完成了同步。同步信息上报如下图
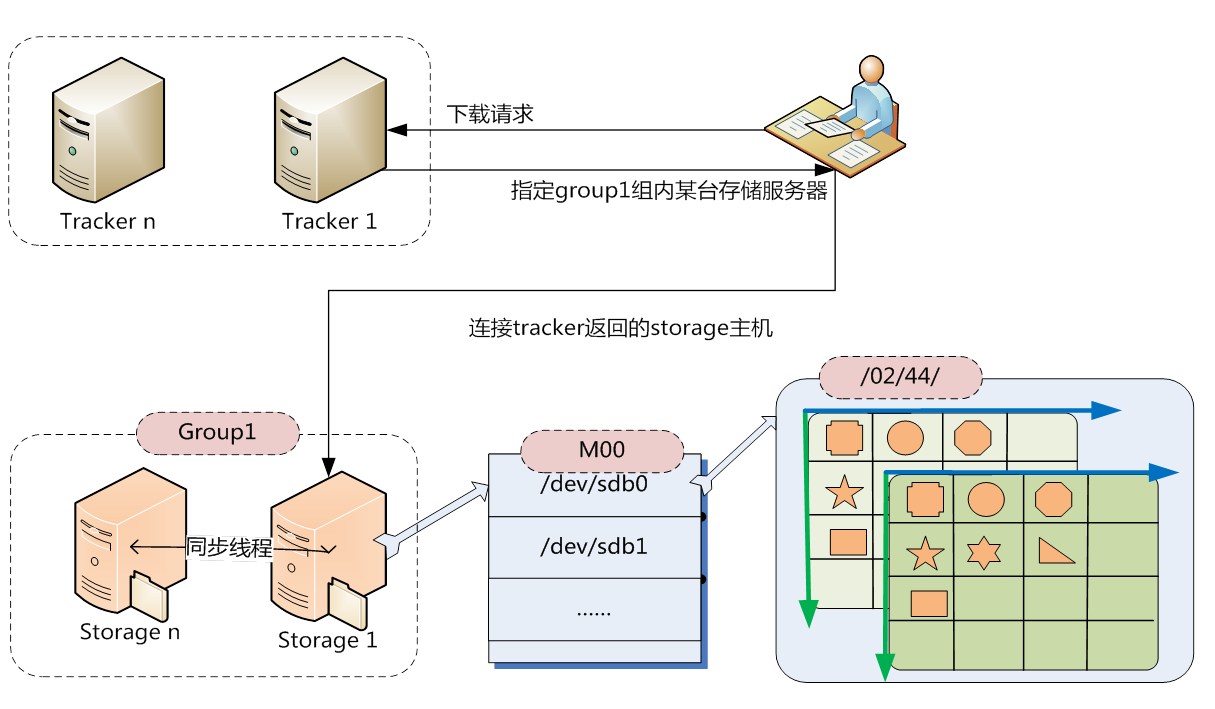
下载机制:
精巧的FID:
说到下载就不得不提文件索引(又称:FID)的精巧设计了。文件索引结构如下图,是客户端上传文件后存储服务器返回给客户端,用于以后访问该文件的索引信息。文件索引信息包括:组名,虚拟磁盘路径,数据两级目录,文件名。![]()
ps:
- 组名:文件上传后所在的存储组名称,在文件上传成功后有存储服务器返回,需要客户端自行保存。
- 虚拟磁盘路径:存储服务器配置的虚拟路径,与磁盘选项store_path*对应。
- 数据两级目录:存储服务器在每个虚拟磁盘路径下创建的两级目录,用于存储数据文件。
- 文件名:与文件上传时不同。是由存储服务器根据特定信息生成,文件名包含:源存储服务器IP地址、文件创建时间戳、文件大小、随机数和文件拓展名等信息。
快速定位文件:
- 知道FastDFS FID的组成后,我们来看看FastDFS是如何通过这个精巧的FID定位到需要访问的文件。
- 通过组名tracker能够很快的定位到客户端需要访问的存储服务器组,并将选择合适的存储服务器提供客户端访问;
- 存储服务器根据“文件存储虚拟磁盘路径”和“数据文件两级目录”可以很快定位到文件所在目录,并根据文件名找到客户端需要访问的文件。


开始动起手吧, 下载地址
http://sourceforge.net/projects/fastdfs/files/
http://code.google.com/p/fastdfs/
- 整体网络配置
Tracker Server 192.168.55.222 /home/tracker 端口:22122 Tracker Server 192.168.55.226 /home/tracker 端口:22122 Storage1 Server 192.168.55.223 group1 /home/storage 端口:23000 Storage4 Server 192.168.55.227 group1 /home/storage 端口:23000 Storage2 Server 192.168.55.224 group2 /home/storage 端口:23000 Storage3 Server 192.168.55.225 group2 /home/storage 端口:23000 #Storage2为group2的源服务器 注意: 1.group2同组的Storage2和Storage3 FastDFS服务端口必须一致: port=23000。 2.一台服务器可以装多个组(group)但不能装同组的多个Storage,日志会报错误,日志报错原因是"注意1" 3.Version 4.05之前fastdfs内部绑定了libevent作为http服务器.Version 4.05之后的版本删除了内置的web http服务,内置的web http服务是个累赘,不用也罢! 4.启动storage server时,一直处于僵死状态.启动storage server,storage将连接tracker server,如果连不上,将一直重试。直到连接成功,启动才算真正完成!如果集群中有2台tracker server,而其中一台tracker没有启动,可能会导致storage server一直处于僵死状态 - 系统操作环境的设置
#软件安装包存储: /usr/local/src /usr/local/fastdfs fastdfs安装目录 #基本目录列表: #创建fastdfs用户 /usr/sbin/groupadd fastdfs /usr/sbin/useradd -g fastdfs fastdfs #创建存储数据目录 mkdir -p /home/fastdfs/tracker;#创建tracker目录保存运行日志 mkdir -p /home/fastdfs/storage;#创建Storage目录保存运行日志及其data数据 # source .bashrc - 为方便查找目录,设置变量
################Tracker################ # vi .bashrc alias worksrc='cd /usr/local/src;ls' alias workfastdfs='cd /usr/local/fastdfs;ls' alias worktracker='cd /home/fastdfs/tracker;ls' #track启动 重启 停止 alias sertracker='service fdfs_trackerd' 配置生效 # source .bashrc - 为方便查找目录,设置变量
################Storage################
# vi .bashrc
  alias  worksrc='cd /usr/local/src;ls'
  alias  workfastdfs='cd /usr/local/fastdfs;ls'
  alias  workstorage='cd /home/fastdfs/storage;ls'
  alias  workfastdfs='cd /usr/local/nginx;ls'
#storage启动 重启 停止
  alias  serstorage='service fdfs_storaged'
#nginx 启动 重启 停止
  alias  sernginx='service nginxd'
配置生效
# source .bashrc
1.安装libevent 和 fastdfs
- 首先安装libevent. fastdfs在编译源程序时fastdfs内部调用libevent的处理机制,,需要用到libevent一些依赖文件,否则编译fastdfs会出错
libevent是一个事件触发、异步事件的网络库,是一个轻量级的开源高性能网络库,以BSD许可证发布,适用于Windows、Linux、BSD、Mac OS等多种平台,内部使用select、epoll等系统调用。
http://hahaya.github.io/2013/07/15/build-libevent.html#确保系统已经安装以下工具包 gcc perl libevent-devel make pcre-devel #卸载系统自带libevent,自带版本过低,安装fastdfs会出错 rpm -qa|grep libevent # 或者 yum remove libevent* #下载安装libevent #worksrc; wget http://cloud.github.com/downloads/libevent/libevent/libevent-2.0.19-stable.tar.gz; tar -zxvf libevent-2.0.19-stable.tar.gz; cd libevent-2.0.19-stable; #make clean; ./configure --prefix=/usr/local/libevent make && make install; #为libevent创建软链接到/lib库下,64位系统对应/lib64 ln -s /usr/local/libevent/lib/libevent-2.0.so.5 /usr/lib/libevent-2.0.so.5 ln -s /usr/local/libevent/lib/libevent-2.0.so.5 /usr/lib64/libevent-2.0.so.5 #命令汇总: worksrc;wget http://cloud.github.com/downloads/libevent/libevent/libevent-2.0.19-stable.tar.gz;tar -zxvf libevent-2.0.19-stable.tar.gz;cd libevent-2.0.19-stable;make clean;./configure --prefix=/usr/local/libevent;make && make install;cd ../ - 安装fastdfs的步骤
修改 fastdfs 启动文件worksrc; # 自行下载 4.07 http://sourceforge.net/projects/fastdfs/files/ # wget http://fastdfs.googlecode.com/files/FastDFS_v4.06.tar.gz tar -zxvf FastDFS_v4.07.tar.gz cd FastDFS #由于定义/usr/local/fastdfs为fastdfs安装目录,所以需要修改make.sh vim make.sh #/etc/fdfs 全部替换为 /usr/local/fastdfs/conf %s/\/etc\/fdfs/\/usr\/local\/fastdfs\/conf/g # TARGET_PREFIX=/usr/local 修改为 /usr/local/fastdfs sed -i 's:TARGET_PREFIX=.*:TARGET_PREFIX=/usr/local/fastdfs:g' make.sh # TARGET_CONF_PATH=/etc/fdfs 修改为 /usr/local/fastdfs/conf sed -i 's:TARGET_CONF_PATH=.*:TARGET_CONF_PATH=/usr/local/fastdfs/conf:g' make.sh #安装 ./make.sh C_INCLUDE_PATH=/usr/local/libevent/include LIBRARY_PATH=/usr/local/libevent/lib ./make.sh install# 修改 fdfs_trackerd 配置文件 vim /etc/init.d/fdfs_trackerd #替换 %s/usr\/local/usr\/local\/fastdfs/g %s/etc\/fdfs/usr\/local\/fastdfs\/conf/g #增加x权限 chmod a+x /etc/init.d/fdfs_trackerd # 修改 fdfs_storaged 配置文件 vim /etc/init.d/fdfs_storaged #替换 %s/usr\/local/usr\/local\/fastdfs/g %s/etc\/fdfs/usr\/local\/fastdfs\/conf/g #增加x权限 chmod a+x /etc/init.d/fdfs_storaged
2.安装Tracker Server - 192.168.55.222
- 引用上例中安装libevent 和 fastdfs步骤
- 配置及启动Tracker Server,端口:22122
复制storage_ids.conf文件#修改tracker.conf配置 vim /usr/local/fastdfs/conf/tracker.conf # the tracker server port port=22122 # the base path to store data and log files base_path=/home/yuqing/fastdfs -> base_path=/home/fastdfs/tracker #日志目录 # sed -i 's:base_path=.*:base_path=/home/fastdfs/tracker:g' tracker.conf reserved_storage_space = 4GB -> reserved_storage_space = 1GB # sed -i 's:reserved_storage_space=.*:reserved_storage_space = 1GB:g' tracker.conf #unix group name to run this program, #not set (empty) means run by the group of current user run_by_group= -> fastdfs #unix username to run this program, #not set (empty) means run by current user run_by_user= -> fastdfs #开启自定义server ID取代ip形式,方便内部网络服务器更换ip#**此方式要重点理解,4.0以后新特性 use_storage_id = true #使用server ID作为storage server标识 storage_ids_filename = storage_ids.conf #<id> <group_name> <ip_or_hostname> id_type_in_filename = id #文件名反解析中包含server ID,以前是ipcp -r /usr/local/src/FastDFS/conf/storage_ids.conf /usr/local/fastdfs/conf/ #编辑storage服务器ID与IP地址的对应关系 vim /usr/local/fastdfs/conf/storage_ids.conf #<id> <group_name> <ip_or_hostname> # 100001 group1 192.168.55.223 - 设置 Tracker Server 用户及组
增加x权限chown -R fastdfs:fastdfs /home/fastdfs
启动 Trackerchmod a+x /etc/init.d/fdfs_trackerd
设置开机启动 Trackerservice fdfs_trackerd start #启动过程中出现的错误 ./fdfs_trackerd: error while loading shared libraries: libevent-2.0.so.5: cannot open shared object file: No such file or directory #解决办法 ln -s /usr/lib/libevent-2.0.so.5 /usr/lib64/libevent-2.0.so.5 #查看日志 vim /home/fastdfs/tracker/logs/trackerd.log #启动后成功的日志 #[2013-10-03 20:50:08] INFO - FastDFS v4.07, base_path=/home/fastdfs/tracker, run_by_group=fastdfs, run_by_user=fastdfs, connect_timeout=30s, network_timeout=60s, port=22122, bind_addr=, max_connections=256, accept_threads=1, work_threads=4, store#_lookup=2, store_group=, store_server=0, store_path=0, reserved_storage_space=10.00%, download_server=0, allow_ip_count=-1, sync_log_buff_interval=10s, check_active_interval=120s, thread_stack_size=64 KB, storage_ip_changed_auto_adjust=1, storage_sy#nc_file_max_delay=86400s, storage_sync_file_max_time=300s, use_trunk_file=0, slot_min_size=256, slot_max_size=16 MB, trunk_file_size=64 MB, trunk_create_file_advance=0, trunk_create_file_time_base=02:00, trunk_create_file_interval=86400, trunk_create_file_sp#ace_threshold=20 GB, trunk_init_check_occupying=0, trunk_init_reload_from_binlog=0, use_storage_id=1, id_type_in_filename=id, storage_id_count=1, rotate_error_log=0, error_log_rotate_time=00:00, rotate_error_log_size=0, store_slave_file_use_link=0, use_con#nection_pool=0, g_connection_pool_max_idle_time=3600s
附目录说明vim /etc/rc.d/rc.local service fdfs_trackerd start
安装 nginx 做 tracker server 负载均衡# tracker server目录及文件结构: # ${base_path} # |__data # | |__storage_groups.dat:存储分组信息 # | |__storage_servers.dat:存储服务器列表 # |__logs # |__trackerd.log:tracker server日志文件upstream webservergroup1 { server 192.168.55.223; } upstream webservergroup2 { server 192.168.55.224; server 192.168.55.225; } server { listen 80; server_name localhost; #charset koi8-r; #access_log logs/host.access.log main; location / { root html; index index.html index.htm; } location /group1/M00 { proxy_pass http://webservergroup1; } location /group2/M00 { proxy_pass http://webservergroup2; } }
3.安装Storage Server -192.168.55.223
- 引用上例中安装libevent 和 fastdfs步骤
- 修改storage.conf配置
设置 Storage Server 用户及组vim /usr/local/fastdfs/conf/storage.conf # the name of the group this storage server belongs to group_name=group1 # the name of the group this storage server belongs to # the storage server port #the storage server port port=23000 # the base path to store data and log files #日志目录 base_path=/home/yuqing/fastdfs -> /home/fastdfs/storage # store_path#, based 0, if store_path0 not exists, it's value is base_path #data数据存储目录 # the paths must be exist store_path0=/home/fastdfs/storage # tracker_server can ocur more than once, and tracker_server format is # "host:port", host can be hostname or ip address tracker_server=192.168.209.121:22122 ->192.168.55.222:22122 #unix group name to run this program, #not set (empty) means run by the group of current user run_by_group= -> fastdfs #这儿一定填写执行的用户名,不然会启动报错,测试环境填写的 root #unix username to run this program, #not set (empty) means run by current user run_by_user= -> fastdfs #这儿一定填写执行的用户名,不然会启动报错,测试环境填写的 root
增加x权限chown -R fastdfs:fastdfs /home/fastdfs
启动 Storagechmod a+x /etc/init.d/fdfs_storaged
设置开机启动 Storageservice fdfs_storaged start #接下来会出现很多mkdir data path,这是系统在创建数据目录 #data path: /home/fastdfs/storage/data, mkdir sub dir... #mkdir data path: 00 ... #mkdir data path: 01 ... #mkdir data path: 02 ... #mkdir data path: 03 ... #....................... #data path: /home/fastdfs/storage/data, mkdir sub dir done.
附目录说明vim /etc/rc.d/rc.local service fdfs_storaged start# storage server目录及文件结构: # ${base_path} # |__data # | |__storage_stat.dat:本地存储信息 # | |__sync # | |__ binlog.000 # | |__ binlog.index # |__logs # |__storaged.log:storage server日志文件 - 安装fastdfs-nginx-module模块
安装nginx (这里)#创建相关用户和目录创建www用户和组 /usr/sbin/groupadd www /usr/sbin/useradd -g www www #创建nginx日志目录 mkdir -p /home/www/logs chmod a+w /home/www/logs chown -R www:www /home/www/logs
安装fastdfs-nginx-module插件cd /usr/local/src #下载 nginx #wget http://nginx.org/download/nginx-1.5.4.tar.gz tar -zxvf nginx-1.5.4.tar.gz cd nginx-1.5.4/ ./configure --user=www --group=www --prefix=/usr/local/nginx --with-http_stub_status_module make && make install #--with-http_stub_status_module 用来监控nginx的当前状态
上面编译时使用的动态链接库#worksrc; cd /usr/local/src # wget http://fastdfs.googlecode.com/files/fastdfs-nginx-module_v1.15.tar.gz tar -zxvf fastdfs-nginx-module_v1.15.tar.gz #修改插件配置文件 vim /usr/local/src/fastdfs-nginx-module/src/config ngx_addon_name=ngx_http_fastdfs_module HTTP_MODULES="$HTTP_MODULES ngx_http_fastdfs_module" NGX_ADDON_SRCS="$NGX_ADDON_SRCS $ngx_addon_dir/ngx_http_fastdfs_module.c" CORE_INCS="$CORE_INCS /usr/local/fastdfs/include/fastdfs /usr/local/fastdfs/include/fastcommon/" CORE_LIBS="$CORE_LIBS -L/usr/local/fastdfs/lib -lfastcommon -lfdfsclient" CFLAGS="$CFLAGS -D_FILE_OFFSET_BITS=64 -DFDFS_OUTPUT_CHUNK_SIZE='256*1024' -DFDFS_MOD_CONF_FILENAME='\"/usr/local/fastdfs/conf/mod_fastdfs.conf\"'" #复制mod_fastdfs.conf到/usr/local/fastdfs/conf/目录下 cp /usr/local/src/fastdfs-nginx-module/src/mod_fastdfs.conf /usr/local/fastdfs/conf/
编译fastdfs-nginx-module模块#启动nginx报错 #./nginx: error while loading shared libraries: libfastcommon.so: cannot open shared object file: No such file or directory #解决办法 ---> 将/usr/local/fastdfs/lib 加入系统文件/etc/ld.so.conf中 vim /etc/ld.so.conf /usr/local/fastdfs/lib #更新库文件缓存ld.so.cache /sbin/ldconfig -v
修改mod_fastdfs.conf配置# 重新编译nginx cd /usr/local/src/nginx-1.5.4 ./configure --add-module=/usr/local/src/fastdfs-nginx-module/src make; make install
nginx配置简洁版本vim /usr/local/fastdfs/conf/mod_fastdfs.conf # the base path to store log files base_path=/tmp # if load FastDFS parameters from tracker server # since V1.12 # default value is false load_fdfs_parameters_from_tracker=true # FastDFS tracker_server can ocur more than once, and tracker_server format is # "host:port", host can be hostname or ip address # valid only when load_fdfs_parameters_from_tracker is true tracker_server=192.168.55.222:22122 # the port of the local storage server # the default value is 23000 storage_server_port=23000 # the group name of the local storage server group_name=group1 # if the url / uri including the group name # set to false when uri like /M00/00/00/xxx # set to true when uri like ${group_name}/M00/00/00/xxx, such as group1/M00/xxx # default value is false url_have_group_name = true # path(disk or mount point) count, default value is 1 # must same as storage.conf store_path_count=1 # store_path#, based 0, if store_path0 not exists, it's value is base_path # the paths must be exist # must same as storage.conf store_path0=/home/fastdfs/storage # set the log filename, such as /usr/local/apache2/logs/mod_fastdfs.log # empty for output to stderr (apache and nginx error_log file) log_filename=/home/www/logs/mod_fastdfs.log#vim /usr/local/nginx/conf/nginx.conf user www www; worker_processes 2; error_log /home/www/logs/error.log notice; pid /home/www/logs/nginx.pid; worker_rlimit_nofile 5120; events { use epoll; worker_connections 5120; } http { include mime.types; default_type application/octet-stream; sendfile on; tcp_nopush on; keepalive_timeout 60; tcp_nodelay on; server { listen 80; server_name localhost; location /group1/M00 { alias /home/fastdfs/storage/data; ngx_fastdfs_module; } } } #启动nginx /usr/local/nginx/sbin/nginx
4.安装Storage Server -192.168.55.224
- 引用上例中安装libevent 和 fastdfs步骤
- 修改storage.conf配置
vim /usr/local/fastdfs/conf/storage.conf # the name of the group this storage server belongs to group_name=group2 # the name of the group this storage server belongs to # the storage server port #the storage server port port=23000 # the base path to store data and log files #日志目录 base_path=/home/yuqing/fastdfs -> /home/fastdfs/storage # store_path#, based 0, if store_path0 not exists, it's value is base_path #data数据存储目录 # the paths must be exist store_path0=/home/fastdfs/storage #unix group name to run this program, #not set (empty) means run by the group of current user run_by_group= -> fastdfs #这儿一定填写执行的用户名,不然会启动报错,测试环境填写的 root #unix username to run this program, #not set (empty) means run by current user run_by_user= -> fastdfs #这儿一定填写执行的用户名,不然会启动报错,测试环境填写的 root # tracker_server can ocur more than once, and tracker_server format is # "host:port", host can be hostname or ip address tracker_server=192.168.xxx.xxxx:22122 -> tracker_server=192.168.55.222:22122 - 引用上例中 "编辑启动脚本" 步骤
#启动 Storage service fdfs_storaged restart #接下来会出现很多mkdir data path,这是系统在创建数据目录 #data path: /home/fastdfs/storage/data, mkdir sub dir... #mkdir data path: 00 ... #mkdir data path: 01 ... #mkdir data path: 02 ... #mkdir data path: 03 ... #....................... #data path: /home/fastdfs/storage/data, mkdir sub dir done. - 安装fastdfs-nginx-module插件
上面编译时使用的动态链接库#worksrc; cd /usr/local/src # wget http://fastdfs.googlecode.com/files/fastdfs-nginx-module_v1.15.tar.gz tar -zxvf fastdfs-nginx-module_v1.15.tar.gz #修改插件配置文件 vim /usr/local/src/fastdfs-nginx-module/src/config ngx_addon_name=ngx_http_fastdfs_module HTTP_MODULES="$HTTP_MODULES ngx_http_fastdfs_module" NGX_ADDON_SRCS="$NGX_ADDON_SRCS $ngx_addon_dir/ngx_http_fastdfs_module.c" CORE_INCS="$CORE_INCS /usr/local/fastdfs/include/fastdfs /usr/local/fastdfs/include/fastcommon/" CORE_LIBS="$CORE_LIBS -L/usr/local/fastdfs/lib -lfastcommon -lfdfsclient" CFLAGS="$CFLAGS -D_FILE_OFFSET_BITS=64 -DFDFS_OUTPUT_CHUNK_SIZE='256*1024' -DFDFS_MOD_CONF_FILENAME='\"/usr/local/fastdfs/conf/mod_fastdfs.conf\"'" #复制mod_fastdfs.conf到/usr/local/fastdfs/conf/目录下 cp /usr/local/src/fastdfs-nginx-module/src/mod_fastdfs.conf /usr/local/fastdfs/conf/
编译fastdfs-nginx-module模块#将/usr/local/fastdfs/lib 加入系统文件/etc/ld.so.conf中 vim /etc/ld.so.conf /usr/local/fastdfs/lib #更新库文件缓存ld.so.cache /sbin/ldconfig
修改mod_fastdfs.conf配置# 重新编译nginx cd /usr/local/src/nginx-1.5.4 ./configure --add-module=/usr/local/src/fastdfs-nginx-module/src make; make install
nginx配置简洁版本vim /usr/local/fastdfs/conf/mod_fastdfs.conf # the base path to store log files base_path=/tmp # if load FastDFS parameters from tracker server # since V1.12 # default value is false load_fdfs_parameters_from_tracker=true # FastDFS tracker_server can ocur more than once, and tracker_server format is # "host:port", host can be hostname or ip address # valid only when load_fdfs_parameters_from_tracker is true tracker_server=192.168.25.11:22122 # the port of the local storage server # the default value is 23000 storage_server_port=23000 # the group name of the local storage server group_name=group2 # if the url / uri including the group name # set to false when uri like /M00/00/00/xxx # set to true when uri like ${group_name}/M00/00/00/xxx, such as group1/M00/xxx # default value is false url_have_group_name = true # path(disk or mount point) count, default value is 1 # must same as storage.conf store_path_count=1 # store_path#, based 0, if store_path0 not exists, it's value is base_path # the paths must be exist # must same as storage.conf store_path0=/home/fastdfs/storage # set the log filename, such as /usr/local/apache2/logs/mod_fastdfs.log # empty for output to stderr (apache and nginx error_log file) log_filename=/home/www/logs/mod_fastdfs.log#vim /usr/local/nginx/conf/nginx.conf user www www; worker_processes 2; error_log /home/www/logs/error.log notice; pid /home/www/logs/nginx.pid; worker_rlimit_nofile 5120; events { use epoll; worker_connections 5120; } http { include mime.types; default_type application/octet-stream; sendfile on; tcp_nopush on; keepalive_timeout 60; tcp_nodelay on; server { listen 80; server_name localhost; location /group2/M00 { alias /home/fastdfs/storage/data; ngx_fastdfs_module; } } } #启动nginx /usr/local/nginx/sbin/nginx
5.安装Storage Server - 192.168.55.225
- 参考 192.168.55.224 安装,不同点就是192.168.55.224是group2的源服务,storage.conf配置不同,需要注意。
6.测试及使用fastdfs-192.168.55.222
- fastdfs之配置client
#修改 client.conf
  vim /usr/local/fastdfs/conf/client.conf
  base_path=/home/yuqing/fastdfs-> base_path=/home/fastdfs/tracker
  tracker_server=192.168.209.121:22122 -> tracker_server=192.168.55.222:22122
#或
  sed -i 's:base_path=.*:base_path=/home/fastdfs/tracker:g' /usr/local/fastdfs/conf/client.conf
  sed -i 's:tracker_server=.*:tracker_server=192.168.55.222\:22122:g' /usr/local/fastdfs/conf/client.conf
查看文件信息#upload cd /usr/local/fastdfs/bin ./fdfs_upload_file /usr/local/fastdfs/conf/client.conf /tmp/t1.jpg #-—————————————————————————————————————— #group1/M00/00/00/oYYBAFJNRnGASWekAAAXkpktHxI423.jpg
测试上传./fdfs_file_info /usr/local/fastdfs/conf/client.conf group1/M00/00/00/oYYBAFJNQiiAYIXzAAAXkpktHxI095.jpg #———————————————————————————————————————— source storage id: 100001 source ip address: 192.168.55.223 file create timestamp: 2013-10-03 18:26:57 file size: 6034 file crc32: 2569871122 (0x992D1F12)./fdfs_test /usr/local/fastdfs/conf/client.conf upload /tmp/t1.jpg #———————————————————————————————————————— This is FastDFS client test program v4.07 Copyright (C) 2008, Happy Fish / YuQing FastDFS may be copied only under the terms of the GNU General Public License V3, which may be found in the FastDFS source kit. Please visit the FastDFS Home Page http://www.csource.org/ for more detail. [2013-10-04 02:20:19] DEBUG - base_path=/home/fastdfs/tracker, connect_timeout=30, network_timeout=60, tracker_server_count=1, anti_steal_token=0, anti_steal_secret_key length=0, use_connection_pool=0, g_connection_pool_max_idle_time=3600s, use_storage_id=0, storage server id count: 0 tracker_query_storage_store_list_without_group: server 1. group_name=, ip_addr=192.168.55.223, port=23000 group_name=group1, ip_addr=192.168.55.223, port=23000 storage_upload_by_filename group_name=group1, remote_filename=M00/00/00/oYYBAFJNRWeAHhGuAAAXkpktHxI578.jpg source ip address: 192.168.55.223 file timestamp=2013-10-03 18:22:31 file size=6034 file crc32=2569871122 example file url: http://192.168.55.223/group1/M00/00/00/oYYBAFJNRWeAHhGuAAAXkpktHxI578.jpg storage_upload_slave_by_filename group_name=group1, remote_filename=M00/00/00/oYYBAFJNRWeAHhGuAAAXkpktHxI578_big.jpg source ip address: 192.168.55.223 file timestamp=2013-10-03 18:22:31 file size=6034 file crc32=2569871122 example file url: http://192.168.55.223/group1/M00/00/00/oYYBAFJNRWeAHhGuAAAXkpktHxI578_big.jpg
在浏览器中-->http://192.168.55.222/group1/M00/00/00/oYYBAFJNQiiAYIXzAAAXkpktHxI095.jpg
输入上图中的url地址, tracker server 会自动重定向到存储文件的 storage server,文件下载成功。至此,已经成功搭建了fastdfs。弄了两天,终于好了 - 0-:
- 常规命令范例:
#监控storage /usr/local/fastdfs/bin/fdfs_monitor /usr/local/fastdfs/conf/storage.conf #如果存在多个多个组,只需要监控其中一个组,就能调出所有组的状态 #删除组内服务器storage和查看各个组内服务器状态 /usr/local/fastdfs/bin/fdfs_monitor /usr/local/fastdfs/conf/client.conf delete group2 192.168.55.223 /usr/local/fastdfs/bin/fdfs_monitor /usr/local/fastdfs/conf/client.conf storage server有7个状态,如下(数值从1~7): # FDFS_STORAGE_STATUS:INIT :初始化,尚未得到同步已有数据的源服务器 # FDFS_STORAGE_STATUS:WAIT_SYNC :等待同步,已得到同步已有数据的源服务器 # FDFS_STORAGE_STATUS:SYNCING :同步中 # FDFS_STORAGE_STATUS:DELETED :已删除,该服务器从本组中摘除 # FDFS_STORAGE_STATUS:OFFLINE :离线 # FDFS_STORAGE_STATUS:ONLINE :在线,尚不能提供服务 # FDFS_STORAGE_STATUS:ACTIVE :在线,可以提供服务 - 常用操作命令
#调整防火墙的规则,开放端口:22122
  iptables -I INPUT 5 -p tcp -m state --state NEW -m tcp --dport 22122 -j ACCEPT
  /etc/init.d/iptables save

#调整防火墙的规则,开放端口:23000
  iptables -I INPUT 5 -p tcp -m state --state NEW -m tcp --dport 23000 -j ACCEPT
  /etc/init.d/iptables save

#重启防火墙:
  /etc/init.d/iptables restart
#查看CentOS防火墙信息:

  /etc/init.d/iptables status
关闭CentOS防火墙服务:
  /etc/init.d/iptables stop

#删除端口信息
  iptables -D INPUT 3  //删除input的第3条规则
  iptables -L -n
——————————————————————————————————————
#启动tracker进程:
  /etc/init.d/fdfs_trackerd start

#查看trackerd状态:
  /etc/init.d/fdfs_trackerd status

#查看trackerd监听的端口:
  netstat -plantu | grep tracker

#启动Storage进程:
  /etc/init.d/fdfs_storaged start

#查看Storage进程:
  ps -ef | grep storaged | grep -v grep
错误及解决方案:
- mod_fastdfs.log ---> Permission denied
#通过nginx前端服务器请求 fastdfs 图片资源是 日志打印错误:
#查看日志:
/home/www/logs/mod_fastdfs.log
[2013-10-12 14:28:50] ERROR - file: /usr/local/src/fastdfs-nginx-module/src/common.c, line: 881, stat file: /home/fastdfs/storage/data/00/00/pIYBAFJY6LmAHKsiAAAXkpktHxI541.jpg fail, errno: 13, error info: Permission denied

#解决方案:
#找到fastdfs存储目录,如:/home/fastdfs
#看是否有执行权限:
drwx------. 5 fastdfs fastdfs  4096 10月 12 09:10 fastdfs
#增加执行权限就行
chmod 755 fastdfs/
#设置用户和组
chown -R fastdfs:fastdfs fastdfs/
安装图片过滤处理
- http_image_filter_module是nginx提供的集成图片处理模块,支持nginx-0.7.54以后的版本,在网站访问量不是很高磁盘有限不想生成多余的图片文件的前提下可,就可以用它实时缩放图片,旋转图片,验证图片有效性以及获取图片宽高以及图片类型信息,由于是即时计算的结果,所以网站访问量大的话,不建议使用。
./configure --prefix=/usr/local/nginx --with-http_stub_status_module --add-module=/usr/local/software/fastdfs-nginx-module/src/ --with-http_image_filter_module --with-pcre --with-http_gzip_static_module --with-http_ssl_module --with-openssl=/usr/bin/openssl - 如果未安装回报“/configure: error: the HTTP image filter module requires the GD library.”错误
yum install gd-devel apt-get install libgd2-xpm libgd2-xpm-dev - make&&make install后就可以进行配置了,做最简单的配置,先让模块可以跑起来
location ~ /simg/.*\.jpg$ { #proxy_pass http://10.11.11.11; #rewrite "/simg/(.*\.jpg)$" /img/$1 break ; image_filter resize 100 100; error_page 415 = /empty; } - 最后开启nginx,这样访问/simg/目录下的图片,都会按照高度最高100并且宽度最高100按照原图比例进行截取出来,并输出给浏览器。
当然也可以开启重写去读取本机另一个目录下源文件;如果不在一台机器上就可以开启proxy_pass,并加上重写即可。
http_image_filter_module支持5种指令:
image_filter:测试图片文件合法性(image_filter test);3个角度旋转图片(image_filter rotate 90 | 180 | 270);以json格式输出图片宽度、高度、类型(image_filter size);最小边缩小图片保持图片完整性(resize width height);以及最大边缩放图片后截取多余的部分(image_filter crop [width] [height]);
image_filter_jpeg_quality:设置jpeg图片的压缩质量比例(官方最高建议设置到95,但平时75就可以了);
image_filter_buffer:限制图片最大读取大小,默认为1M;
image_filter_transparency:用来禁用gif和palette-based的png图片的透明度,以此来提高图片质量。
image_filter_sharpen:这个指令在nginx-1.1.8和1.0.11版本后增加的,目前还不知道是干啥用,有知道的朋友或者发现文中有什么错误的朋友请留言给我吧^^
来源:oschina
链接:https://my.oschina.net/u/616040/blog/166836
