前提先了解数学算法:
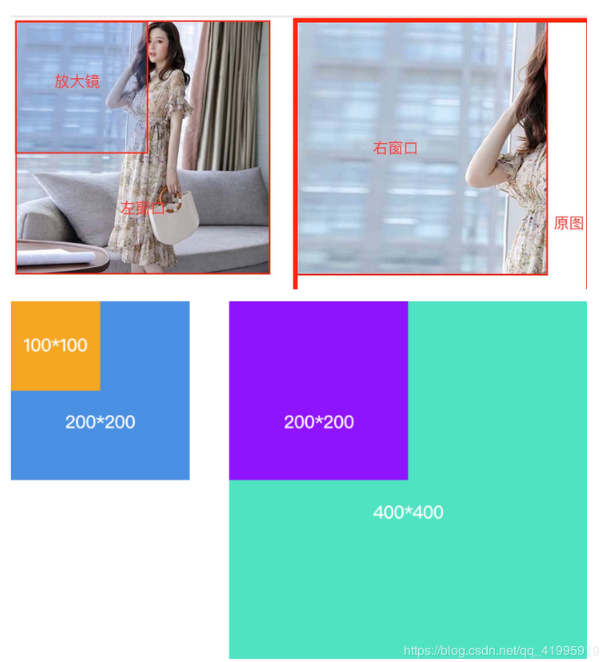
    求遮罩层mask宽度
    大图、大图显示区、小图、遮罩层
    1、小图是大图等比缩放的
    2、遮罩层是大图显示区缩放的
    小图/大图 = 遮罩层/大图显示区
        遮罩层 = 大图显示区*(小图/大图);
    ------------------------------------------------
    大图活动区 = 大图-大图显示区
    小图活动区 = 小图-遮罩层

    遮罩层偏移量/小图活动区 = 大图偏移量/大图活动区

    大图偏移量 = 大图活动区*(遮罩层偏移量/小图活动区)
    大图偏移量 = (大图-大图显示区)*(遮罩层偏移量/(小图-遮罩层))

分解动作:
    1、布局
    2、计算遮罩层宽高度
    3、为small绑定移入移出事件处理
    4、为small绑定鼠标移入事件处理
        4.1、计算mask的偏移量
            (e.clientX-zoom.offsetLeft-zoom.clientLeft-mask.offsetWidth/2)
        4.2、规定mask的最大最小偏移量
        4.3、计算大图偏移量(参照公式)
注意事项:
            1、鼠标移入和鼠标移动事件应该加给small
            2、offsetX/offsetY 值不准确,应该使用clientX/clientY代替
效果:

源码:
<!DOCTYPE html>
<html lang="en">

	<head>
		<meta charset="UTF-8">
		<title>Document</title>
		<style>
			/*整个div中只放置小显示区域即可,大显示区域隐藏,这样直接对zoom设置属性就行了*/

			.zoom {
				width: 200px;
				height: 200px;
				margin-left: 100px;
				margin-top: 100px;
				/*margin-top: 1000px;  测试有滚动条情况下反应*/
				position: relative;
				border: solid 1px #000;
			}

			.big_area {
				/*大显示区域宽高可直接改变*/
				width: 200px;
				height: 200px;
				position: absolute;
				left: -10000px;
				top: -1px;
				border: solid 1px #000;
				overflow: hidden;
			}

			.big_area img {
				position: absolute;
				left: 0;
				top: 0;
			}
			/*遮罩层*/

			.mask {
				position: absolute;
				left: -10000px;
				top: 0;
				width: 100px;
				height: 100px;
				background: #000;
				opacity: 0.65;
				filter: alpha(opacity=65);
			}
		</style>
	</head>

	<body>
		<div class="zoom">
			<div class="small_area">
				<img src="images/zoom.jpg" width="200" height="200" />
				<span class="mask"></span>
			</div>
			<div class="big_area">
				<img src="images/zoom.jpg" width="620" height="620">
			</div>
		</div>

		<script>
			// 获取相应节点元素
			var zoom = document.querySelector('.zoom');
			var simg = document.querySelector('.small_area img');
			var bimg = document.querySelector('.big_area img');
			var big = document.querySelector('.big_area');
			var small = document.querySelector('.small_area');
			var mask = document.querySelector('.mask');

			// 设置遮罩层宽高  小图宽 除以 大图宽 乘以 大显示区域边框
			mask.style.width = (simg.offsetWidth / bimg.offsetWidth) * big.clientWidth + "px";
			mask.style.height = (simg.offsetHeight / bimg.offsetHeight) * big.clientHeight + "px";

			// 定义遮罩层最大边距,也就是最大移动距离
			var maxW = simg.clientWidth - mask.offsetWidth;
			var maxH = simg.clientHeight - mask.offsetHeight;

			// 鼠标移入小显示区域发生事件:1.遮罩层显示 2.大显示区域显示
			small.onmouseenter = function() {
				mask.style.left = 0;
				big.style.left = 210 + "px";
			}
			// 鼠标移入小显示区域发生事件:1.遮罩层消失 2.大显示区域消失
			small.onmouseleave = function() {
				mask.style.left = -10000 + "px";
				big.style.left = -10000 + "px";
			}
			// 鼠标在小显示区域移动
			small.onmousemove = function(e) {
				// 解决兼容问题
				e = e || window.event;
				// 定义两个变量 让鼠标位置一直处于遮罩层位置中间
				var nLeft = e.pageX - zoom.offsetLeft - zoom.clientLeft - mask.offsetWidth / 2;
				var nTop = e.pageY - zoom.offsetTop - zoom.clientTop - mask.offsetHeight / 2;

				// 设置遮罩层永远显示在小显示区域内部 也就是判断nLeft、nTop值
				nLeft = Math.min(maxW, Math.max(0, nLeft));
				nTop = Math.min(maxH, Math.max(0, nTop));

				// 遮罩层位置
				mask.style.left = nLeft + "px";
				mask.style.top = nTop + "px";

				// 设置大图片移动位置 跟随遮罩层百分比移动(语法带入)
				bimg.style.left = -(bimg.offsetWidth - big.clientWidth) * (nLeft / (simg.clientWidth - mask.offsetWidth)) + "px";
				bimg.style.top = -(bimg.offsetHeight - big.clientHeight) * (nTop / (simg.clientHeight - mask.offsetHeight)) + "px";

			}
		</script>

	</body>

</html>
还有一个jqzoom插件也可以实现放大镜效果:
链接:https://pan.baidu.com/s/1VQn9xM9fQusIV05ztt9x3A
提取码:7qav