问题描述:
Mac电脑出厂设置为只能读取但是不能写入NTFS格式的移动硬盘。使得在日常使用中存在很大的不便。
研究过程:
- 由于Mac不能写入NTFS格式的移动硬盘,为解决这个问题,在网上找了一些资料。有人说Mac本身可以支持写入,不过因为相关的版权问题。Mac在出厂时被设置为不能写入NTFS格式的硬盘。也有说后续版本可能直接设置为不支持写入NTFS格式了。
- 有些资料给出了指导方法,是通过终端使用命令行进行一些设置。不过看着方案中给出的步骤较为多,而且感觉里边的命令好像有点危险。所以没太敢照着做。
- 后来发现了有人推荐了收费软件比如
NTFS for Mac、Tuxera NTFS for Mac、Paragon NTFS for Mac等。有段时间也考虑过花点钱买个软件省的操心了。后来在网上也看了一些人讲这几个软件好像也有点问题。然后又考虑到平时实际上使用移动硬盘的几率也不太高。买软件也不太便宜。所以最后没有买。
解决方案:
后来在网上搜索解决方案,发现了一个看起来比较靠谱的。照着这个进行了操作,最终取得了成功。
-
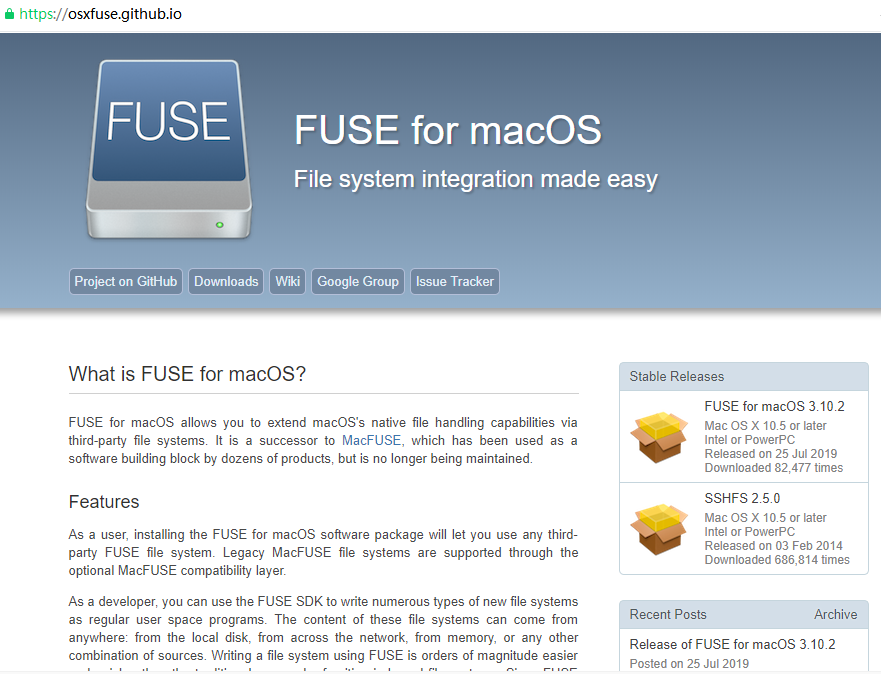
点击第一步回答中给出的网址链接 Fuse for macOS(开源免费的)

- 点击
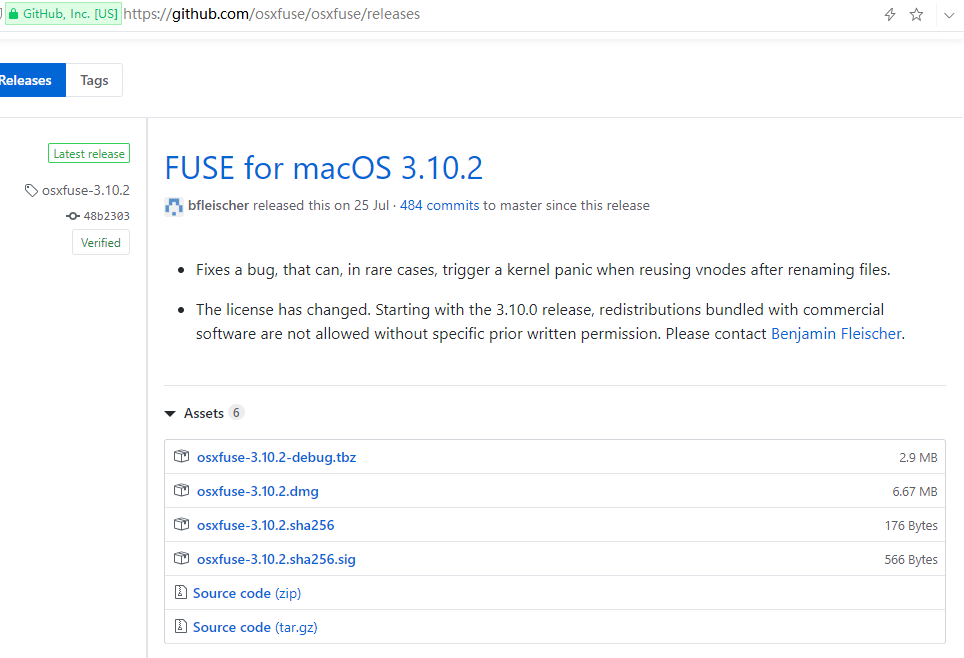
Downloads跳转到Fuse for macOS的下载链接,如图所示,选择 dmg 安装包,下载后安装到Mac电脑上。
- 从第一步回答中给出的网址链接 Fuse for macOS(开源免费的)点击
Wiki跳转到使用说明。
- 第一步回答的评论中还有人给出了另外一个安装教程 免费开源ntfs读写软件教程!FUSE FOR MAC!-远景论坛-微软极客社区
这里直接把原文章引用在此,可以与
Fust for macOS的Wiki进行参照:
以下是教程的内容
0x01:安装FUSE FOR MAC 3.5.8
我在附件中提供了链接.大家下载后打开安装.有一点注意事项如下
在选择安装项目的时候.要勾选所有项目.然后一路安装即可.

0x02:安装homebrew包管理器
介绍与安装官方讲解得很棒我就不多说了.
按照提示正常安装即可.
https://m.baidu.com/from=1019023i/bd_page_type=1/ssid=0/uid=0/pu=usm%401%2Csz%401320_2001%2Cta%40iphone_1_10.2_3_601/baiduid=3695F2983A495494A6C55AAFCA34B674/w=0_10_/t=iphone/l=1/tc?ref=www_iphone&lid=12250308442610989631&order=1&fm=alop&waplogo=1&tj=www_normal_1_0_10_title&vit=osres&waput=3&cltj=normal_title&asres=1&title=HomebrewmacOS%E7%BC%BA%E5%A4%B1%E7%9A%84%E8%BD%AF%E4%BB%B6%E5%8C%85%E7%AE%A1%E7%90%86%E5%99%A8&dict=-1&w_qd=IlPT2AEptyoA_yixI5qcGT1xq_&sec=21181&di=a77f28080c702c7b&bdenc=1&tch=124.0.42.192.0.0&nsrc=IlPT2AEptyoA_yixCFOxCGZb8c3JV3T5ABSDMDcKAT0rzyeuhPTaC_d5WnrwLjWOF5j-&eqid=aa01d69fa6cbf8001000000059219b15&wd=

0x03:使用homebrew安装ntfs-3g
安装完homebrew之后.
执行如下命令:
brew install ntfs-3g
稍等片刻即可安装完毕

0x04:将ntfs-3g驱动程序作为macOS的默认挂载驱动.
执行以下两条命令:
sudo mv "/Volumes/xxx/sbin/mount_ntfs" "/Volumes/xxx/sbin/mount_ntfs.orig"
sudo ln -s /usr/local/sbin/mount_ntfs "/Volumes/xxx/sbin/mount_ntfs"
注意此处的xxx应该改为你系统安装磁盘的名称.


0x05:重启&ENJOY!
(注:这里我的是把上边的 xxx 替换成了 Macintosh HD )
- 由于前面官方Wiki是英文的,且文章较多。所以参考了第三步中评论中给出的第三方教程。在官方Wiki中我重点关注了里边涉及到
NTFS-3G的部分。
-
下面对这部分中涉及到的相关命令进行简单介绍:
-
Installation:打开终端,使用命令行通过
Homebrew安装ntfs-3g (Homebrew 是Mac上常用的包管理工具,在此不再赘述。)执行以下命令:brew install ntfs-3g -
安装
ntfs-3g之后。执行以下命令:
sudo mkdir /Volumes/NTFS
sudo /usr/local/bin/ntfs-3g /dev/disk1s1 /Volumes/NTFS -olocal -oallow_other
-
在执行这步时可能会提示权限不够,执行时可能需要把其中的
/usr/local/bin/ntfs-3g替换成/usr/local/sbin/mount_ntfs此处存疑。 -
Auto-mount NTFS volumes in read-write mode
Even though you have installed NTFS-3G, newly connected NTFS volumes will still be auto-mounted in read-only mode.
To change this you need to replace Apple's NTFS mount tool /sbin/mount_ntfs with the one provided by NTFS-3G.
-
这里引用Wiki原文,新安装
NTFS-3g之后,NTFS格式的磁盘还是会按只读模式挂载,需要把苹果原来的NTFS挂载工具替换为NTFS-3g提供的。 -
Note:
On OS X El Capitan files in the /sbin directory are protected from being tampered with by a new security feature called
System Integrity Protection (SIP). SIP does not protect you against the security threat outlined above.

To replace /sbin/mount_ntfs with the version provided by NTFS-3G you will need to reboot your Mac in recovery mode before proceeding.
See https://support.apple.com/en-us/HT201314 for details on how to start the recovery system.

Once in recovery mode open a new Terminal window from the Utilities menu.
-
以上引用Wiki原文,Mac的
/sbin目录被System Integrity Protection (SIP)安全特性保护了。修改其中的内容是会提示权限不够。需要参照后边的教程来临时关闭这个特性。 -
If volume is APFS, then it will need to be unlocked to install mount_ntfs. Let's assume that Macintosh HD is identified as disk1s1.
diskutil list
diskutil apfs unlockVolume disk1s1
- To replace Apple's NTFS mount tool with the one provided by NTFS-3G execute the following commands in Terminal. This will back up the original mount tool to /Volumes/Macintosh HD/sbin/mount_ntfs.orig.
sudo mv "/Volumes/Macintosh HD/sbin/mount_ntfs" "/Volumes/Macintosh HD/sbin/mount_ntfs.orig"
sudo ln -s /usr/local/sbin/mount_ntfs "/Volumes/Macintosh HD/sbin/mount_ntfs"
-
执行这个命令来备份原来的ntfs 挂载工具到
/Volumes/Macintosh HD/sbin/mount_ntfs.orig并把新安装的NTFS-3g带来的挂载工具当做默认的ntfs 挂载工具。 这个命令会改变Mac的/sbin目录。需要参照下边的教程来临时关闭SIP保护特性。 -
临时关闭SIP特性需要重启时按住
Command (⌘)-R进入recovery模式。并打开终端,操作时有几次没找到打开终端的地方,后来又找到了。具体可参照下边的教程。另外注意及时再把这个保护特性给打开。

