在此页面中,您将扩展“Tour of Heroes”应用程序,以显示英雄列表,并允许用户选择英雄并显示英雄的详细信息。
必备条件
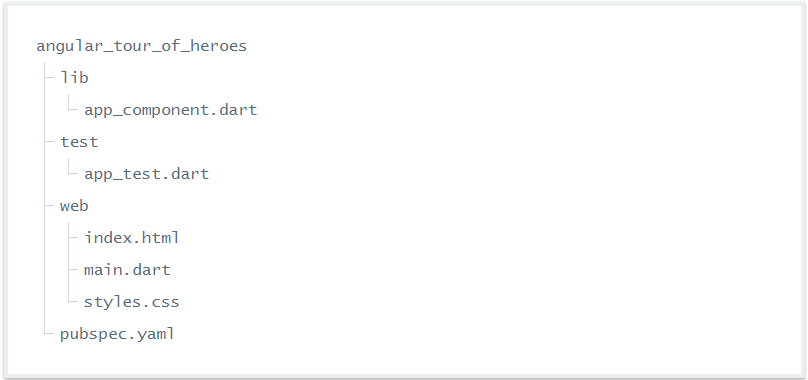
在继续本“英雄之旅”页面之前,请确认您在“英雄编辑器”页面之后具有以下结构。 如果您的结构不匹配,请返回该页面以弄清楚您错过了什么。

如果该应用尚未运行,请启动该应用。 当您进行更改时,请通过重新加载浏览器窗口来保持运行。
应用程序重构
在添加新功能之前,您可以从应用程序重构中受益。
应用模板文件
您将对应用程序组件的模板进行多次更新。 首先,将模板移动到自己的文件中:
lib/app_component.html
<h1>{{title}}</h1>
<h2>{{hero.name}} details!</h2>
<div><label>id: </label>{{hero.id}}</div>
<div>
  <label>name: </label>
  <input [(ngModel)]="hero.name" placeholder="name">
</div>
用指向新模板文件的templateUrl替换@Component模板:
lib/app_component.dart (metadata)
@Component(
  selector: 'my-app',
  templateUrl: 'app_component.html',
  directives: const [formDirectives],
)
刷新浏览器。 该应用仍然继续运行。
Hero类
分开使用并将Hero类从app_component.dart 中移动到它自己的文件中,创建lib/src文件夹来装Hero源文件:lib/src/hero.dart
class Hero {
  final int id;
  String name;

  Hero(this.id, this.name);
}
回到应用程序组件中,使用相对路径添加一个import 到新创建的文件:lib/app_component.dart (hero import)
import 'src/hero.dart';
刷新浏览器,程序将正常运行,现在添加新功能的准备工作就做好了。
展示英雄们
显示一个英雄列表,首先需要将英雄们添加到视图模板
模拟英雄
在lib / src下的以下文件中创建十个英雄的列表:lib/src/mock_heroes.dart
import 'hero.dart';

final mockHeroes = <Hero>[
  new Hero(11, 'Mr. Nice'),
  new Hero(12, 'Narco'),
  new Hero(13, 'Bombasto'),
  new Hero(14, 'Celeritas'),
  new Hero(15, 'Magneta'),
  new Hero(16, 'RubberMan'),
  new Hero(17, 'Dynama'),
  new Hero(18, 'Dr IQ'),
  new Hero(19, 'Magma'),
  new Hero(20, 'Tornado')
];
最终这个应用程序将从Web服务获取英雄列表,但现在你可以显示模拟英雄。
应用hero字段
将hero字段替换为AppComponent中的公共heros字段,并使用模拟英雄进行初始化(不要忘记导入):lib/app_component.dart (heroes)
import 'src/mock_heroes.dart';

// ···
class AppComponent {
  final title = 'Tour of Heroes';
  List<Hero> heroes = mockHeroes;
  // ···
}
英雄数据与类实现分开,因为英雄名字最终将来自数据服务。
在模板中显示英雄名称
要在无序列表中显示英雄名称,请将所有当前模板替换为以下HTML:lib/app_component.html (heroes template)
<h1>{{title}}</h1>
<h2>My Heroes</h2>
<ul class="heroes">
  <li>
    <!-- each hero goes here -->
  </li>
</ul>
下一步你将添加英雄名字
使用ngFor指令罗列英雄
目标是将组件中的英雄列表绑定到模板,迭代它们,并单独显示它们。通过添加核心指令* ngFor修改<li>标签。
<li *ngFor="let hero of heroes">
ngFor的前缀(*)是此语法的关键部分。 它表示<li>元素及其子元素构成一个主模板。
ngFor指令遍历组件的英雄列表并为该列表中的每个英雄呈现该模板的一个实例。
表达式部分将hero标识为模板输入变量,其中包含每个迭代的英雄详情。
你可以在模板中引用这个变量来访问当前英雄的属性。
在显示数据的Showing a list property with *ngFor部分阅读更多关于ngFor和模板输入变量和模板语法页的ngFor部分
在<li>节点内添加内容hero模板变量来显示英雄属性 lib/app_component.html (ngFor)
<li *ngFor="let hero of heroes">
  <span class="badge">{{hero.id}}</span> {{hero.name}}
</li>
要在模板中使用Angular指令,需要在组件的@Component注解的指令参数中列出。 与您在第1部分中所做的相似,添加所有:CORE_DIRECTIVES:
CORE_DIRECTIVES = const [NgClass, NgFor, NgIf, NgTemplateOutlet, NgStyle, NgSwitch, NgSwitchWhen, NgSwitchDefault]lib/app_component.dart (directives)
@Component(
  selector: 'my-app',
  // ···
  directives: const [CORE_DIRECTIVES, formDirectives],
)
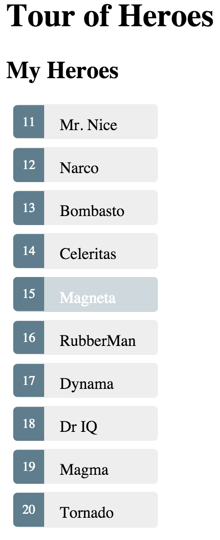
刷新浏览器,英雄列表将显示出来。
装饰英雄
用户应该得到一个他们徘徊和被选中英雄的视觉提示。要为组件添加样式,可以设置@Component注解的styles参数:lib/app_component.dart (styles)
// Not recommended when adding many CSS classes:
styles: const [
  '''
    .selected { ... }
    .heroes { ... }
    ...
  '''
],
但是,当添加多个样式时,这使得Dart文件更长,更不易读。 而应将样式放在.css文件中,并使用@Component的styleUrls参数引用该文件。 按照惯例,组件的CSS和Dart文件的名称具有相同的基础命名前缀(app_component)。lib/app_component.dart (stylUrls)
@Component(
  selector: 'my-app',
  // ···
  styleUrls: const ['app_component.css'],
  // ···
)
lib/app_component.css
.selected {
  background-color: #CFD8DC !important;
  color: white;
}
.heroes {
  margin: 0 0 2em 0;
  list-style-type: none;
  padding: 0;
  width: 15em;
}
.heroes li {
  cursor: pointer;
  position: relative;
  left: 0;
  background-color: #EEE;
  margin: .5em;
  padding: .3em 0;
  height: 1.6em;
  border-radius: 4px;
}
.heroes li.selected:hover {
  color: white;
}
.heroes li:hover {
  color: #607D8B;
  background-color: #EEE;
  left: .1em;
}
.heroes .text {
  position: relative;
  top: -3px;
}
.heroes .badge {
  display: inline-block;
  font-size: small;
  color: white;
  padding: 0.8em 0.7em 0 0.7em;
  background-color: #607D8B;
  line-height: 1em;
  position: relative;
  left: -1px;
  top: -4px;
  height: 1.8em;
  margin-right: .8em;
  border-radius: 4px 0 0 4px;
}
将样式分配给组件时,它们的作用域为该特定组件。 这些样式仅适用于AppComponent,不影响外部HTML。
显示英雄的模板应该是这样的:lib/app_component.html (styled heroes)
<h2>My Heroes</h2>
<ul class="heroes">
  <li *ngFor="let hero of heroes">
    <span class="badge">{{hero.id}}</span> {{hero.name}}
  </li>
</ul>
选择一个英雄
该应用程序现在显示英雄列表,以及在详细信息视图中的单个英雄。 但是列表和细节视图没有连接。 当用户从列表中选择一个英雄时,选择的英雄应该出现在细节视图中。 这个UI模式被称为“主/细节”。在这种情况下,主人是英雄列表,细节是选择的英雄。
接下来,您将通过selectedHero组件属性将主链接到详细信息,该属性绑定到单击事件。
处理点击事件
添加点击事件绑定到<li>:lib/app_component.html (click)
<li *ngFor="let hero of heroes" (click)="onSelect(hero)">
  <span class="badge">{{hero.id}}</span> {{hero.name}}
</li>
圆括号将<li>元素的点击事件标识为目标。 onSelect(hero)表达式调用AppComponent方法onSelect(),传递模板输入变量hero作为参数。 这是你在ngFor指令中定义的同一个英雄变量。
添加一个点击处理程序来显示选定的英雄
你不再需要hero属性,因为你不再显示一个英雄; 你正在显示一个英雄列表。 但是用户可以通过点击选择一个英雄。 所以用这个简单的selectedHero属性来替换hero属性:lib/app_component.dart (selectedHero)
Hero selectedHero;
在用户选择英雄之前,所有的英雄名字都应该被取消选择,所以你不会像hero一样初始化selectedHero。添加一个onSelect()方法,将selectedHero属性设置为用户单击的英雄。lib/app_component.dart (onSelect)
void onSelect(Hero hero) => selectedHero = hero;
该模板仍然是指旧的英雄属性。 绑定到新的selectedHero属性,如下所示:lib/app_component.html (selectedHero details)
<h2>{{selectedHero.name}} details!</h2>
<div><label>id: </label>{{selectedHero.id}}</div>
<div>
  <label>name: </label>
  <input [(ngModel)]="selectedHero.name" placeholder="name">
</div>
使用ngIf指令隐藏空的对象
当应用程序加载时,selectedHero为null。 当用户点击英雄的名字时,所选择的英雄被初始化。 Angular无法显示null selectedHero的属性并抛出以下错误,在浏览器的控制台中可见:
EXCEPTION: TypeError: Cannot read property 'name' of undefined in [null]
尽管selectedHero.name显示在模板中,但必须保留DOM外的英雄详细信息,直到出现选定的英雄。用<div>包装模板的HTML英雄细节内容。 然后添加ngIf核心指令并将其设置为selectedHero!= null。lib/app_component.html (ngIf)
<div *ngIf="selectedHero != null">
  <h2>{{selectedHero.name}} details!</h2>
  <div><label>id: </label>{{selectedHero.id}}</div>
  <div>
    <label>name: </label>
    <input [(ngModel)]="selectedHero.name" placeholder="name">
  </div>
</div>
不要忘记ngIf前面的星号(*)。
刷新浏览器,该应用程序不再失败,名称列表再次显示在浏览器中。
当没有选定的英雄时,ngIf指令从DOM中移除英雄详情HTML。 没有英雄细节元素或绑定担心。
当用户选择一个英雄时,selectedHero变为非null,ngIf将英雄详细内容放入DOM中,并评估嵌套的绑定。
格式化选中hero
当选择的英雄细节显示在列表下方时,很难在列表中识别选定的英雄。
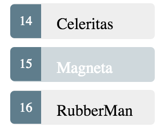
在上面添加的样式元数据中,有一个名为selected的自定义CSS类。 为了让选定的英雄更清晰可见,当用户点击英雄名字时,你将把这个选定的class应用到<li>。 例如,当用户点击“Magneta”时,它应该用一个独特但微妙的背景颜色渲染,如下所示:

在模板中,将以下绑定添加到<li>标记中:
[class.selected]="hero === selectedHero"
当表达式(hero === selectedHero)为true时,Angular将添加所选的CSS类。 当表达式为false时,Angular删除选定的类。
===运算符测试给定的对象是否相同。
在模板语法指南中阅读有关[class]绑定的更多信息。
<li>的最终版本如下所示:lib/app_component.html (ngFor with class.selected)
<li *ngFor="let hero of heroes"
    [class.selected]="hero === selectedHero"
    (click)="onSelect(hero)">
  <span class="badge">{{hero.id}}</span> {{hero.name}}
</li>
点击“Magneta”后,列表应该如下所示:

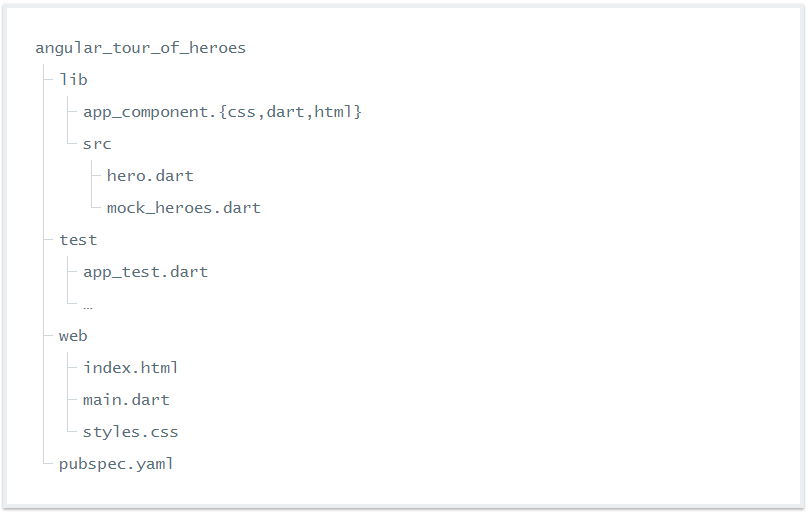
回顾应用程序结构
您的项目应该有以下文件:

教程组件测试
本教程不包括测试,但是如果您查看示例代码,则会为本教程添加的每个新功能进行组件测试。 详细信息请参阅组件测试页面。
你走过的路
以下是您在此页面中所取得的成果:
英雄之旅(Tour of Heroes)应用程序显示可选英雄列表。
您将应用程序模板移到了自己的文件中。
您将Hero类移到lib / src下的自己的文件中。
你增加了选择英雄和显示英雄的细节的能力。
您了解了如何在组件模板中使用核心指令ngIf和ngFor。
您在CSS文件中定义了样式,并使用它们来设置应用程序的样式。
你的应用应该看起来像这个实例(查看源代码)。
前方的路
你已经扩大了英雄之旅的应用程序,但它还远远没有完成。 一个应用程序不应该是一个单一的组件。 在下一页中,您将将应用程序拆分为子组件,并使它们一起工作。
来源:oschina
链接:https://my.oschina.net/u/3647851/blog/1555208