一、bean的生命周期
1.简介
Spring Bean 的生命周期在整个 Spring 中占有很重要的位置,从BeanFactory或ApplicationContext取得的实例为Singleton,也就是预设为每一个Bean的别名只能维持一个实例,而不是每次都产生一个新的对象使用Singleton模式产生单一实例,在spring中,singleton属性默认是true,只有设定为false,则每次指定别名取得的Bean时都会产生一个新的实例,Spring只帮我们管理单例模式Bean的完整生命周期,对于prototype的bean,Spring在创建好交给使用者之后则不会再管理后续的生命周期。
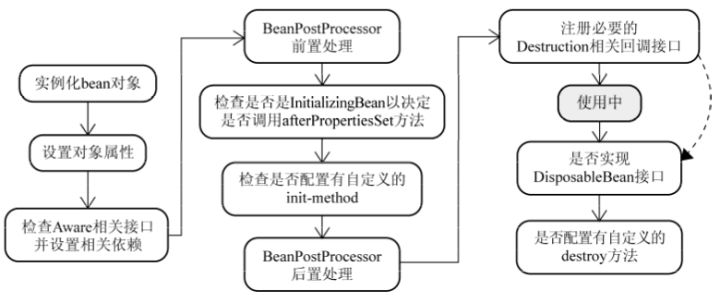
2.生命周期图

3.代码示例
spring 容器中的bean的完整生命周期一共分为十一步完成:
1.bean对象的实例化
2.封装属性,也就是设置properties中的属性值
3.如果bean实现了BeanNameAware,则执行setBeanName方法,也就是bean中的id值
4.如果实现BeanFactoryAware或者ApplicationContextAware ,需要设置setBeanFactory或者上下文对象setApplicationContext
5.如果存在类实现BeanPostProcessor后处理bean,执行postProcessBeforeInitialization,可以在初始化之前执行一些方法
6.如果bean实现了InitializingBean,则执行afterPropertiesSet,执行属性设置之后的操作
7.调用<bean init-method="">执行指定的初始化方法
8.如果存在类实现BeanPostProcessor则执行postProcessAfterInitialization,执行初始化之后的操作
9.执行自身的业务方法
10.如果bean实现了DisposableBean,则执行spring的的销毁方法
11.调用<bean destory-method="">执行自定义的销毁方法。
第五步和第八步可以结合aop,在初始化执行之前或者执行之后执行一些操作。
以上就是springbean的完整生命周期.
代码如下:
(1)对象代码:
public class Man implements BeanNameAware, ApplicationContextAware, InitializingBean, DisposableBean {
    private String name;

    public Man() {
        System.out.println("第一步:实例化类");
    }
  //构造器注入
  public Man(String name){
    System.out.print("第一步:实例化类");
    this.name=name;
    System.out.print("第二步:设置属性,构造器注入");
  }

  //setter注入
    public void setName(String name) {
        System.out.println("第二步:设置属性");
        this.name = name;
    }

    @Override
    public void setBeanName(String s) {
        System.out.println("第三步:设置bean的名称也就是spring容器中的名称,也就是id值" + name);
    }

    @Override
    public void setApplicationContext(ApplicationContext applicationContext) throws BeansException {
        System.out.println("第四步:了解工厂信息ApplicationContext");
    }
    //第五步执行初始化之前执行的方法

    @Override
    public void afterPropertiesSet() throws Exception {
        System.out.println("第六步:属性设置后执行的方法");
    }

    public void setup() {
        System.out.println("第七步:执行自己配置的初始化方法");
    }
    //第八步执行初始化之后执行的方法

    public void run() {
        System.out.println("第九步:执行自身的业务方法");
    }

    @Override
    public void destroy() throws Exception {
        System.out.println("第十步:执行spring的销毁方法");
    }

    public void destory() {
        System.out.println("第十一步:执行自己配置的销毁方法");
    }

}
(2)指定的类实现了BeanPostProcessor
public class MyBeanPostProcess implements BeanPostProcessor {

    //后处理bean,最重要的两步
    @Override
    public Object postProcessBeforeInitialization(Object bean, String s) throws BeansException {
        System.out.println("第五步:初始化之前执行的方法");
        return bean;
    }

    @Override
    public Object postProcessAfterInitialization(Object bean, String s) throws BeansException {
        System.out.println("第八步:执行初始化之后的方法");
        return bean;
    }
}
(3)applicationContext.xml
<?xml version="1.0" encoding="UTF-8"?>
<beans xmlns="http://www.springframework.org/schema/beans"
       xmlns:xsi="http://www.w3.org/2001/XMLSchema-instance"
       xmlns:context="http://www.springframework.org/schema/context"
       xmlns:aop="http://www.springframework.org/schema/aop" xmlns:tx="http://www.springframework.org/schema/tx"
       xsi:schemaLocation="http://www.springframework.org/schema/beans
                              http://www.springframework.org/schema/beans/spring-beans.xsd
                              http://www.springframework.org/schema/aop
                              http://www.springframework.org/schema/aop/spring-aop.xsd
                              http://www.springframework.org/schema/context
                              http://www.springframework.org/schema/context/spring-context.xsd http://www.springframework.org/schema/tx http://www.springframework.org/schema/tx/spring-tx.xsd">


    <!--spring生命周期-->
<bean id="man" class="com.itheima.ioc.springBeanlife.Man" init-method="setup" destroy-method="destory">
<property name="name" value="张三"/>
<!--<constructor-arg name="name" value= "张三">-->
</bean>
<bean class="com.itheima.ioc.springBeanlife.MyBeanPostProcess"/></beans>(4)测试代码
@Test
public  void beanlifeTest(){
    ClassPathXmlApplicationContext context=new ClassPathXmlApplicationContext("applicationContext.xml");
    Man man=(Man)context.getBean("man");
    man.run();
    context.close();
}
二、spring解决循环依赖
来源:oschina
链接:https://my.oschina.net/u/4380903/blog/3378725