本文介绍了如何创建一个动态线程和一个静态线程
RT-thread版本:RT-thread system 3.1.0
开发环境:MDK5
为了编程方便,创建了sample1.c文件,然后添加到工程中
话不多说,先上代码
#include "rtthread.h"


#define stack_size 1024   //设置动态线程栈大小
#define priority 25    //设置优先级
#define tick 10       //时间片


static rt_thread_t tid1 = NULL;  //指针初始化为NULL

static void thread1_entry(void *parameter)   //线程1入口函数
{
    rt_base_t i;
    rt_uint16_t count = 0;
    for(i = 0; i < 10; i++)
    {
        rt_kprintf("thread1, count: %d\n", count++);

    }

}

ALIGN(RT_ALIGN_SIZE);

static struct rt_thread thread2;

static char thread_stack[1024];


static void thread2_entry(void *parameter)   //线程2入口代码
{
    rt_base_t i, count = 0;
    for(i = 0; i < 10; i++)
    {
        rt_kprintf("thread2, count: %d\n", count++);

    }
    rt_kprintf("thread2 exit!\n");

}

void sample1(void *parameter)        //线程创建函数
{
    tid1 = rt_thread_create("thread1",
                            thread1_entry,
                            RT_NULL,
                                                stack_size, priority, tick
                                                    );
    if(tid1 != NULL)
        rt_thread_startup(tid1);
  rt_thread_init(&thread2, "thread2", thread2_entry, RT_NULL, &thread_stack[0], sizeof(thread_stack), priority-1, tick);
        rt_thread_startup(&thread2);

}
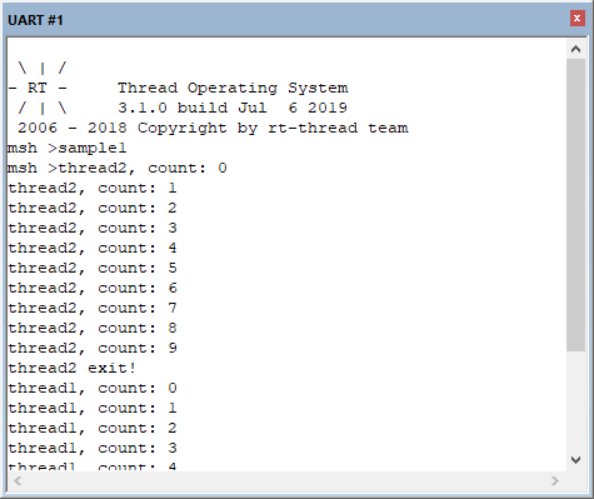
MSH_CMD_EXPORT(sample1, RT-Thread first sample); //添加到msh命令列表中在sample1.c中添加上述代码,点击![]() 按钮进行仿真,在串口框中输入“sample1”,即可看到效果如下图。
按钮进行仿真,在串口框中输入“sample1”,即可看到效果如下图。

线程2输出“thread2 exit!”后被系统自动删除,线程1开始执行。
对于能够执行结束的线程,系统在执行结束后,自动删除。
学习RT-thread推荐书籍:嵌入式实时操作系统RT-Thread设计与实现,还是很不错的。
RT-thread官网也有视频教程,视频可以看完书再看,容易接受一点。
原文出处:https://www.cnblogs.com/li-23/p/11143015.html
来源:oschina
链接:https://my.oschina.net/u/4298822/blog/3259856