10.19 iptables规则备份和恢复
保存和备份iptables规则
1、service iptables save #会把规则保存到/etc/sysconfig/iptabels中,启动时会加载。
2、把iptables规则保存在自定义的位置:iptables-save > 位置
例如:iptables-save > /tmp/my_iptables.txt
[root@liang-00 ~]# iptables-save > /tmp/my_iptables.txt
[root@liang-00 ~]# cat /tmp/my_iptables.txt
# Generated by iptables-save v1.4.21 on Tue Nov 20 19:47:32 2018
*nat
:PREROUTING ACCEPT [12:936]
:INPUT ACCEPT [0:0]
:OUTPUT ACCEPT [1:76]
:POSTROUTING ACCEPT [1:76]
COMMIT
# Completed on Tue Nov 20 19:47:32 2018
# Generated by iptables-save v1.4.21 on Tue Nov 20 19:47:32 2018
*filter
:INPUT ACCEPT [0:0]
:FORWARD ACCEPT [0:0]
:OUTPUT ACCEPT [419:35455]
-A INPUT -m state --state RELATED,ESTABLISHED -j ACCEPT
-A INPUT -p icmp -j ACCEPT
-A INPUT -i lo -j ACCEPT
-A INPUT -p tcp -m state --state NEW -m tcp --dport 22 -j ACCEPT
-A INPUT -j REJECT --reject-with icmp-host-prohibited
-A FORWARD -j REJECT --reject-with icmp-host-prohibited
COMMIT
# Completed on Tue Nov 20 19:47:32 2018
[root@liang-00 ~]#
恢复iptables:iptables-restore < /tmp/my_iptables.txt
10.20 firewalld的9个zone
Linux防火墙-firewalld
首先关闭netfilter,打开firewalld
[root@liang-00 ~]# systemctl disable iptables
Removed symlink /etc/systemd/system/basic.target.wants/iptables.service.
[root@liang-00 ~]# systemctl stop iptables
[root@liang-00 ~]# systemctl enable firewalld
Created symlink from /etc/systemd/system/dbus-org.fedoraproject.FirewallD1.service to /usr/lib/systemd/system/firewalld.service.
Created symlink from /etc/systemd/system/multi-user.target.wants/firewalld.service to /usr/lib/systemd/system/firewalld.service.
[root@liang-00 ~]# systemctl start firewalld
[root@liang-00 ~]#
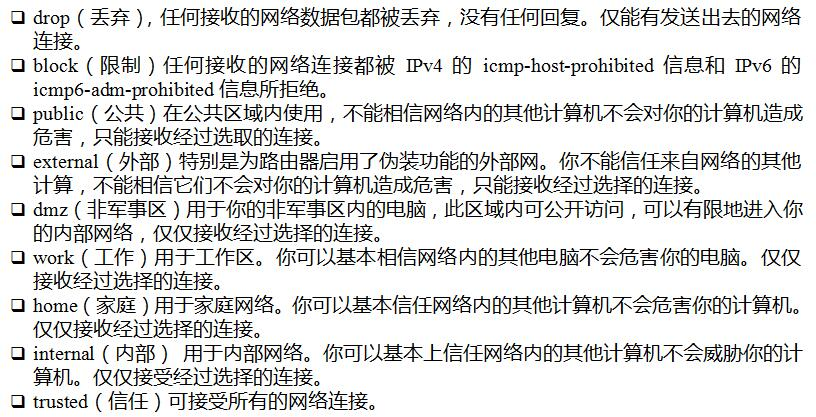
- firewalld默认有9个zone。
- 默认zone为public
查看所有zone:firewall-cmd --get-zones
[root@liang-00 ~]# firewall-cmd --get-zones
block dmz drop external home internal public trusted work
[root@liang-00 ~]#
查看默认zone:firewall-cmd --get-default-zone,可以看到firewall默认zone为:public
[root@liang-00 ~]# firewall-cmd --get-default-zone
public
[root@liang-00 ~]#
关于firewall的9个zone作用:
10.21 firewalld关于zone的操作
1、设定默认zone。
firewall-cmd --set-default-zone=work #不设置之前默认的是public
[root@liang-00 ~]# firewall-cmd --set-default-zone=work
success
[root@liang-00 ~]#
2、查看指定网卡的zone。
[root@liang-00 ~]# firewall-cmd --get-zone-of-interface=ens33
no zone
[root@liang-00 ~]# firewall-cmd --get-zone-of-interface=lo
no zone
[root@liang-00 ~]#
3、给指定网卡设置zone。
[root@liang-00 ~]# firewall-cmd --zone=public --add-interface=ens33
success
[root@liang-00 ~]# firewall-cmd --get-zone-of-interface=ens33
public
[root@liang-00 ~]#
4、针对指定网卡更改zone。
[root@liang-00 ~]# firewall-cmd --zone=dmz --change-interface=ens33
success
[root@liang-00 ~]# firewall-cmd --get-zone-of-interface=ens33
dmz
[root@liang-00 ~]#
5、针对指定网卡删除zone
[root@liang-00 ~]# firewall-cmd --zone=dmz --remove-interface=ens33
success
[root@liang-00 ~]# firewall-cmd --get-zone-of-interface=ens33
no zone
[root@liang-00 ~]#
6、查看系统所有网卡所在的zone。
[root@liang-00 ~]# firewall-cmd --get-active-zones
public
  interfaces: ens33 lo
10.22 firewalld关于service的操作
firewall的service是zone下面的一个服务。
用 firewall-cmd --get-services #查看所有service,services可以不加“s”。
[root@liang-00 ~]# firewall-cmd --get-services
RH-Satellite-6 amanda-client amanda-k5-client bacula bacula-client bitcoin bitcoin-rpc bitcoin-testnet bitcoin-testnet-rpc ceph ceph-mon cfengine condor-collector ctdb dhcp dhcpv6 dhcpv6-client dns docker-registry dropbox-lansync elasticsearch freeipa-ldap freeipa-ldaps freeipa-replication freeipa-trust ftp ganglia-client ganglia-master high-availability http https imap imaps ipp ipp-client ipsec iscsi-target kadmin kerberos kibana klogin kpasswd kshell ldap ldaps libvirt libvirt-tls managesieve mdns mosh mountd ms-wbt mssql mysql nfs nfs3 nrpe ntp openvpn ovirt-imageio ovirt-storageconsole ovirt-vmconsole pmcd pmproxy pmwebapi pmwebapis pop3 pop3s postgresql privoxy proxy-dhcp ptp pulseaudio puppetmaster quassel radius rpc-bind rsh rsyncd samba samba-client sane sip sips smtp smtp-submission smtps snmp snmptrap spideroak-lansync squid ssh synergy syslog syslog-tls telnet tftp tftp-client tinc tor-socks transmission-client vdsm vnc-server wbem-https xmpp-bosh xmpp-client xmpp-local xmpp-server
[root@liang-00 ~]# firewall-cmd --zone=work --list-services
ssh dhcpv6-client
[root@liang-00 ~]#
查看当前zone下的service。
[root@liang-00 ~]# firewall-cmd --get-default-zone
public
[root@liang-00 ~]# firewall-cmd --list-services
ssh dhcpv6-client
[root@liang-00 ~]#
也可以用 firewall-cmd --zone=work --list-services 查看指定zone的service。
[root@liang-00 ~]# firewall-cmd --zone=block --list-services

[root@liang-00 ~]#
把http服务增加到指定zone下。
[root@liang-00 ~]# firewall-cmd --zone=public --add-service=http
success
[root@liang-00 ~]# firewall-cmd --zone=public --list-services
ssh dhcpv6-client http
[root@liang-00 ~]#
zone和service的配置文件模板;zone和service的配置文件。
在 /usr/lib/firewalld/zones/ 和 /usr/lib/firewalld/services/ 保存着zone和service的配置文件模板。
[root@liang-00 ~]# ls /usr/lib/firewalld/zones/
block.xml  dmz.xml  drop.xml  external.xml  home.xml  internal.xml  public.xml  trusted.xml  work.xml
[root@liang-00 ~]# ls /usr/lib/firewalld/services/
amanda-client.xml        freeipa-replication.xml  libvirt-tls.xml           pop3.xml             snmp.xml
amanda-k5-client.xml     freeipa-trust.xml        libvirt.xml               postgresql.xml       spideroak-lansync.xml
bacula-client.xml        ftp.xml                  managesieve.xml           privoxy.xml          squid.xml
bacula.xml               ganglia-client.xml       mdns.xml                  proxy-dhcp.xml       ssh.xml
bitcoin-rpc.xml          ganglia-master.xml       mosh.xml                  ptp.xml              synergy.xml
bitcoin-testnet-rpc.xml  high-availability.xml    mountd.xml                pulseaudio.xml       syslog-tls.xml
bitcoin-testnet.xml      https.xml                mssql.xml                 puppetmaster.xml     syslog.xml
bitcoin.xml              http.xml                 ms-wbt.xml                quassel.xml          telnet.xml
ceph-mon.xml             imaps.xml                mysql.xml                 radius.xml           tftp-client.xml
ceph.xml                 imap.xml                 nfs3.xml                  RH-Satellite-6.xml   tftp.xml
cfengine.xml             ipp-client.xml           nfs.xml                   rpc-bind.xml         tinc.xml
condor-collector.xml     ipp.xml                  nrpe.xml                  rsh.xml              tor-socks.xml
ctdb.xml                 ipsec.xml                ntp.xml                   rsyncd.xml           transmission-client.xml
dhcpv6-client.xml        iscsi-target.xml         openvpn.xml               samba-client.xml     vdsm.xml
dhcpv6.xml               kadmin.xml               ovirt-imageio.xml         samba.xml            vnc-server.xml
dhcp.xml                 kerberos.xml             ovirt-storageconsole.xml  sane.xml             wbem-https.xml
dns.xml                  kibana.xml               ovirt-vmconsole.xml       sips.xml             xmpp-bosh.xml
docker-registry.xml      klogin.xml               pmcd.xml                  sip.xml              xmpp-client.xml
dropbox-lansync.xml      kpasswd.xml              pmproxy.xml               smtp-submission.xml  xmpp-local.xml
elasticsearch.xml        kshell.xml               pmwebapis.xml             smtps.xml            xmpp-server.xml
freeipa-ldaps.xml        ldaps.xml                pmwebapi.xml              smtp.xml
freeipa-ldap.xml         ldap.xml                 pop3s.xml                 snmptrap.xml
[root@liang-00 ~]#
而zone和service的配置文件在 /etc/firewalld/zones/ 和 /etc/firewalld/services/ 目录中。
[root@liang-00 ~]# ls /etc/firewalld/zones/
public.xml  public.xml.old
[root@liang-00 ~]# ls /etc/firewalld/services/
[root@liang-00 ~]#
案例需求:
ftp服务自定义端口1121,需要在work zone下面放行ftp。
步骤:
1) cp /usr/lib/firewalld/services/ftp.xml /etc/firewalld/services/ #拷贝ftp配置模板到service配置文件中
2)修改ftp.xml文件端口为:1121。

3)cp /usr/lib/firewalld/zones/work.xml /etc/firewalld/zones/ #拷贝work.xml模板到zone配置文件内。
4)编辑work.xml文件

5)重新加载
[root@liang-00 ~]# firewall-cmd --reload
success
[root@liang-00 ~]#
6)查看work中的service
[root@liang-00 ~]# firewall-cmd --zone=work --list-services
ssh dhcpv6-client ftp
[root@liang-00 ~]#
10.23 linux任务计划cron
crontab:在linxu中提交和管理用户的需要周期性执行的任务。
- -e:编辑该用户的计时器设置;
- -l:列出该用户的计时器设置;
- -r:删除该用户的计时器设置;
- -u<用户名称>:指定要设定计时器的用户名称。
1、任务计划配置文件。
cat /etc/crontab
[root@liang-00 ~]# cat /etc/crontab
SHELL=/bin/bash
PATH=/sbin:/bin:/usr/sbin:/usr/bin
MAILTO=root

# For details see man 4 crontabs

# Example of job definition:
# .---------------- minute (0 - 59)
# |  .------------- hour (0 - 23)
# |  |  .---------- day of month (1 - 31)
# |  |  |  .------- month (1 - 12) OR jan,feb,mar,apr ...
# |  |  |  |  .---- day of week (0 - 6) (Sunday=0 or 7) OR sun,mon,tue,wed,thu,fri,sat
# |  |  |  |  |
# *  *  *  *  * user-name  command to be executed
前三行是用来配置crond任务运行的环境变量.
- 第一行SHELL变量指定了系统要使用哪个shell,这里是bash;
- 第二行PATH变量指定了系统执行命令的路径;
- 第三行MAILTO变量指定了crond的任务执行信息将通过电子邮件发送给root用户,如果MAILTO变量的值为空,则表示不发送任务执行信息给用户;
* * * * * user-name command to be executed 时程表的格式。
- 第一个*:minute (0 - 59) 表示分钟,可以是从0到59之间的任何整数。
- 第二个*:hour (0 - 23) 表示小时,可以是从0到23之间的任何整数。
- 第三个*:day of month (1 - 31) 表示日期,可以是从1到31之间的任何整数。
- 第四个*:month (1 - 12) OR jan,feb,mar,apr ... 表示月份,可以是从1到12之间的任何整数。可以用数字或英文缩写表示。
- 第五个*:day of week (0 - 6) (Sunday=0 or 7) OR sun,mon,tue,wed,thu,fri,sat 表示星期几,可以是从0到7之间的任何整数,这里的0或7代表星期日。也可以用英文缩写表示。
- user-name:执行该任务的用户。
- command to be executed:执行的具体任务。可以是系统命令,也可以是自己编写的脚本文件。
在以上五个时间字段中,还可以使用以下特殊字符。
- 星号(*):代表所有可能的值,例如month字段如果是星号,则表示在满足其它字段的制约条件后每月都执行该命令操作。
- 逗号(,):可以用逗号隔开的值指定一个列表范围,例如,“1,2,5,7,8,9”
- 中杠(-):可以用整数之间的中杠表示一个整数范围,例如“2-6”表示“2,3,4,5,6”
- 正斜线(/):可以用正斜线指定时间的间隔频率,例如“0-23/2”表示每两小时执行一次。同时正斜线可以和星号一起使用,例如*/10,如果用在minute字段,表示每十分钟执行一次。
2、crontab文件配置。
用 crontab -e 命令。
需求1:在每天的3点0分执行一个shell脚本,将输出内容(包含错误的内容)重定向追加到指定文件内。

需求2:只有每月的1到10号执行该脚本。
0 3 1-10 * * /bin/bash /usr/local/sbin/123.sh >> /tmp/123.log 2>> /tmp/123.log
需求3:只在双数月份的1-10号执行脚本。
0 3 1-10 */2 * /bin/bash /usr/local/sbin/123.sh >> /tmp/123.log 2>> /tmp/123.log
需求4:在双数月份的1-10号,并且只在周二和周五执行脚本。
0 3 1-10 */2 2,5 /bin/bash /usr/local/sbin/123.sh >> /tmp/123.log 2>> /tmp/123.log
3、crond服务开启。
systemctl start crond开启crond服务,用 ps aux |grep 'cron' 查看进程中的crond服务。
[root@liang-00 ~]# systemctl start crond
[root@liang-00 ~]# ps aux |grep 'cron'
root       751  0.0  0.1 126280  1612 ?        Ss   09:42   0:00 /usr/sbin/crond -n
root      1566  0.0  0.0 112708   972 pts/0    S+   10:25   0:00 grep --color=auto cron
[root@liang-00 ~]#
也可以用 sytemctl status crond.service 看到 绿色active(running)表示crond服务已开启。
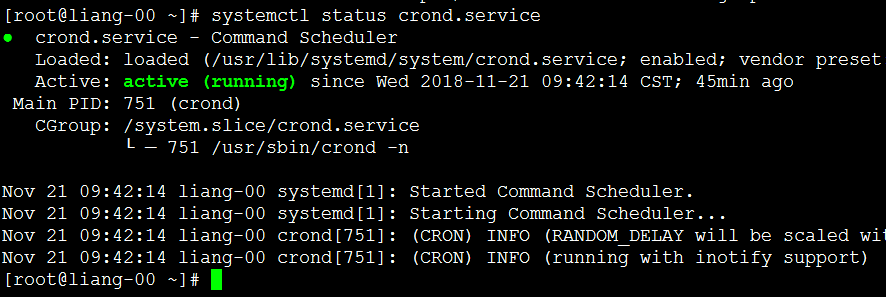
有时我们会遇到,自己写的任务是正确的为什么它没有执行的情况,这种情况大多是命令没有用绝对路径导致的。解决办法第一是把命令改为绝对路径,第二是把命令路径添加到配置文件的PATH中。
4、crontab -l 查看已存在的计划任务。
[root@liang-00 ~]# crontab -l
0 4 1-10 * * /usr/bin/find /tmp -type f -mtime +100 |xargs rm -f
[root@liang-00 ~]#
crontab的配置文件路径为: /var/spool/cron/root 文件是以执行该任务的用户的用户名来命名的。
5、crontab -u 指定用户;
crontab -r 删除计划任务。
10.24 chkconfig工具
chkconfig命令 检查、设置系统的各种服务。centos7版本不在使用此工具。
查看使用chkconfig的服务。
1、chkconfig --list
[root@liang-00 ~]# chkconfig --list

Note: This output shows SysV services only and does not include native
      systemd services. SysV configuration data might be overridden by native
      systemd configuration.

      If you want to list systemd services use 'systemctl list-unit-files'.
      To see services enabled on particular target use
      'systemctl list-dependencies [target]'.

netconsole         0:off    1:off    2:off    3:off    4:off    5:off    6:off
network            0:off    1:off    2:on    3:on    4:on    5:on    6:off
[root@liang-00 ~]#
服务的脚本存在于 /etc/init.d/ 目录下面。

chkconfig --list 显示的是服务在 0-6 启动级别下的状态。
2、用 chkconfig network off 关闭 network的所有启动级别下状态。
[root@liang-00 ~]# chkconfig network off
[root@liang-00 ~]# chkconfig --list

Note: This output shows SysV services only and does not include native
      systemd services. SysV configuration data might be overridden by native
      systemd configuration.

      If you want to list systemd services use 'systemctl list-unit-files'.
      To see services enabled on particular target use
      'systemctl list-dependencies [target]'.

netconsole         0:off    1:off    2:off    3:off    4:off    5:off    6:off
network            0:off    1:off    2:off    3:off    4:off    5:off    6:off
[root@liang-00 ~]#
指定运行级别,来对服务进行操作。
chkconfig --level 3 network on #打开3级别下的network服务。
[root@liang-00 ~]#
[root@liang-00 ~]# chkconfig --level 3 network on
[root@liang-00 ~]# chkconfig --list

Note: This output shows SysV services only and does not include native
      systemd services. SysV configuration data might be overridden by native
      systemd configuration.

      If you want to list systemd services use 'systemctl list-unit-files'.
      To see services enabled on particular target use
      'systemctl list-dependencies [target]'.

netconsole         0:off    1:off    2:off    3:off    4:off    5:off    6:off
network            0:off    1:off    2:off    3:on    4:off    5:off    6:off
[root@liang-00 ~]#
chkconfig --level 345 network on #打开345级别下的network服务。
3、增加一个服务。
1)首先我们拷贝一个123服务器到 /etc/init.d/ 目录下。
2)chkconfig --add 123 #添加到服务列表中去。
[root@liang-00 ~]# cp /etc/init.d/network /etc/init.d/123
[root@liang-00 ~]# ls /etc/init.d/
123  functions  netconsole  network  README
[root@liang-00 ~]# chkconfig --add 123
[root@liang-00 ~]# chkconfig --list

Note: This output shows SysV services only and does not include native
      systemd services. SysV configuration data might be overridden by native
      systemd configuration.

      If you want to list systemd services use 'systemctl list-unit-files'.
      To see services enabled on particular target use
      'systemctl list-dependencies [target]'.

123                0:off    1:off    2:on    3:on    4:on    5:on    6:off
netconsole         0:off    1:off    2:off    3:off    4:off    5:off    6:off
network            0:off    1:off    2:on    3:on    4:on    5:on    6:off
[root@liang-00 ~]#
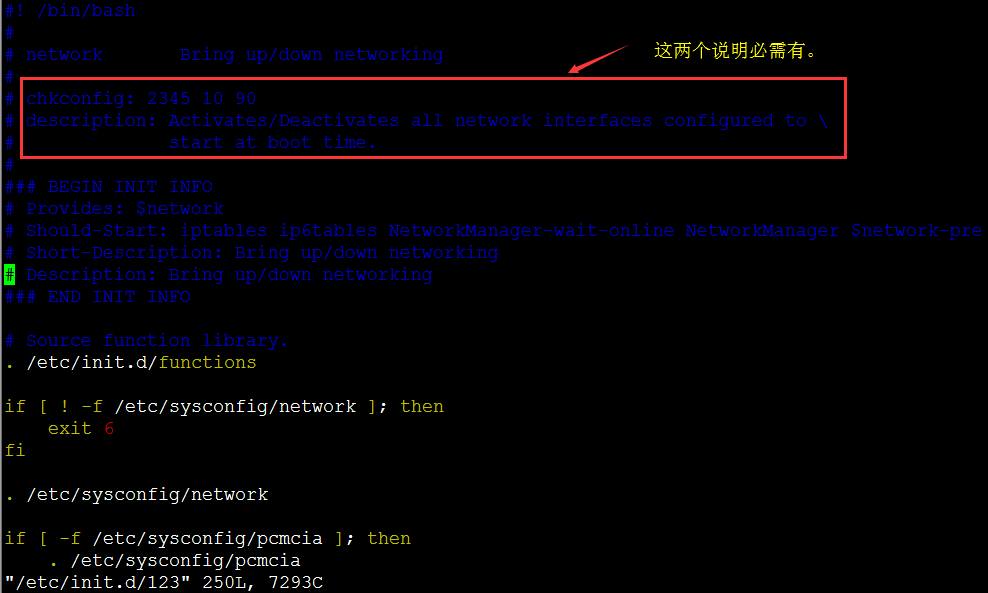
添加的服务文件名字没有要求,但是文件内容有要求。
vim /etc/init.d/123
4、删除服务。
chkconfig --del 123
[root@liang-00 ~]# chkconfig --del 123
[root@liang-00 ~]# chkconfig --list

Note: This output shows SysV services only and does not include native
      systemd services. SysV configuration data might be overridden by native
      systemd configuration.

      If you want to list systemd services use 'systemctl list-unit-files'.
      To see services enabled on particular target use
      'systemctl list-dependencies [target]'.

netconsole         0:off    1:off    2:off    3:off    4:off    5:off    6:off
network            0:off    1:off    2:on    3:on    4:on    5:on    6:off
[root@liang-00 ~]#
10.25 systemd管理服务
systemd系统服务管理。
1、systemctl list-units --all --type=service 查看所有启动的service。

--all 表示显示所有状态,不加只显示active状态的。
2、启动和关闭服务。
• systemctl enable crond.service //让服务开机启动
[root@liang-00 ~]# systemctl enable crond.service
Created symlink from /etc/systemd/system/multi-user.target.wants/crond.service to /usr/lib/systemd/system/crond.service.
[root@liang-00 ~]#
从内容中我们可以获得服务的配置文件 /etc/systemd/system/multi-user.target.wants/crond.service,它实际上是一个软链接。
[root@liang-00 ~]# cat /etc/systemd/system/multi-user.target.wants/crond.service
[Unit]
Description=Command Scheduler
After=auditd.service systemd-user-sessions.service time-sync.target

[Service]
EnvironmentFile=/etc/sysconfig/crond
ExecStart=/usr/sbin/crond -n $CRONDARGS
ExecReload=/bin/kill -HUP $MAINPID
KillMode=process

[Install]
WantedBy=multi-user.target
[root@liang-00 ~]# ll /etc/systemd/system/multi-user.target.wants/crond.service
lrwxrwxrwx 1 root root 37 Nov 21 11:37 /etc/systemd/system/multi-user.target.wants/crond.service -> /usr/lib/systemd/system/crond.service
[root@liang-00 ~]#
我们disable后软连接就会失效。
[root@liang-00 ~]# ll /etc/systemd/system/multi-user.target.wants/crond.service
ls: cannot access /etc/systemd/system/multi-user.target.wants/crond.service: No such file or directory
[root@liang-00 ~]#
• systemctl disable crond //不让开机启动
• systemctl status crond //查看状态
• systemctl stop crond //停止服务
• systemctl start crond //启动服务
• systemctl restart crond //重启服务
• systemctl is-enabled crond //检查服务是否开机启动
[root@liang-00 ~]# systemctl is-enabled crond.service
enabled
[root@liang-00 ~]#
10.26 unit介绍
ls /usr/lib/systemd/system #系统所有unit

系统所有unit类型。
unit相关命令。
systemctl list-units --all #列出正在运行的unit。

systemctl list-units --all #列出所有,包括失败的或者inactive的
systemctl list-units --all --state=inactive #列出inactive的unit
systemctl list-units --type=service #列出状态为active的service
systemctl is-active crond.service #查看某个服务是否为active
10.27 target介绍
系统为了方便管理用target来管理unit。
systemctl list-unit-files --type=target #列出系统所有target。
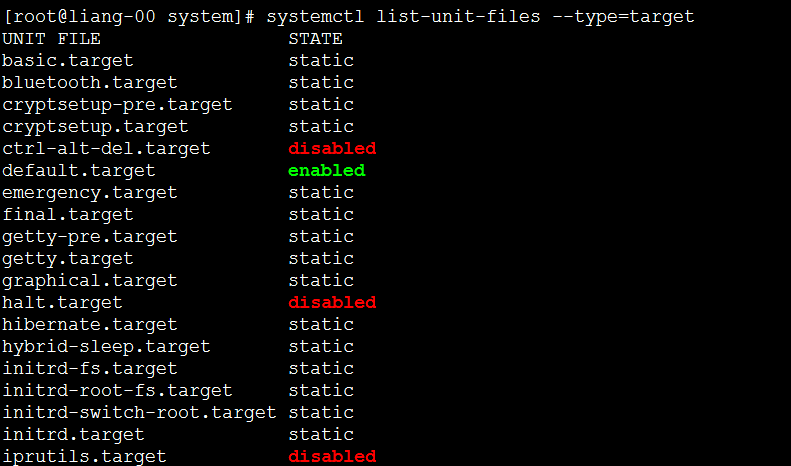
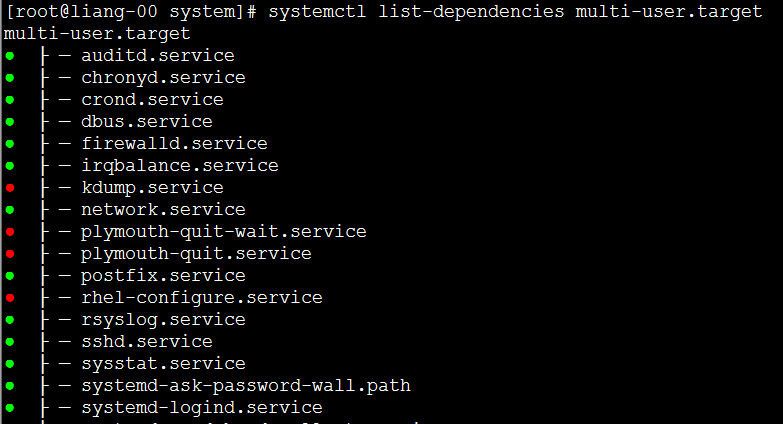
systemctl list-dependencies multi-user.target #查看指定target下有哪些unit。查看multi-user.target 下的unit
target下面也可与有target。
查看系统默认target
systemctl get-default
[root@liang-00 system]# systemctl get-default
multi-user.target
[root@liang-00 system]#
设置默认target
[root@liang-00 system]# systemctl set-default multi-user.target
Removed symlink /etc/systemd/system/default.target.
Created symlink from /etc/systemd/system/default.target to /usr/lib/systemd/system/multi-user.target.
[root@liang-00 system]#
[root@liang-00 system]# cat /usr/lib/systemd/system/sshd.service
[Unit]
Description=OpenSSH server daemon
Documentation=man:sshd(8) man:sshd_config(5)
After=network.target sshd-keygen.service
Wants=sshd-keygen.service

[Service]
Type=notify
EnvironmentFile=/etc/sysconfig/sshd
ExecStart=/usr/sbin/sshd -D $OPTIONS
ExecReload=/bin/kill -HUP $MAINPID
KillMode=process
Restart=on-failure
RestartSec=42s

[Install]
WantedBy=multi-user.target
[root@liang-00 system]#
来源:oschina
链接:https://my.oschina.net/u/3993922/blog/2885365