翻译| 《 JavaScript无处不在》第5章数据库(^_^) 
写在最前面
大家好呀,我是毛小悠,是一位前端开发工程师。正在翻译一本英文技术书籍。
为了提高大家的阅读体验,对语句的结构和内容略有调整。如果发现本文中有存在瑕疵的地方,或者你有任何意见或者建议,可以在评论区留言,或者加我的微信:code_maomao,欢迎相互沟通交流学习。
(σ゚∀゚)σ..:*☆哎哟不错哦
翻译 | 《JavaScript Everywhere》第5章 数据库(^_^)
第5章 数据库
当我还是个孩子时,我痴迷地收集各类运动卡。收集卡片的过程中很大一部分时间是在整理卡片。我将明星球员放在一个盒子里,有一整个盒子专门放篮球巨星迈克尔·乔丹(Michael Jordan)的纸牌,其余的纸牌则按运动分类,或者按团队分类。这种组织方法使我能够安全地存储卡牌,并在任何给定时间内轻松找到我要找的卡。我自我感觉所知甚少,但是像这样的存储系统实际上就等同于数据库。数据库的核心是允许我们存储信息并在以后检索它。
刚开始进行Web开发时,我发现数据库令人生畏。我看到很多有关运行数据库和输入晦涩的SQL命令的说明,这感觉就像是一个附加的抽象概念,我无法搞定。值得庆幸的是,我最终跨越了障碍,并且不再被SQL表联接所吓倒,因此,如果你仍在踯躅不前,我希望你知道你是可以浏览数据库的世界的。
在本书中,我们将使用MongoDB作为我们的首选数据库。我之所以选择Mongo,是因为它是Node.js生态系统中的一种流行选择,并且是适合任何人入门的出色数据库。Mongo将我们的数据存储在类似于JavaScript对象的“文档”中。这意味着我们将能够以任何JavaScript开发人员熟悉的格式编写和检索信息。但是,如果你拥有一个非常喜欢的数据库(例如PostgreSQL),那么本书中涉及的主题只需做很少的工作即可转移到任何类型的系统上。
在使用Mongo之前,我们需要确保MongoDB服务器在本地运行。这是整个开发过程中必需的。为此,请按照第1章中有关系统的说明进行操作。
MongoDB入门
运行Mongo,让我们探索如何使用Mongo Shell从终端直接与Mongo交互。
首先通过键入以下内容打开MongoDB shell
mongo命令:
$ mongo
运行此命令后,你应该看到有关MongoDB Shell本地服务器连接的信息,以及打印到终端上的一些其他信息。现在,我们可以从终端应用程序中直接与MongoDB进行交互。我们可以使用使用命令创建一个数据库。
让我们创建一个名为learning的数据库:
$ use learning
在本章开头介绍的卡片收藏中,我将卡片整理在不同的盒子中。MongoDB带来了相同的概念,称为集合。
集合是我们将相似文档组合在一起的方式。例如,博客应用程序可能有一个文章集合,一个用户集合和第三个评论集合。如果将集合与JavaScript对象进行比较,它将是一个顶级对象,而文档是其中的单个对象。我们可以像这样将它可视化:
collection: {
  document: {},
  document: {},
  document: {}.
  ...
}
掌握了这些信息后,让我们在学习数据库的集合中创建一个文档。我们将创建一个披萨集合,在其中存储披萨类型的文档。在MongoDB shell中输入以下内容:
$ db.pizza.save({ type: "Cheese" })
如果成功,我们应该看到一个返回的结果:
WriteResult({ "nInserted" : 1 })
我们还可以一次将多个条目写入数据库:
$ db.pizza.save([{type: "Veggie"}, {type: "Olive"}])
现在我们已经向数据库中写入了一些文档,让我们对其进行检索。为此,我们将使用MongoDB的find方法。要查看集合中的所有文档,请运行查找带有空参数的命令:
$ db.pizza.find()
现在,我们应该在数据库中看到所有三个条目。除了存储数据外,MongoDB还自动为每个条目分配一个唯一的ID。结果应如下所示:
{ "_id" : ObjectId("5c7528b223ab40938c7dc536"), "type" : "Cheese" }
{ "_id" : ObjectId("5c7529fa23ab40938c7dc53e"), "type" : "Veggie" }
{ "_id" : ObjectId("5c7529fa23ab40938c7dc53f"), "type" : "Olive" }
我们还可以通过属性值以及Mongo分配的ID查找单个文档:
$ db.pizza.find({ type: "Cheese" })
$ db.pizza.find({ _id: ObjectId("A DOCUMENT ID HERE") })
我们不仅希望能够找到文档,而且能够对其进行更新也很有用。我们可以使用Mongo的update方法来做到这一点,该方法接受要更改的文档的第一个参数和第二个参数。让我们将蔬菜比萨更新为蘑菇比萨:
$ db.pizza.update({ type: "Veggie" }, { type: "Mushroom" })
现在,如果我们运行db.pizza.find(),我们应该看到你的文档已经更新:
{ "_id" : ObjectId("5c7528b223ab40938c7dc536"), "type" : "Cheese" }
{ "_id" : ObjectId("5c7529fa23ab40938c7dc53e"), "type" : "Mushroom" }
{ "_id" : ObjectId("5c7529fa23ab40938c7dc53f"), "type" : "Olive" }
与更新文档一样,我们也可以使用Mongo的remove方法删除一个文档。让我们从数据库中删除蘑菇披萨:
$ db.pizza.remove({ type: "Mushroom" })
现在,如果我们执行数据库:db.pizza.find() 查询,我们只会在集合中看到两个条目。
如果我们决定不再希望包含任何数据,则可以在没有空对象参数的情况下运行remove方法,这将清除整个集合:
$ db.pizza.remove({})
现在,我们已经成功地使用MongoDB Shell创建数据库,将文档添加到集合中,更新这些文档并删除它们。当我们将数据库集成到项目中时,这些基本的数据库操作将提供坚实的基础。在开发中,我们还可以使用MongoDB Shell访问数据库。这对于调试、手动删除或更新条目等任务很有帮助。
将MongoDB连接到我们的应用程序
现在,你已经从shell中学习了一些有关使用MongoDB的知识,让我们将其连接到我们的API应用程序。为此,我们将使用Mongoose对象文档映射器(ODM)。Mongoose是一个库,它通过使用基于模式的建模解决方案来减少和简化样式代码,从而简化了在Node.js应用程序中使用MongoDB的工作量。是的,你没看错-另一种模式!如你所见,一旦定义了数据库模式,通过Mongoose使用MongoDB的方式与我们在Mongo Shell中编写的命令的类型类似。
我们首先需要更新在我们本地数据库URL的.env文件。这将使我们能够在我们正在使用的任何环境(例如本地开发和生产)中设置数据库URL。
本地MongoDB服务器的默认URL为mongodb://localhost:27017,我们将在其中添加数据库名称。因此,在我们.env文件,我们将使用Mongo数据库实例的URL设置一个DB_HOST变量,如下所示:
DB_HOST=mongodb://localhost:27017/notedly
在我们的应用程序中使用数据库的下一步是连接到该数据库。让我们写一些代码,在启动时将我们的应用程序连接到我们的数据库。为此,我们将首先在src目录中创建一个名为db.js的新文件。在db.js中,我们将编写数据库连接代码。我们还将包括一个关闭数据库连接的功能,这将对测试应用程序很有用。
在src/db.js中,输入以下内容:
// Require the mongoose library
const mongoose = require('mongoose');

module.exports = {
  connect: DB_HOST => {
    // Use the Mongo driver's updated URL string parser
    mongoose.set('useNewUrlParser', true);
    // Use findOneAndUpdate() in place of findAndModify()
    mongoose.set('useFindAndModify', false);
    // Use createIndex() in place of ensureIndex()
    mongoose.set('useCreateIndex', true);
    // Use the new server discovery and monitoring engine
    mongoose.set('useUnifiedTopology', true);
    // Connect to the DB
    mongoose.connect(DB_HOST);
    // Log an error if we fail to connect
    mongoose.connection.on('error', err => {
      console.error(err);
      console.log(
        'MongoDB connection error. Please make sure MongoDB is running.'
      );
      process.exit();
    });
  },

  close: () => {
    mongoose.connection.close();
  }
};
现在,我们将更新src/index.js来调用此连接。为此,我们将首先导入.env配置以及db.js文件。在导入中,在文件顶部,添加以下导入:
require('dotenv').config();
const db = require('./db');
我喜欢在env文件中定义DB_HOST值作为一个变量。直接在下面的端口变量定义中添加此变量:
const DB_HOST = process.env.DB_HOST;
然后,通过将以下内容添加到src/index.js文件中,可以调用我们的连接:
db.connect(DB_HOST);
src/index.js文件现在如下:
const express = require('express');
const { ApolloServer, gql } = require('apollo-server-express');
require('dotenv').config();

const db = require('./db');

// Run the server on a port specified in our .env file or port 4000
const port = process.env.PORT || 4000;
// Store the DB_HOST value as a variable
const DB_HOST = process.env.DB_HOST;

let notes = [
  {
    id: '1',
    content: 'This is a note',
    author: 'Adam Scott'
  },
  {
    id: '2',
    content: 'This is another note',
    author: 'Harlow Everly'
  },
  {
    id: '3',
    content: 'Oh hey look, another note!',
    author: 'Riley Harrison'
  }
];

// Construct a schema, using GraphQL's schema language
const typeDefs = gql`
  type Note {
    id: ID
    content: String
    author: String
  }

  type Query {
    hello: String
    notes: [Note]
    note(id: ID): Note
  }

  type Mutation {
    newNote(content: String!): Note
  }
`;

// Provide resolver functions for our schema fields
const resolvers = {
  Query: {
    hello: () => 'Hello world!',
    notes: () => notes,
    note: (parent, args) => {
      return notes.find(note => note.id === args.id);
    }
  },
  Mutation: {
    newNote: (parent, args) => {
      let noteValue = {
        id: notes.length + 1,
        content: args.content,
        author: 'Adam Scott'
      };
      notes.push(noteValue);
      return noteValue;
    }
  }
};

const app = express();

// Connect to the database
db.connect(DB_HOST);

// Apollo Server setup
const server = new ApolloServer({ typeDefs, resolvers });

// Apply the Apollo GraphQL middleware and set the path to /api
server.applyMiddleware({ app, path: '/api' });

app.listen({ port }, () =>
  console.log(
    `GraphQL Server running at http://localhost:${port}${server.graphqlPath}`
  )
);
尽管实际功能没有更改,但是如果你运行npm run dev,则应用程序应该成功连接到数据库并且运行没有错误。
从我们的应用程序读取和写入数据
现在我们可以连接到数据库了,让我们编写从应用程序内部读取数据和向其写入数据所需的代码。Mongoose允许我们定义如何将数据作为JavaScript对象存储在数据库中,然后我们可以存储匹配该模型结构的数据并对其进行操作。考虑到这一点,让我们创建我们的对象,称为Mongoose模式。
首先,在我们的src目录中创建一个名为models的文件夹来存放该模式文件。在此文件夹中,创建一个名为note.js的文件。在src/models/note.js中,我们将从定义文件的基本设置开始:
// Require the mongoose library
const mongoose = require('mongoose');

// Define the note's database schema
const noteSchema = new mongoose.Schema();

// Define the 'Note' model with the schema
const Note = mongoose.model('Note', noteSchema);
// Export the module
module.exports = Note;
接下来,我们将在noteSchema变量中定义我们的模式。与内存数据示例类似,目前,我们当前的结构中将包括笔记的内容以及代表作者的字符串。我们还将包括为笔记添加时间戳的选项,当创建或编辑笔记时,时间戳将自动存储。我们将继续在笔记结构中添加这些功能。
我们的Mongoose模式的结构如下:
// Define the note's database schema
const noteSchema = new mongoose.Schema(
  {
    content: {
      type: String,
      required: true
    },
    author: {
      type: String,
      required: true
    }
  },
  {
    // Assigns createdAt and updatedAt fields with a Date type
    timestamps: true
  }
);
数据永久性
我们将在整个开发过程中更新和更改数据模型,有时会从数据库中删除所有数据。因此,我不建议使用此API存储重要的内容,例如课堂笔记、朋友的生日列表或前往你最喜欢的披萨店的地址导航信息。
现在,我们的整体src/models/note.js文件应如下所示:
// Require the mongoose library
const mongoose = require('mongoose');

// Define the note's database schema
const noteSchema = new mongoose.Schema(
  {
    content: {
      type: String,
      required: true
    },
    author: {
      type: String,
      required: true
    }
  },
  {
    // Assigns createdAt and updatedAt fields with a Date type
    timestamps: true
  }
);

// Define the 'Note' model with the schema
const Note = mongoose.model('Note', noteSchema);
// Export the module
module.exports = Note;
为了简化将模型导入Apollo Server Express应用程序的过程,我们将向index.js文件添加到src/models目录中。这会将我们的模型合并到一个JavaScript模块中。尽管这不是严格必要的,但随着应用程序和数据库模型的增长,我认为这是一个很好的策略。在src/models/index.js中,我们将导入笔记模型并将其添加到要导出的模块对象中:
const Note = require('./note');

const models = {
  Note
};

module.exports = models;
现在,通过将模块导入到src/index.js文件中,我们可以将数据库模块合并到Apollo Server Express应用程序代码中:
const models = require('./models');
导入数据库模块代码后,我们可以使解析器实现保存和读取数据库的需求,而不是通过存放在内存中的变量。为此,我们将重写notes查询,用来通过使用从MongoDB数据库中提取笔记:
notes: async () => {
  return await models.Note.find();
},
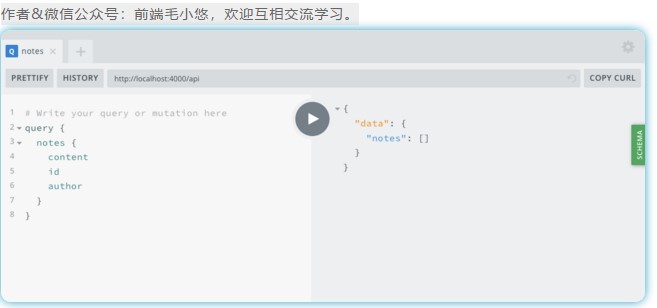
在服务器运行后,我们可以在浏览器中访问GraphQL Playground并运行笔记查询:
query {
  notes {
    content
    id
    author
  }
}
预期结果将是一个空数组,因为我们尚未向数据库中添加任何数据(图5-1):
{
  "data": {
    "notes": []
  }
}

图5-1。笔记查询。
更新我们的newNote修改以向我们的数据库中添加一个笔记,我们将使用MongoDB模块的create方法来接受一个对象。
现在,我们将继续对作者的姓名进行编写:
newNote: async (parent, args) => {
  return await models.Note.create({
   content: args.content,
   author: 'Adam Scott'
  });
}
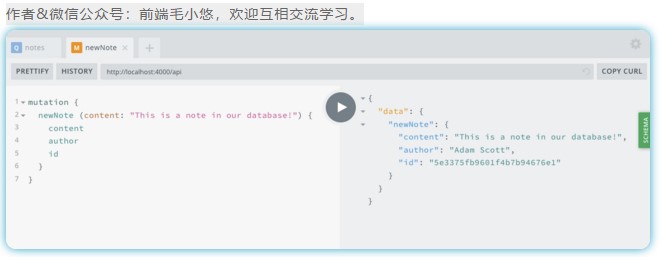
现在,我们可以访问GraphQL Playground并编写一个修改,该修改将为我们的数据库添加一个笔记:
mutation {
  newNote (content: "This is a note in our database!") {
  content
  author
  id
  }
}
我们的修改将返回一个新笔记,其中包含我们放入变量中的内容,作者的姓名以及MongoDB生成的ID(图5-2)。

图5-2。修改会在数据库中创建新笔记
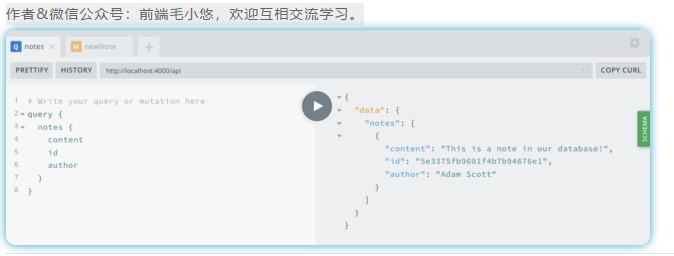
如果现在重新运行笔记查询,则应该看到从数据库中检索到的笔记!(请参阅图5-3)

图5-3。我们的笔记查询返回数据库中的数据。
最后一步是使用MongoDB分配给每个条目的唯一ID重写note的查询,用于从数据库中提取特定的笔记。为此,我们将使用Mongoose的findbyId方法:
note: async (parent, args) => {
  return await models.Note.findById(args.id);
}
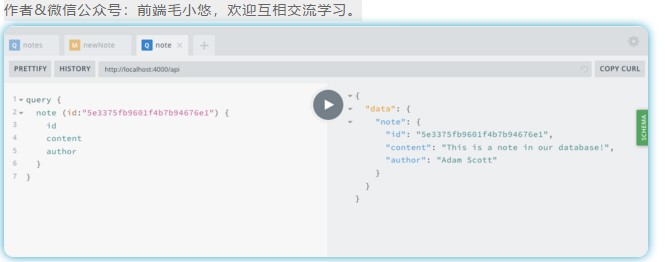
现在,我们可以使用在笔记查询或newNote修改中看到的唯一ID查询了,可以从数据库中检索单个笔记。为此,我们将编写一个带id参数的笔记查询(图5-4):
query {
  note(id: "5c7bff794d66461e1e970ed3") {
   id
   content
   author
  }
}
你的笔记编号
上一个示例中使用的ID对于我的本地数据库是唯一的。确保从你自己的查询或修改结果中复制一个ID。

图5-4。查询单个笔记
我们最终的src/index.js文件将如下所示:
const express = require('express');
const { ApolloServer, gql } = require('apollo-server-express');
require('dotenv').config();

const db = require('./db');
const models = require('./models');

// Run our server on a port specified in our .env file or port 4000
const port = process.env.PORT || 4000;
const DB_HOST = process.env.DB_HOST;

// Construct a schema, using GraphQL's schema language
const typeDefs = gql`
  type Note {
   id: ID
   content: String
   author: String
  }

  type Query {
   hello: String
   notes: [Note]
   note(id: ID): Note
  }

  type Mutation {
   newNote(content: String!): Note
  }
`;

// Provide resolver functions for our schema fields
const resolvers = {
  Query: {
   hello: () => 'Hello world!',
   notes: async () => {
    return await models.Note.find();
   },
   note: async (parent, args) => {
    return await models.Note.findById(args.id);
   }
  },
  Mutation: {
   newNote: async (parent, args) => {
    return await models.Note.create({
     content: args.content,
     author: 'Adam Scott'
    });
   }
  }
};

const app = express();

db.connect(DB_HOST);

// Apollo Server setup
const server = new ApolloServer({ typeDefs, resolvers });

// Apply the Apollo GraphQL middleware and set the path to /api
server.applyMiddleware({ app, path: '/api' });

app.listen({ port }, () =>
  console.log(
   `GraphQL Server running at http://localhost:${port}${server.graphqlPath}`
  )
);
现在,我们可以使用GraphQL API从数据库读取和写入数据!尝试增加更多的笔记,浏览笔记查询所有的注意事项。并浏览单个笔记查询的信息内容。
结论
在本章中,你学习了如何通过我们的API使用MongoDB和Mongoose库。数据库(例如MongoDB)使我们能够安全地存储和检索应用程序的数据。对象建模库(例如Mongoose)通过提供用于数据库查询和数据验证的工具来简化数据库的工作。在下一章中,我们将更新API以使数据库内容具有完整的CRUD(创建,读取,更新和删除)功能。
如果有理解不到位的地方,欢迎大家纠错。如果觉得还可以,麻烦您点赞收藏或者分享一下,希望可以帮到更多人。:slightly_smiling_fac
来源:oschina
链接:https://my.oschina.net/u/4836587/blog/4733667