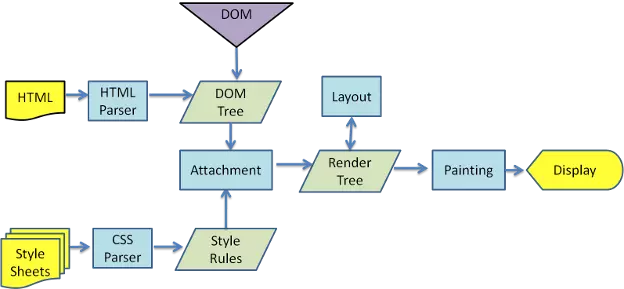
页面呈现流程
在讨论页面重绘、回流之前。需要对页面的呈现流程有些了解,页面是怎么把html结合css等显示到浏览器上的,下面的流程图显示了浏览器对页面的呈现的处理流程。可能不同的浏览器略微会有些不同。但基本上都是类似的。

1. 浏览器把获取到的html代码解析成1个Dom树,html中的每个tag都是Dom树中的1个节点,根节点就是我们常用的document对象(<html> tag)。
dom树就是我们用firebug或者IE Developer Toolbar等工具看到的html结构,里面包含了所有的html tag,包括display:none隐藏,还有用JS动态添加的元素等。
2. 浏览器把所有样式(主要包括css和浏览器的样式设置)解析成样式结构体,在解析的过程中会去掉浏览器不能识别的样式,比如IE会去掉-moz开头的样式,而firefox会去掉_开头的样式。
3、dom tree和样式结构体结合后构建呈现树(render tree),render tree有点类似于dom tree,但其实区别有很大,render tree能识别样式,render tree中每个node都有自己的style,而且render tree不包含隐藏的节点(比如display:none的节点,还有head节点),因为这些节点不会用于呈现,而且不会影响呈现的,所以就不会包含到render tree中。注意 visibility:hidden隐藏的元素还是会包含到render tree中的,因为visibility:hidden 会影响布局(layout),会占有空间。根据css2的标准,render tree中的每个节点都称为box(Box dimensions),box所有属性:width,height,margin,padding,left,top,border等。
4. 一旦render tree构建完毕后,浏览器就可以根据render tree来绘制页面了。
回流与重绘
1. 当render tree中的一部分(或全部)因为元素的规模尺寸,布局,隐藏等改变而需要重新构建。这就称为回流(其实我觉得叫重新布局更简单明了些)。每个页面至少需要一次回流,就是在页面第一次加载的时候。
2. 当render tree中的一些元素需要更新属性,而这些属性只是影响元素的外观,风格,而不会影响布局的,比如background-color。则就叫称为重绘。
注:从上面可以看出,回流必将引起重绘,而重绘不一定会引起回流。
什么操作会引起重绘、回流
其实任何对render tree中元素的操作都会引起回流或者重绘,比如:
1. 添加、删除元素(回流+重绘)
2. 隐藏元素,display:none(回流+重绘),visibility:hidden(只重绘,不回流)
3. 移动元素,比如改变top,left(jquery的animate方法就是,改变top,left不一定会影响回流),或者移动元素到另外1个父元素中。(重绘+回流)
4. 对style的操作(对不同的属性操作,影响不一样)
5. 还有一种是用户的操作,比如改变浏览器大小,改变浏览器的字体大小等(回流+重绘)
看一个例子:
var s = document.body.style;
s.padding = "2px"; // 回流+重绘
s.border = "1px solid red"; // 再一次 回流+重绘
s.color = "blue"; // 再一次重绘
s.backgroundColor = "#ccc"; // 再一次 重绘
s.fontSize = "14px"; // 再一次 回流+重绘
// 添加node,再一次 回流+重绘
document.body.appendChild(document.createTextNode('abc!'));、
s.padding = "2px"; // 回流+重绘
s.border = "1px solid red"; // 再一次 回流+重绘
s.color = "blue"; // 再一次重绘
s.backgroundColor = "#ccc"; // 再一次 重绘
s.fontSize = "14px"; // 再一次 回流+重绘
// 添加node,再一次 回流+重绘
document.body.appendChild(document.createTextNode('abc!'));、
上面的代码进行了多次的重绘和回流,回流比重绘的代价要更高,回流的花销跟render tree有多少节点需要重新构建有关系,假设你直接操作body,比如在body最前面插入1个元素,会导致整个render tree回流,这样代价当然会比较高,但如果是指body后面插入1个元素,则不会影响前面元素的回流。
如果每句JS操作都去回流重绘的话,浏览器可能就会受不了。所以很多浏览器都会优化这些操作,浏览器会维护1个队列,把所有会引起回流、重绘的操作放入这个队列,等队列中的操作到了一定的数量或者到了一定的时间间隔,浏览器就会把flush队列,进行一个批处理。这样就会让多次的回流、重绘变成一次回流重绘。
如何减少回流、重绘
减少回流、重绘其实就是需要减少对render tree的操作,并减少对一些style信息的请求,尽量利用好浏览器的优化策略。具体方法有:
1. 不要1个1个地改变元素的样式属性,最好直接改变className,但className是预先定义好的样式,不是动态的,如果你要动态改变一些样式,则使用cssText来改变,见下面代码:减少回流、重绘其实就是需要减少对render tree的操作,并减少对一些style信息的请求,尽量利用好浏览器的优化策略。具体方法有:
// 不好的写法
var left = 1;
var top = 1;
el.style.left = left + "px";
el.style.top = top + "px";
// 比较好的写法
el.className += " className1";
// 比较好的写法
el.style.cssText += "; left: " + left + "px; top: " + top + "px;";
var left = 1;
var top = 1;
el.style.left = left + "px";
el.style.top = top + "px";
// 比较好的写法
el.className += " className1";
// 比较好的写法
el.style.cssText += "; left: " + left + "px; top: " + top + "px;";
2. 让要操作的元素进行"离线处理",处理完后一起更新,这里所谓的"离线处理"即让元素不存在于render tree中,比如:
a) 使用documentFragment或div等元素进行缓存操作,这个主要用于添加元素的时候,大家应该都用过,就是先把所有要添加到元素添加到1个div(这个div也是新加的),
最后才把这个div append到body中。
b) 先display:none 隐藏元素,然后对该元素进行所有的操作,最后再显示该元素。因对display:none的元素进行操作不会引起回流、重绘。所以只要操作只会有2次回流。
3 不要经常访问会引起浏览器flush队列的属性,如果你确实要访问,就先读取到变量中进行缓存,以后用的时候直接读取变量就可以了,见下面代码:
for(循环) {
el.style.left = el.offsetLeft + 5 + "px";
el.style.top = el.offsetTop +
var left = el.offsetLeft,top = el.offsetTop,s = el.style;
for(循环) {
left += 10;
top += 10;
s.left = left + "px";
s.top = top + "px";
}
4. 考虑你的操作会影响到render tree中的多少节点以及影响的方式,影响越多,花费肯定就越多。比如现在很多人使用jquery的animate方法移动元素来展示一些动画效果,想想下面2种移动的方法:
// block1是position:absolute 定位的元素,它移动会影响到它父元素下的所有子元素。
// 因为在它移动过程中,所有子元素需要判断block1的z-index是否在自己的上面,
// 如果是在自己的上面,则需要重绘,这里不会引起回流
$("#block1").animate({left:50});
// 如果是在自己的上面,则需要重绘,这里不会引起回流
$("#block1").animate({left:50});
// block2是相对定位的元素,这个影响的元素与block1一样,但是因为block2非绝对定位
// 而且改变的是marginLeft属性,所以这里每次改变不但会影响重绘,
// 还会引起父元素及其下元素的回流
// 而且改变的是marginLeft属性,所以这里每次改变不但会影响重绘,
// 还会引起父元素及其下元素的回流
$("#block2").animate({marginLeft:50});
用一些实际的例子来说明:
第一个测试代码不改变元素的规则,大小,位置。只改变颜色,所以不存在回流,仅测试重绘,代码如下:
<body>
<script type="text/javascript">
var s = document.body.style;
var computed;
if (document.body.currentStyle) {
computed = document.body.currentStyle;
} else {
computed = document.defaultView.getComputedStyle(document.body, '');
}
function testOneByOne(){
s.color = 'red';;
tmp = computed.backgroundColor;
s.color = 'white';
tmp = computed.backgroundImage;
s.color = 'green';
tmp = computed.backgroundAttachment;
}
function testAll() {
s.color = 'yellow';
s.color = 'pink';
s.color = 'blue';
tmp = computed.backgroundColor;
tmp = computed.backgroundImage;
tmp = computed.backgroundAttachment;
}
</script>
color test <br />
<button onclick="testOneByOne()">Test One by One</button>
<button onclick="testAll()">Test All</button>
</body>
testOneByOne 函数改变3次color,其中每次改变后调用getComputedStyle,读取属性值(按我们上面的讨论,这里会引起队列的flush),testAll 同样是改变3次color,但是每次改变后并不马上调用getComputedStyle。
测试代码2:这个测试跟第一次测试的代码很类似,但加上了对layout的改变,为的是测试回流。
<!DOCTYPE html PUBLIC "-//W3C//DTD XHTML 1.0 Transitional//EN" "http://www.w3.org/TR/xhtml1/DTD/xhtml1-transitional.dtd">
<html xmlns="http://www.w3.org/1999/xhtml">
<head>
</head>
<body>
<script type="text/javascript">
var s = document.body.style;
var computed;
if (document.body.currentStyle) {
computed = document.body.currentStyle;
} else {
computed = document.defaultView.getComputedStyle(document.body, '');
}
function testOneByOne(){
s.color = 'red';
s.padding = '1px';
tmp = computed.backgroundColor;
s.color = 'white';
s.padding = '2px';
tmp = computed.backgroundImage;
s.color = 'green';
s.padding = '3px';
tmp = computed.backgroundAttachment;
}
function testAll() {
s.color = 'yellow';
s.padding = '4px';
s.color = 'pink';
s.padding = '5px';
s.color = 'blue';
s.padding = '6px';
tmp = computed.backgroundColor;
tmp = computed.backgroundImage;
tmp = computed.backgroundAttachment;
}
</script>
color test <br />
<button onclick="testOneByOne()">Test One by One</button>
<button onclick="testAll()">Test All</button>
</body>
来源:oschina
链接:https://my.oschina.net/u/4417994/blog/3703226