原文:
练手WPF(四)——贪吃蛇小游戏的简易实现(上)
一. 游戏界面
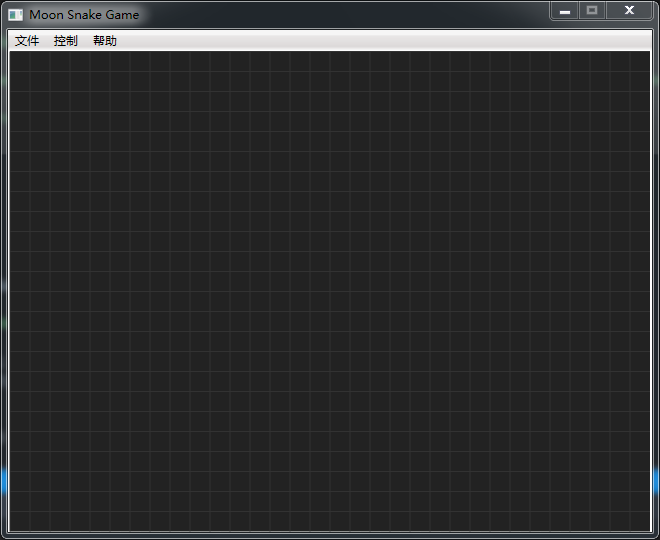
首先,按照惯例,编辑MainWindow.xaml,先将游戏界面制作好。非常简单:
(1)主游戏区依然使用我们熟悉的Canvas控件,大小为640X480像素,设定每小格子为20px,所以横坚坐标的格子数为32x24。见源代码的最后位置。
(2)定位控件我们使用DockPanel,方便放置主菜单。
(3)将按键事件PreviewKeyDown放在Window内。
<Window x:Class="MoonSnake.MainWindow"
        xmlns="http://schemas.microsoft.com/winfx/2006/xaml/presentation"
        xmlns:x="http://schemas.microsoft.com/winfx/2006/xaml"
        xmlns:d="http://schemas.microsoft.com/expression/blend/2008"
        xmlns:mc="http://schemas.openxmlformats.org/markup-compatibility/2006"
        xmlns:local="clr-namespace:MoonSnake"
        mc:Ignorable="d"
        PreviewKeyDown="MyCanvas_PreviewKeyDown"
        Title="Moon Snake Game" Height="540" Width="660" WindowStartupLocation="CenterScreen" ResizeMode="CanMinimize">
    <DockPanel>
        <Menu DockPanel.Dock="Top">
            <MenuItem Header="文件">
                <MenuItem Name="MenuFile_NewGame" Header="新游戏" Click="MenuFile_NewGame_Click" />
                <Separator/>
                <MenuItem Name="MenuFile_Exit" Header="退出" Click="MenuFile_Exit_Click" />
            </MenuItem>
            <MenuItem Header="控制">
                <MenuItem Name="MenuControl_Pause" Header="暂停" Click="MenuControl_Pause_Click" />
            </MenuItem>
            <MenuItem Header="帮助">
                <MenuItem Name="MenuHelp_About" Header="关于..." Click="MenuHelp_About_Click" />
            </MenuItem>
        </Menu>
        <Canvas x:Name="myCanvas" Height="480" Width="640" Background="#222222" Focusable="True"
                    PreviewKeyDown="MyCanvas_PreviewKeyDown" />

    </DockPanel>
</Window>
二、添加水果Fruit类
因为我们不打算使用任何图片,所以为了简单起见,就只使用红色的实心圆代表水果好了。
看下面的代码:功能简单,主要通过两个属性指定水果的位置和图形。
public class Fruit
{
    public Point _pos { get; set; }
    public Ellipse _ellipse { get; set; }
    public Canvas _canvas { get; set; }

    public Fruit(Point point, Canvas canvas)
    {
        _pos = point;
        _canvas = canvas;

        _ellipse = new Ellipse
        {
            Width = 20,
            Height = 20,
            Fill = Brushes.Red
        };

        _ellipse.SetValue(Canvas.LeftProperty, _pos.X * 20);
        _ellipse.SetValue(Canvas.TopProperty, _pos.Y * 20);
        _canvas.Children.Add(_ellipse);
    }

    public void SetPostion(Point pos)
    {
        _pos = pos;

        _ellipse.SetValue(Canvas.LeftProperty, _pos.X * 20);
        _ellipse.SetValue(Canvas.TopProperty, _pos.Y * 20);
    }
}
三、添加单节蛇身SnakeNode类
每个SnakeNode代表蛇身的一节,之后我们会通过List<SnakeNode>列表代表整条蛇。
看代码就知道了,与水果类非常相似,甚至比它更简单,构造函数没有传递Canvas参数,因为我们打算在主程序实现添加图形到主游戏区的功能,只要指定它的位置和形状即可,形状则使用了有边线的矩形代替。
public class SnakeNode
{
    public Point _pos { get; set; }
    public Rectangle _rect { get; set; }

    public SnakeNode(Point point)
    {
        _pos = point;

        _rect = new Rectangle
        {
            Width = 20,
            Height = 20,
            Stroke = new SolidColorBrush(Colors.DodgerBlue),
            StrokeThickness = 3,
            Fill = Brushes.SkyBlue
        };

        _rect.SetValue(Canvas.LeftProperty, _pos.X * 20);
        _rect.SetValue(Canvas.TopProperty, _pos.Y * 20);
    }
}
四、定义四个常量和两个枚举
看注释:
const int CellSize = 20;                // 小格子大小
const int SnakeHead = 0;                // 蛇头位置(永远位于列表0)
const int CellWidth = 640 / CellSize;    // 游戏区横格数
const int CellHeight = 480 / CellSize;    // 游戏区纵格数

// 蛇身前进方向
enum Direction
{
    UP,
    DOWN,
    LEFT,
    RIGHT
}
Direction Direct = Direction.UP;

// 游戏状态
enum GameState
{
    NONE,
    GAMEING,
    PAUSE,
    STOP
}
GameState CurrGameState = GameState.NONE;
五、很少的几个字段变量
List<SnakeNode> SnakeNodes = new List<SnakeNode>();        // 蛇身列表
Fruit fruit;                                            // 水果
Random rnd = new Random((int)DateTime.Now.Ticks);        // 随机数
System.Windows.Threading.DispatcherTimer timer = new System.Windows.Threading.DispatcherTimer();    // 计时器
六、画游戏区暗格线
主要使用Path控件,通过循环每隔20px画一根横线和纵线。
private void DrawGrid()
{
    Path gridPath = new Path();
    gridPath.Stroke = new SolidColorBrush(Color.FromArgb(255, 50, 50, 50));
    gridPath.StrokeThickness = 1;

    StringBuilder data = new StringBuilder();

    for (int x = 0; x < 640; x += CellSize)
    {
        data.Append($"M{x},0 L{x},480 ");
    }

    for (int y = 0; y<480; y += CellSize)
    {
        data.Append($"M0,{y} L640,{y} ");
    }

    gridPath.Data = Geometry.Parse(data.ToString());
    myCanvas.Children.Add(gridPath);
}
七、我是构造方法
这里画底线和设置计时器。
public MainWindow()
{
    InitializeComponent();

    DrawGrid();

    timer.Interval = new TimeSpan(0, 0, 0, 0, 260);
    timer.Tick += Timer_Tick;
}
可先注释掉最后一行,运行看看游戏界面了。

来源:oschina
链接:https://my.oschina.net/u/4290892/blog/3500859