源码:https://gitee.com/smfx1314/sendMail
Spring Boot中发送邮件步骤
Spring Boot中发送邮件具体的使用步骤如下
- 1、添加Starter模块依赖
- 2、添加Spring Boot配置(QQ/网易系/Gmail)
- 3、调用JavaMailSender接口发送邮件
开始编码
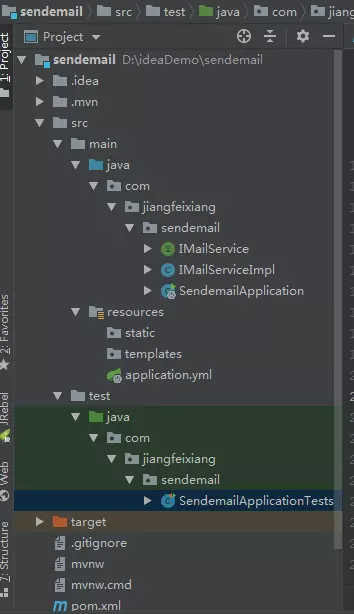
创建springboot项目,添加依赖 项目结构 
1、添加依赖 在 Maven pom.xml 配置文件中加入 spring-boot-starter-mail 依赖。
<dependency>
    <groupId>org.springframework.boot</groupId>
    <artifactId>spring-boot-starter-mail</artifactId>
</dependency>
2、添加配置参数 然后在 application.yml 文件中加入以下配置。
application.yml 配置 网易系(126/163/yeah)邮箱配置
## QQ邮箱配置
spring:
  mail:
    host: smtp.qq.com #发送邮件服务器
    username: 1016767658@qq.com #发送邮件的邮箱地址
    password:  ivhkrc*****kbdcf #客户端授权码,不是邮箱密码,这个在qq邮箱设置里面自动生成的
    properties.mail.smtp.port: 465 #端口号465或587
    from: 1016767658@qq.com # 发送邮件的地址,和上面username一致
  可以任意
    properties.mail.smtp.starttls.enable: true
    properties.mail.smtp.starttls.required: true
    properties.mail.smtp.ssl.enable: true
    default-encoding: utf-8
网易系(126/163/yeah)邮箱配置
##网易系(126/163/yeah)邮箱配置
spring:
  mail:
    host: smtp.126.com #发送邮件服务器
    username: xx@126.com #发送邮件的邮箱地址
    password: xxxxxxx #客户端授权码,不是邮箱密码,网易的是自己设置的
    properties.mail.smtp.port: 994 #465或者994
    from: xxx@126.com # 发送邮件的地址,和上面username一致
   可以任意
    properties.mail.smtp.starttls.enable: true
    properties.mail.smtp.starttls.required: true
    properties.mail.smtp.ssl.enable: true
    default-encoding: utf-8
注意:
- 126邮箱SMTP服务器地址:smtp.126.com,端口号:465或者994
- 163邮箱SMTP服务器地址:smtp.163.com,端口号:465或者994
- yeah邮箱SMTP服务器地址:smtp.yeah.net,端口号:465或者994
封装邮件接口,方便调用发送邮件 IMailService 接口
package com.jiangfeixiang.sendemail;

/**
 * @Author: 姜飞祥
 * @Description: 封装一个发邮件的接口,后边直接调用即可
 * @Date: Create in 2019/1/28/0028 21:57
 * @param: $params$
 * @return: $returns$
 */
public interface IMailService {

    /**
     * 发送文本邮件
     * @param to 收件人
     * @param subject 主题
     * @param content 内容
     */
    void sendSimpleMail(String to, String subject, String content);

    /**
     * 发送HTML邮件
     * @param to 收件人
     * @param subject 主题
     * @param content 内容
     */
    public void sendHtmlMail(String to, String subject, String content);


    /**
     * 发送带附件的邮件
     * @param to 收件人
     * @param subject 主题
     * @param content 内容
     * @param filePath 附件
     */
    public void sendAttachmentsMail(String to, String subject, String content, String filePath);
}
IMailServiceImpl 实现类
package com.jiangfeixiang.sendemail;

import org.slf4j.Logger;
import org.slf4j.LoggerFactory;
import org.springframework.beans.factory.annotation.Autowired;
import org.springframework.beans.factory.annotation.Value;
import org.springframework.core.io.FileSystemResource;
import org.springframework.mail.SimpleMailMessage;
import org.springframework.mail.javamail.JavaMailSender;
import org.springframework.mail.javamail.MimeMessageHelper;
import org.springframework.stereotype.Service;

import javax.mail.MessagingException;
import javax.mail.internet.MimeMessage;
import java.io.File;

/**
 * @Author: 姜飞祥
 * @Description:
 * @Date: Create in 2019/1/28/0028 22:00
 * @param: $params$
 * @return: $returns$
 */
@Service
public class IMailServiceImpl implements IMailService {
    private final Logger logger = LoggerFactory.getLogger(this.getClass());

    /**
     * Spring Boot 提供了一个发送邮件的简单抽象,使用的是下面这个接口,这里直接注入即可使用
     */
    @Autowired
    private JavaMailSender mailSender;

    /**
     * 配置文件中我的qq邮箱
     */
    @Value("${spring.mail.from}")
    private String from;

    /**
     * 简单文本邮件
     * @param to 收件人
     * @param subject 主题
     * @param content 内容
     */
    @Override
    public void sendSimpleMail(String to, String subject, String content) {
        //创建SimpleMailMessage对象
        SimpleMailMessage message = new SimpleMailMessage();
        //邮件发送人
        message.setFrom(from);
        //邮件接收人
        message.setTo(to);
        //邮件主题
        message.setSubject(subject);
        //邮件内容
        message.setText(content);
        //发送邮件
        mailSender.send(message);
    }

    /**
     * html邮件
     * @param to 收件人
     * @param subject 主题
     * @param content 内容
     */
    @Override
    public void sendHtmlMail(String to, String subject, String content) {
        //获取MimeMessage对象
        MimeMessage message = mailSender.createMimeMessage();
        MimeMessageHelper messageHelper;
        try {
            messageHelper = new MimeMessageHelper(message, true);
            //邮件发送人
            messageHelper.setFrom(from);
            //邮件接收人
            messageHelper.setTo(subject);
            //邮件主题
            message.setSubject(subject);
            //邮件内容,html格式
            messageHelper.setText(content, true);
            //发送
            mailSender.send(message);
            //日志信息
            logger.info("邮件已经发送。");
        } catch (MessagingException e) {
            logger.error("发送邮件时发生异常!", e);
        }
    }

    /**
     * 带附件的邮件
     * @param to 收件人
     * @param subject 主题
     * @param content 内容
     * @param filePath 附件
     */
    @Override
    public void sendAttachmentsMail(String to, String subject, String content, String filePath) {
        MimeMessage message = mailSender.createMimeMessage();
        try {
            MimeMessageHelper helper = new MimeMessageHelper(message, true);
            helper.setFrom(from);
            helper.setTo(to);
            helper.setSubject(subject);
            helper.setText(content, true);

            FileSystemResource file = new FileSystemResource(new File(filePath));
            String fileName = filePath.substring(filePath.lastIndexOf(File.separator));
            helper.addAttachment(fileName, file);
            mailSender.send(message);
            //日志信息
            logger.info("邮件已经发送。");
        } catch (MessagingException e) {
            logger.error("发送邮件时发生异常!", e);
        }


    }
}
测试
package com.jiangfeixiang.sendemail;

import org.junit.Test;
import org.junit.runner.RunWith;
import org.springframework.beans.factory.annotation.Autowired;
import org.springframework.boot.test.context.SpringBootTest;
import org.springframework.test.context.junit4.SpringRunner;

@RunWith(SpringRunner.class)
@SpringBootTest
public class SendemailApplicationTests {

    /**
     * 注入发送邮件的接口
     */
    @Autowired
    private IMailService mailService;

    /**
     * 测试发送文本邮件
     */
    @Test
    public void sendmail() {
        mailService.sendSimpleMail("smfx1314@163.com","主题:你好普通邮件","内容:第一封邮件");
    }

    @Test
    public void sendmailHtml(){
        mailService.sendHtmlMail("smfx1314@163.com","主题:你好html邮件","<h1>内容:第一封html邮件</h1>");
    }
}
到此已经结束,下一篇,我将分享常见的网站注册,邮箱点击链接验证激活如何实现。
来源:oschina
链接:https://my.oschina.net/u/4328407/blog/3661040