在介绍美颜定制之前,我们先来复习一下OpenGL中图像绘制原理。OpenGL的图像绘制,是由许许多多三角形构成的。OpenGL的绘制离不开三角形的绘制。通常对于不需要对图像细节进行处理的时候,我们一般会使用glDrawArrays方法将整张图片绘制处理。但如果要对图像的某一个部分进行形变等微调,这时候通常将图像划分为许许多多的三角形。比如MLS算法原理就是通过调整三角形的顶点位置实现图像形变的。将一张图像划分为许许多多的三角形之后,使用glDrawArrays就不够划算了,由于glDrawArrays在图像有多个连续的三角形构成的时候,会出现许多重复的边,这里面不仅仅产生比较大的内存开销,也对CPU到GPU传递数据的带宽造成一定的影响,对于移动端来说,内存和带宽都比较受限。这时候,使用glDrawElements是一个比较好的方式。
人脸三角形索引构建
本人将结合美颜类相机的美型处理用到的技术,详细介绍glDrawElements的用法。
我用的是Face++免费提供的人脸关键点检测SDK,虽然免费使用有设备和次数限制,但对于验证来说,足够了,在此感谢Face++的帮助。根据Face++的SDK的文档,106个关键点如下图所示:
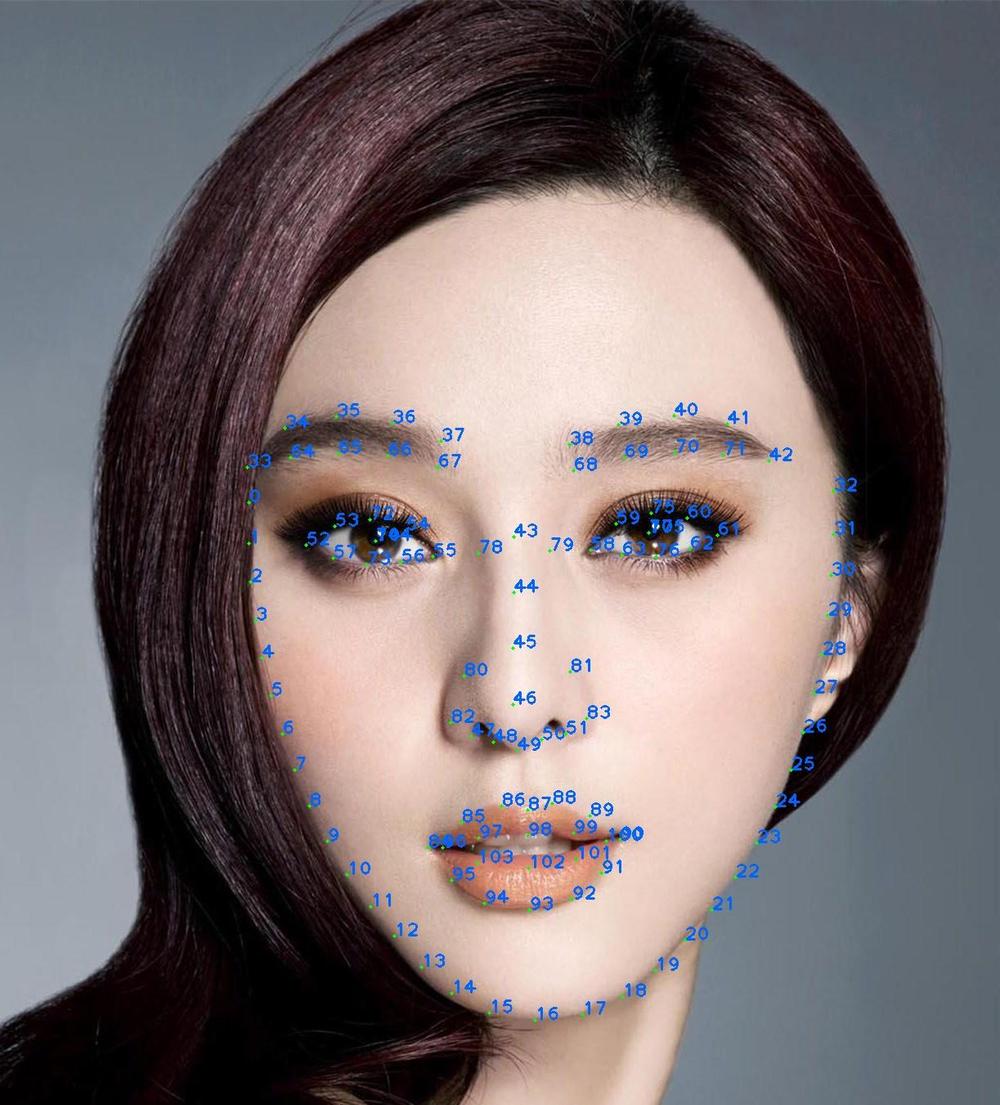
我们在得到人脸关键点后,需要对关键点进行三角划分,三角剖分算法通常是Delaunay Triangulation,关于Delaunay Triangulation 算法可以参考官方资料。这里不做介绍,这里并不是重点。由于人脸关键点的位置是相对固定的,人脸关键点内部的关系是固定的,因此在实时预览的时候,并不需要每次都用Delaunay算法来对图像进行三角剖分,并且对于移动端来说,每次都用Delaunay进行三角划分是不实际的,不管是CPU负载还是手机发热等方面都是行不通的。我们只需要提前建立一个索引,配合人脸检测SDK得到的顶点坐标和纹理坐标就可以做三角划分以及图像重建工作了。
我们把上图中122个关键点连起来,可以得到以下的图像:
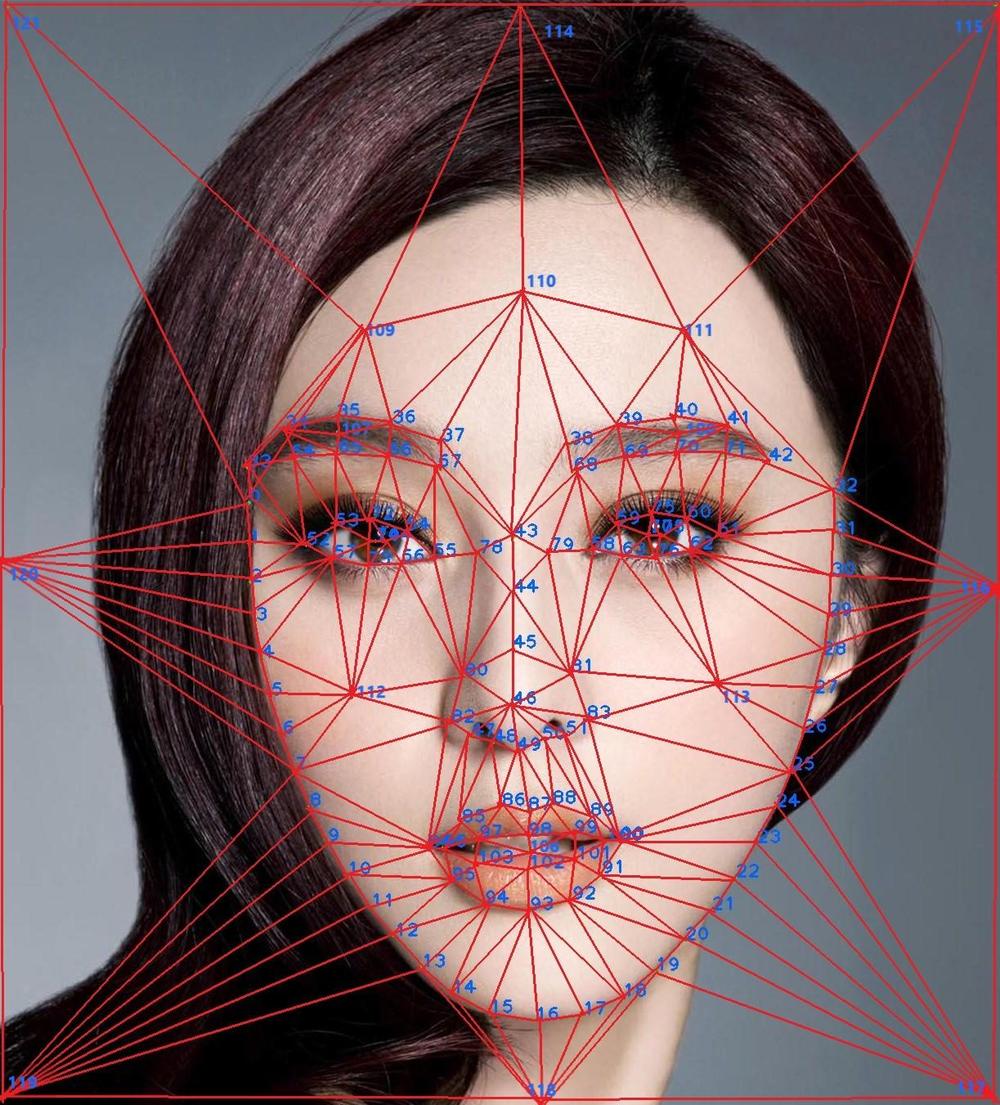
然后,我们逐个将三角形的索引连接起来,得到下面这样一个索引数组:
// 脸外索引(人脸顶部中心逆时针数) 44个三角形
110, 114, 111,
111, 114, 115,
115, 111, 32,
32, 115, 116,
116, 32, 31,
31, 116, 30,
30, 116, 29,
29, 116, 28,
28, 116, 27,
27, 116, 26,
26, 116, 25,
25, 116, 117,
117, 25, 24,
24, 117, 23,
23, 117, 22,
22, 117, 21,
21, 117, 20,
20, 117, 19,
19, 117, 118,
118, 19, 18,
18, 118, 17,
17, 118, 16,
16, 118, 15,
15, 118, 14,
14, 118, 13,
13, 118, 119,
119, 13, 12,
12, 119, 11,
11, 119, 10,
10, 119, 9,
9, 119, 8,
8, 119, 7,
7, 119, 120,
120, 7, 6,
6, 120, 5,
5, 120, 4,
4, 120, 3,
3, 120, 2,
2, 120, 1,
1, 120, 0,
0, 120, 121,
121, 0, 109,
109, 121, 114,
114, 109, 110,
// 脸内部索引
// 额头 14个三角形
0, 33, 109,
109, 33, 34,
34, 109, 35,
35, 109, 36,
36, 109, 110,
36, 110, 37,
37, 110, 43,
43, 110, 38,
38, 110, 39,
39, 110, 111,
111, 39, 40,
40, 111, 41,
41, 111, 42,
42, 111, 32,
// 左眉毛  10个三角形
33, 34, 64,
64, 34, 65,
65, 34, 107,
107, 34, 35,
35, 36, 107,
107, 36, 66,
66, 107, 65,
66, 36, 67,
67, 36, 37,
37, 67, 43,
// 右眉毛 10个三角形
43, 38, 68,
68, 38, 39,
39, 68, 69,
39, 40, 108,
39, 108, 69,
69, 108, 70,
70, 108, 41,
41, 108, 40,
41, 70, 71,
71, 41, 42,
// 左眼 21个三角形
0, 33, 52,
33, 52, 64,
52, 64, 53,
64, 53, 65,
65, 53, 72,
65, 72, 66,
66, 72, 54,
66, 54, 67,
54, 67, 55,
67, 55, 78,
67, 78, 43,
52, 53, 57,
53, 72, 74,
53, 74, 57,
74, 57, 73,
72, 54, 104,
72, 104, 74,
74, 104, 73,
73, 104, 56,
104, 56, 54,
54, 56, 55,
// 右眼 21个三角形
68, 43, 79,
68, 79, 58,
68, 58, 59,
68, 59, 69,
69, 59, 75,
69, 75, 70,
70, 75, 60,
70, 60, 71,
71, 60, 61,
71, 61, 42,
42, 61, 32,
61, 60, 62,
60, 75, 77,
60, 77, 62,
77, 62, 76,
75, 77, 105,
77, 105, 76,
105, 76, 63,
105, 63, 59,
105, 59, 75,
59, 63, 58,
// 左脸颊 16个
0, 52, 1,
1, 52, 2,
2, 52, 57,
2, 57, 3,
3, 57, 4,
4, 57, 112,
57, 112, 74,
74, 112, 56,
56, 112, 80,
80, 112, 82,
82, 112, 7,
7, 112, 6,
6, 112, 5,
5, 112, 4,
56, 80, 55,
55, 80, 78,
// 右脸颊 16个
32, 61, 31,
31, 61, 30,
30, 61, 62,
30, 62, 29,
29, 62, 28,
28, 62, 113,
62, 113, 76,
76, 113, 63,
63, 113, 81,
81, 113, 83,
83, 113, 25,
25, 113, 26,
26, 113, 27,
27, 113, 28,
63, 81, 58,
58, 81, 79,
// 鼻子部分 16个
78, 43, 44,
43, 44, 79,
78, 44, 80,
79, 81, 44,
80, 44, 45,
44, 81, 45,
80, 45, 46,
45, 81, 46,
80, 46, 82,
81, 46, 83,
82, 46, 47,
47, 46, 48,
48, 46, 49,
49, 46, 50,
50, 46, 51,
51, 46, 83,
// 鼻子和嘴巴中间三角形 14个
7, 82, 84,
82, 84, 47,
84, 47, 85,
85, 47, 48,
48, 85, 86,
86, 48, 49,
49, 86, 87,
49, 87, 88,
88, 49, 50,
88, 50, 89,
89, 50, 51,
89, 51, 90,
51, 90, 83,
83, 90, 25,
// 上嘴唇部分 10个
84, 85, 96,
96, 85, 97,
97, 85, 86,
86, 97, 98,
86, 98, 87,
87, 98, 88,
88, 98, 99,
88, 99, 89,
89, 99, 100,
89, 100, 90,
// 下嘴唇部分 10个
90, 100, 91,
100, 91, 101,
101, 91, 92,
101, 92, 102,
102, 92, 93,
102, 93, 94,
102, 94, 103,
103, 94, 95,
103, 95, 96,
96, 95, 84,
// 唇间部分 8个
96, 97, 103,
97, 103, 106,
97, 106, 98,
106, 103, 102,
106, 102, 101,
106, 101, 99,
106, 98, 99,
99, 101, 100,
// 嘴巴与下巴之间的部分(关键点7 到25 与嘴巴鼻翼围起来的区域) 24个
7, 84, 8,
8, 84, 9,
9, 84, 10,
10, 84, 95,
10, 95, 11,
11, 95, 12,
12, 95, 94,
12, 94, 13,
13, 94, 14,
14, 94, 93,
14, 93, 15,
15, 93, 16,
16, 93, 17,
17, 93, 18,
18, 93, 92,
18, 92, 19,
19, 92, 20,
20, 92, 91,
20, 91, 21,
21, 91, 22,
22, 91, 90,
22, 90, 23,
23, 90, 24,
24, 90, 25
在得到索引数组之后,我们接下来对图像进行三角剖分和重建工作。
图像三角形绘制与图像重建
上一步,我们根据图像得到了三角剖分的索引,接下来我们需要使用glDrawElements方法将人脸识别得到的关键点的顶点和纹理坐标给计算出来。为了方便处理,在106个关键点基础上,添加眉心、脸颊、额头以及图像四周8个顶点坐标进来,然后将得到的顶点坐标和纹理坐标传递到Filter中进行处理。然后在绘制前更新顶点坐标和纹理左边缓冲Buffer,将坐标传给shader进行处理即可。
美颜定制分类
美型定制分类主要可以分成三大类:
- 美白、磨皮处理。主要是磨皮、肤色调节处理。
- 利用遮罩纹理进行颜色调节、颜色映射等处理。这个主要是用来调节某个部位的,比如亮眼、美牙、消除法令纹(鼻唇沟)、消除眼袋、调节卧蚕等某一部位的调节
- 调节像素偏移。主要是脸部形态调节,比如瘦脸大眼、下巴、嘴型等调节处理。
美颜定制分类实现
一、美白、磨皮处理
磨皮
磨皮可以参考本人关于实时美颜处理的优化文章:
Android OpenGLES 实时美颜(磨皮)的优化
Android OpenGLES 实时美颜(磨皮)的优化(二)
本项目主要基于第二篇文章的处理实现,具体的过程这里就不做重复介绍了。
肤色(美白)调节
肤色调节主要通过LUT将皮肤的色彩映射成白色的。我们需要限定皮肤的灰度范围,根据灰度范围进行映射调节即可。灰度纹理是一个256 x 1大小的问题,也就是通常说的一阶颜色查找表。另外,由于皮肤的颜色比较单一,我们可以将通用的512 x 512大小的Lookup Table缩放成64x64像素的,提高映射效率。由于实现起来比较简单,也不知该怎么说比较好,可以参考本人的开源相机CainCamera 中的GLImageBeautyComplexionFilter的实现,整个fragment shader 如下:
// 美肤滤镜
precision mediump float;
varying highp vec2 textureCoordinate;
uniform sampler2D inputTexture; // 图像texture
uniform sampler2D grayTexture; // 灰度查找表
uniform sampler2D lookupTexture; // LUT
uniform highp float levelRangeInv; // 范围
uniform lowp float levelBlack; // 灰度level
uniform lowp float alpha; // 肤色程度
void main() {
lowp vec3 textureColor = texture2D(inputTexture, textureCoordinate).rgb;
textureColor = clamp((textureColor - vec3(levelBlack, levelBlack, levelBlack)) * levelRangeInv, 0.0, 1.0);
textureColor.r = texture2D(grayTexture, vec2(textureColor.r, 0.5)).r;
textureColor.g = texture2D(grayTexture, vec2(textureColor.g, 0.5)).g;
textureColor.b = texture2D(grayTexture, vec2(textureColor.b, 0.5)).b;
mediump float blueColor = textureColor.b * 15.0;
mediump vec2 quad1;
quad1.y = floor(blueColor / 4.0);
quad1.x = floor(blueColor) - (quad1.y * 4.0);
mediump vec2 quad2;
quad2.y = floor(ceil(blueColor) / 4.0);
quad2.x = ceil(blueColor) - (quad2.y * 4.0);
highp vec2 texPos1;
texPos1.x = (quad1.x * 0.25) + 0.5 / 64.0 + ((0.25 - 1.0 / 64.0) * textureColor.r);
texPos1.y = (quad1.y * 0.25) + 0.5 / 64.0 + ((0.25 - 1.0 / 64.0) * textureColor.g);
highp vec2 texPos2;
texPos2.x = (quad2.x * 0.25) + 0.5 / 64.0 + ((0.25 - 1.0 / 64.0) * textureColor.r);
texPos2.y = (quad2.y * 0.25) + 0.5 / 64.0 + ((0.25 - 1.0 / 64.0) * textureColor.g);
lowp vec4 newColor1 = texture2D(lookupTexture, texPos1);
lowp vec4 newColor2 = texture2D(lookupTexture, texPos2);
lowp vec3 newColor = mix(newColor1.rgb, newColor2.rgb, fract(blueColor));
textureColor = mix(textureColor, newColor, alpha);
gl_FragColor = vec4(textureColor, 1.0);
}
二、通过遮罩纹理进行颜色变换/映射处理的
亮眼
亮眼的实现并不算什么难度,一句话概括就是—— 把眼睛白色部分变得更白,黑色部分变得更黑。为了得到颜色差值,我们需要得到一张比较平滑的图像,再与原图比较才能得到明显的颜色差。因此,实现思路如下:
1、我们需要对图像进行高斯模糊,这里需要不同的kernel进行高斯模糊处理,将眼睛部分与输入原图的颜色差值更加明显
2、将得到的高斯模糊图像与输入图像进行比较,得到颜色差,再将颜色差值放大几倍。最后做线性混合处理即可。
实现代码如下:
// 高斯模糊的图像颜色值
vec4 blurColor = texture2D(blurTexture, textureCoordinate);
// 统计颜色
vec3 sumColor = vec3(0.0, 0.0, 0.0);
// 将RGB颜色差值放大。突出眼睛明亮部分
sumColor = clamp((sourceColor.rgb - blurColor.rgb) * 6.0, 0.0, 1.0);
sumColor = max(sourceColor.rgb, sumColor);
// 用原图和最终得到的明亮部分进行线性混合处理
color = mix(sourceColor, vec4(sumColor, 1.0), strength);
如果整张图片做这个处理,将会是这样的:
可以看到颜色差比较明显。你可以将6.0改小一点就没那么明显过爆的感觉了,这里可以根据实际需要进行调节。
这里有个问题,由于是整图处理的,所以图像其他地方也出现了明显的颜色差变化,我们不需要除了眼睛外的其他地方颜色差发生变化,因此我们需要添加眼睛部分的遮罩纹理进来做处理。
眼睛遮罩图如下:

我们将遮罩图与处理后的图像进行比较,保留白色的眼睛部分,其他部分则用原始图像的颜色值即可。
为了实现遮罩,我们对遮罩进行三角剖分,遮罩图的三角剖分如下:

对应人脸关键点三角剖分的地方,如图所示:
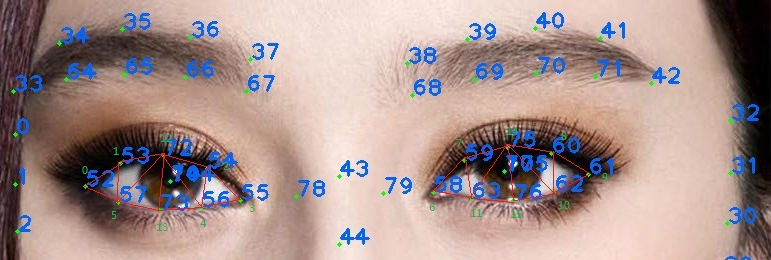
我们将眼睛周围的点标记为0 ~ 15。由此可以得到遮罩的纹理坐标如下:
/**
* 眼睛遮罩纹理坐标
*/
private static final float[] mEyeMaskTextureVertices = new float[] {
0.102757f, 0.465517f,
0.175439f, 0.301724f,
0.370927f, 0.310345f,
0.446115f, 0.603448f,
0.353383f, 0.732759f,
0.197995f, 0.689655f,
0.566416f, 0.629310f,
0.659148f, 0.336207f,
0.802005f, 0.318966f,
0.884712f, 0.465517f,
0.812030f, 0.681034f,
0.681704f, 0.750023f,
0.273183f, 0.241379f,
0.275689f, 0.758620f,
0.721805f, 0.275862f,
0.739348f, 0.758621f,
};
眼睛部分的三角剖分索引如下:
/**
* 眼睛部分索引
*/
private static final short[] mEyeIndices = new short[] {
0, 5, 1,
1, 5, 12,
12, 5, 13,
12, 13, 4,
12, 4, 2,
2, 4, 3,
6, 7, 11,
7, 11, 14,
14, 11, 15,
14, 15, 10,
14, 10, 8,
8, 10, 9
};
同时,我们要取得某个人脸的眼睛的顶点坐标:
/**
* 取得亮眼需要的顶点坐标
* @param vertexPoints
* @param faceIndex
*/
public synchronized void getBrightEyeVertices(float[] vertexPoints, int faceIndex) {
if (vertexPoints == null || vertexPoints.length < 32
|| faceIndex >= mFaceArrays.size() || mFaceArrays.get(faceIndex) == null) {
return;
}
// 眼睛边沿部分 index = 0 ~ 11
for (int i = 52; i < 64; i++) {
vertexPoints[(i - 52) * 2] = mFaceArrays.get(faceIndex).vertexPoints[i * 2];
vertexPoints[(i - 52) * 2 + 1] = mFaceArrays.get(faceIndex).vertexPoints[i * 2 + 1];
}
vertexPoints[12 * 2] = mFaceArrays.get(faceIndex).vertexPoints[72 * 2];
vertexPoints[12 * 2 + 1] = mFaceArrays.get(faceIndex).vertexPoints[72 * 2 + 1];
vertexPoints[13 * 2] = mFaceArrays.get(faceIndex).vertexPoints[73 * 2];
vertexPoints[13 * 2 + 1] = mFaceArrays.get(faceIndex).vertexPoints[73 * 2 + 1];
vertexPoints[14 * 2] = mFaceArrays.get(faceIndex).vertexPoints[75 * 2];
vertexPoints[14 * 2 + 1] = mFaceArrays.get(faceIndex).vertexPoints[75 * 2 + 1];
vertexPoints[15 * 2] = mFaceArrays.get(faceIndex).vertexPoints[76 * 2];
vertexPoints[15 * 2 + 1] = mFaceArrays.get(faceIndex).vertexPoints[76 * 2 + 1];
}
至此,我们准备好了需要绘制的遮罩纹理、遮罩纹理坐标、图像顶点坐标、眼睛部分的索引。所有数据都准备好了。我们就可以用这些数据进行亮眼处理了。绘制阶段,我们只需要将对应的遮罩纹理坐标传给shader,使用glDrawElements绘制三角形即可。
单一亮眼处理的完整shader如下:
// 亮眼处理
precision highp float;
varying vec2 textureCoordinate;
varying vec2 maskCoordinate;
uniform sampler2D inputTexture; // 输入图像纹理
uniform sampler2D blurTexture; // 经过高斯模糊处理的图像纹理
uniform sampler2D maskTexture; // 眼睛遮罩图像纹理
uniform float strength; // 明亮程度
uniform int enableProcess; // 是否允许亮眼,没有人脸时不需要亮眼处理
void main()
{
vec4 sourceColor = texture2D(inputTexture, textureCoordinate);
vec4 maskColor = texture2D(maskTexture, maskCoordinate);
vec4 color = sourceColor;
if (enableProcess == 1) {
// 如果遮罩纹理存在
if (maskColor.r > 0.01) {
// 高斯模糊的图像颜色值
vec4 blurColor = texture2D(blurTexture, textureCoordinate);
// 统计颜色
vec3 sumColor = vec3(0.0, 0.0, 0.0);
// 将RGB颜色差值放大。突出眼睛明亮部分
sumColor = clamp((sourceColor.rgb - blurColor.rgb) * 3.0, 0.0, 1.0);
sumColor = max(sourceColor.rgb, sumColor);
// 用原图和最终得到的明亮部分进行线性混合处理
color = mix(sourceColor, vec4(sumColor, 1.0), strength * maskColor.r);
}
}
gl_FragColor = color;
}
美牙
跟前面的亮眼处理类似,都需要遮罩只对嘴巴部分进行映射处理。牙齿美白过程则跟肤色调节处理一样,通过颜色查找表进行映射处理。我们首先要得到嘴巴的遮罩纹理,并对其进行三角剖分,入下图所示:
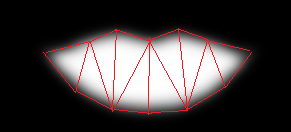
对应的人脸关键点三角剖分以及索引标号0~11:
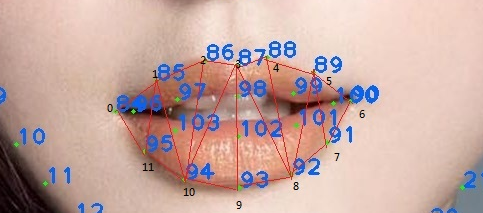
由此,我们可以得到嘴唇遮罩纹理坐标:
/**
* 美牙遮罩纹理坐标
*/
private static final float[] mTeethMaskTextureVertices = new float[] {
0.154639f, 0.378788f,
0.295533f, 0.287879f,
0.398625f, 0.196970f,
0.512027f, 0.287879f,
0.611684f, 0.212121f,
0.728523f, 0.287879f,
0.872852f, 0.378788f,
0.742268f, 0.704546f,
0.639176f, 0.848485f,
0.522337f, 0.636364f,
0.398625f, 0.833333f,
0.240550f, 0.651515f,
};
美牙所需要的索引:
/**
* 美牙索引
*/
private static final short[] mTeethIndices = new short[] {
0, 11, 1,
1, 11, 10,
1, 10, 2,
2, 10, 3,
3, 10, 9,
3, 9, 8,
3, 8, 4,
4, 8, 5,
5, 8, 7,
5, 7, 6,
};
以及某个人脸上嘴巴顶点的坐标:
/**
* 取得美牙需要的顶点坐标,嘴巴周围12个顶点
* @param vertexPoints
* @param faceIndex
*/
public synchronized void getBeautyTeethVertices(float[] vertexPoints, int faceIndex) {
if (vertexPoints == null || vertexPoints.length < 24
|| faceIndex >= mFaceArrays.size() || mFaceArrays.get(faceIndex) == null) {
return;
}
for (int i = 84; i < 96; i++) {
vertexPoints[(i - 84) * 2] = mFaceArrays.get(faceIndex).vertexPoints[i * 2];
vertexPoints[(i - 84) * 2 + 1] = mFaceArrays.get(faceIndex).vertexPoints[i * 2 + 1];
}
}
在得到了遮罩纹理坐标、绘制需要的索引、人脸嘴巴顶点坐标后,我们就可以做美牙处理了。由于牙齿的颜色比较单一,整体都是白偏黄。因此颜色查找表可以用 64 x 64大小。shader代码如下:
vec4 maskColor = texture2D(maskTexture, maskCoordinate.xy);
if (maskColor.r > 0.001) {
mediump float blueColor = sourceColor.b * 15.0;
vec2 quad1;
vec2 quad2;
quad1.y = floor(floor(blueColor) * 0.25);
quad1.x = floor(blueColor) - (quad1.y * 4.0);
quad2.y = floor(ceil(blueColor) * 0.25);
quad2.x = ceil(blueColor) - (quad2.y * 4.0);
vec2 texPos1;
vec2 texPos2;
texPos1.x = (quad1.x * 0.25) + 0.0078125 + (0.234375 * sourceColor.r);
texPos1.y = (quad1.y * 0.25) + 0.0078125 + (0.234375 * sourceColor.g);
texPos2.x = (quad2.x * 0.25) + 0.0078125 + (0.234375 * sourceColor.r);
texPos2.y = (quad2.y * 0.25) + 0.0078125 + (0.234375 * sourceColor.g);
lowp vec3 newColor1 = texture2D(teethLookupTexture, texPos1).rgb;
lowp vec3 newColor2 = texture2D(teethLookupTexture, texPos2).rgb;
lowp vec3 newColor = mix(newColor1, newColor2, fract(blueColor));
color = vec4(mix(sourceColor.rgb, newColor, teethStrength * maskColor.r), 1.0);
}
法令纹理、卧蚕、眼袋处理这些由于没有遮罩纹理,这里就不再介绍了。处理思路跟亮眼差不多,都是找到颜色差之后进行颜色差消除、突出颜色差等处理实现。
这部分本人将其统称为人脸美化滤镜,可以参考本项目中的GLImageBeautyFaceFilter的实现。这里为了方便,将整个shader集中起来,利用不同的processType进行分类,shader如下:
vertex_beauty_face.glsl:
attribute vec4 aPosition; // 图像顶点坐标
attribute vec4 aTextureCoord; // 遮罩纹理坐标,这里是复用了原来的图像纹理坐标
varying vec2 textureCoordinate;
varying vec2 maskCoordinate;
void main() {
gl_Position = aPosition;
maskCoordinate = aTextureCoord.xy;
// 用顶点坐标来处理纹理坐标
textureCoordinate = aPosition.xy * 0.5 + 0.5;
}
fragment_beauty_face.glsl:
// 人脸美化处理
precision highp float;
varying vec2 textureCoordinate;
varying vec2 maskCoordinate;
uniform sampler2D inputTexture; // 输入图像纹理
uniform sampler2D blurTexture; // 经过高斯模糊处理的图像纹理
uniform sampler2D blurTexture2; // 经过高斯模糊处理的图像纹理2
uniform sampler2D maskTexture; // 遮罩图像纹理
uniform sampler2D teethLookupTexture; // 美牙的lookup table 纹理
uniform float brightEyeStrength; // 亮眼程度
uniform float teethStrength; // 美牙程度
uniform float nasolabialStrength; // 法令纹处理程度
uniform float furrowStrength; // 卧蚕处理程度
uniform float eyeBagStrength; // 眼袋处理程度
uniform int processType; // 处理类型, 1表示亮眼处理,2表示美牙处理,3表示消除法令纹,4表示消除卧蚕眼袋,其他类型则直接绘制原图
void main()
{
vec4 sourceColor = texture2D(inputTexture, textureCoordinate);
vec4 color = sourceColor;
if (processType == 1) { // 亮眼处理
// 如果遮罩纹理存在
vec4 maskColor = texture2D(maskTexture, maskCoordinate);
if (maskColor.r > 0.01) {
// 高斯模糊的图像颜色值
vec4 blurColor = texture2D(blurTexture2, textureCoordinate);
// 统计颜色
vec3 sumColor = vec3(0.0, 0.0, 0.0);
// 将RGB颜色差值放大。突出眼睛明亮部分
sumColor = clamp((sourceColor.rgb - blurColor.rgb) * 3.3, 0.0, 1.0);
sumColor = max(sourceColor.rgb, sumColor);
// 用原图和最终得到的明亮部分进行线性混合处理
color = mix(sourceColor, vec4(sumColor, 1.0), brightEyeStrength * maskColor.r);
}
} else if (processType == 2) { // 美牙处理
vec4 maskColor = texture2D(maskTexture, maskCoordinate.xy);
if (maskColor.r > 0.001) {
mediump float blueColor = sourceColor.b * 15.0;
vec2 quad1;
vec2 quad2;
quad1.y = floor(floor(blueColor) * 0.25);
quad1.x = floor(blueColor) - (quad1.y * 4.0);
quad2.y = floor(ceil(blueColor) * 0.25);
quad2.x = ceil(blueColor) - (quad2.y * 4.0);
vec2 texPos1;
vec2 texPos2;
texPos1.x = (quad1.x * 0.25) + 0.0078125 + (0.234375 * sourceColor.r);
texPos1.y = (quad1.y * 0.25) + 0.0078125 + (0.234375 * sourceColor.g);
texPos2.x = (quad2.x * 0.25) + 0.0078125 + (0.234375 * sourceColor.r);
texPos2.y = (quad2.y * 0.25) + 0.0078125 + (0.234375 * sourceColor.g);
lowp vec3 newColor1 = texture2D(teethLookupTexture, texPos1).rgb;
lowp vec3 newColor2 = texture2D(teethLookupTexture, texPos2).rgb;
lowp vec3 newColor = mix(newColor1, newColor2, fract(blueColor));
color = vec4(mix(sourceColor.rgb, newColor, teethStrength * maskColor.r), 1.0);
}
} else if (processType == 3) { // 消除法令纹
vec3 maskColor = texture2D(maskTexture, maskCoordinate.xy).rgb;
// 去除法令纹原理,用两张不同程度的高斯模糊图像差值比较,得到鼻唇沟附近的颜色差值比较,配合法令纹遮罩图像去除法令纹
if (maskColor.r > 0.01) {
vec3 blurColor1 = texture2D(blurTexture, textureCoordinate.xy).rgb;
vec3 blurColor2 = texture2D(blurTexture2, textureCoordinate.xy).rgb;
vec3 diffColor = clamp((blurColor2 - blurColor1) * 1.8 + 0.1 * blurColor2, 0.0, 0.5);
color = vec4(min(sourceColor.rgb + diffColor, 1.0), 1.0) * nasolabialStrength * maskColor.r;
}
} else if (processType == 4) {
vec4 maskColor = texture2D(maskTexture, maskCoordinate.xy);
if (maskColor.r > 0.005) { // 消除眼袋,用红色表示
vec3 blurColor1 = texture2D(blurTexture, textureCoordinate.xy).rgb;
vec3 blurColor2 = texture2D(blurTexture2, textureCoordinate.xy).rgb;
// 放大差值,用输入的图像加上差值,消除差值所带来的影响
vec3 diffColor = clamp((blurColor2 - blurColor1) * 2.0 + 0.05 * blurColor2, 0.0, 0.3);
color.rgb = mix(color.rgb, min(color.rgb + diffColor, 1.0), eyeBagStrength * maskColor.r);
} else if (maskColor.g > 0.005) { // 消除卧蚕,蓝色部分为卧蚕遮罩
color.rgb = mix(color.rgb, pow(color.rgb, vec3(0.5, 0.5, 0.5)), furrowStrength * maskColor.g);
}
}
gl_FragColor = color;
}
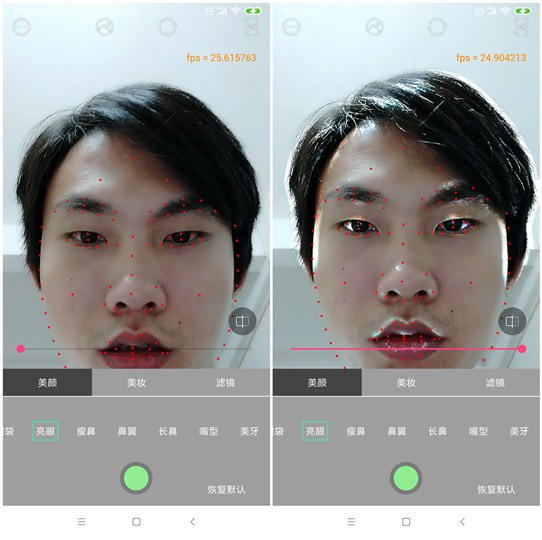
亮眼、美牙的效果如下:
。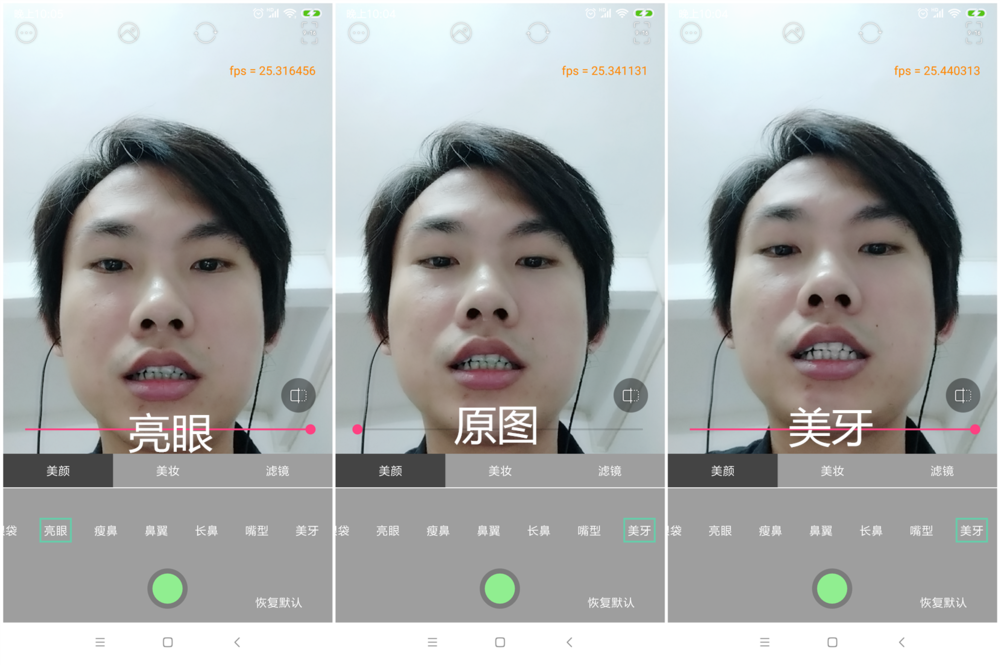
备注:这有由于遮罩用的是白色的,导致了嘴唇部分也变白了一点,这里你可以改成你需要遮罩纹理素材。
三、调节像素偏移
调节像素偏移主要是用来处理瘦脸大眼、调节下巴等处理。前面我们做了图像三角剖分和重建工作,得到了整张人脸的索引。接下来我们只需要得到对应的顶点坐标、纹理坐标,更新顶点坐标缓冲、纹理坐标缓冲即可。这里需要根据是否有人脸来做顶点判断。其中updateCartesianVertices()方法是用来传递人脸关键点在图像中的实际笛卡尔坐标的,这里主要是为了方便做像素偏移计算:
if (LandmarkEngine.getInstance().hasFace()) {
LandmarkEngine.getInstance().updateFaceAdjustPoints(mVertices, mTextureVertices, 0);
mVertexBuffer.clear();
mVertexBuffer.put(mVertices);
mVertexBuffer.position(0);
mTextureBuffer.clear();
mTextureBuffer.put(mTextureVertices);
mTextureBuffer.position(0);
updateCartesianVertices();
mIndexBuffer.clear();
mIndexBuffer.put(FaceImageIndices);
mIndexBuffer.position(0);
mIndexLength = mIndexBuffer.capacity();
setInteger(mEnableReshapeHandle, 1);
} else { // 没有人脸时索引变回默认的6个
mIndexBuffer.clear();
mIndexBuffer.put(TextureRotationUtils.Indices);
mIndexBuffer.position(0);
mIndexLength = 6;
setInteger(mEnableReshapeHandle, 0);
}
接下来,我们就可以在fragment shader 中进行像素调节处理了。关于像素偏移调节,可以参考下面这篇文章,写得比较详细:
在OpenGL中利用shader进行实时瘦脸大眼等脸型微调
脸型调节的fragment shader 如下所示(截止本文章位置,部分脸型调节功能还没完成):
precision mediump float;
varying vec2 textureCoordinate;
uniform sampler2D inputTexture;
// 图像笛卡尔坐标系的关键点,也就是纹理坐标乘以宽高得到
uniform vec2 cartesianPoints[106];
#define INDEX_FACE_LIFT 0 // 瘦脸
#define INDEX_FACE_SHAVE 1 // 削脸
#define INDEX_FACE_NARROW 2 // 小脸
#define INDEX_CHIN 3 // 下巴
#define INDEX_FOREHEAD 4 // 额头
#define INDEX_EYE_ENLARGE 5 // 大眼
#define INDEX_EYE_DISTANCE 6 // 眼距
#define INDEX_EYE_CORNER 7 // 眼角
#define INDEX_NOSE_THIN 8 // 瘦鼻
#define INDEX_ALAE 9 // 鼻翼
#define INDEX_PROBOSCIS 10 // 长鼻
#define INDEX_MOUTH 11 // 嘴型
#define INDEX_SIZE 12 // 索引大小
// 美型程度参数列表
uniform float reshapeIntensity[INDEX_SIZE];
// 纹理宽度
uniform int textureWidth;
// 纹理高度
uniform int textureHeight;
// 是否允许美型处理,存在人脸时为1,没有人脸时为0
uniform int enableReshape;
// 曲线形变处理
vec2 curveWarp(vec2 textureCoord, vec2 originPosition, vec2 targetPosition, float radius)
{
vec2 offset = vec2(0.0);
vec2 result = vec2(0.0);
vec2 direction = targetPosition - originPosition;
float infect = distance(textureCoord, originPosition)/radius;
infect = 1.0 - infect;
infect = clamp(infect, 0.0, 1.0);
offset = direction * infect;
result = textureCoord - offset;
return result;
}
// 大眼处理
vec2 enlargeEye(vec2 currentCoordinate, vec2 circleCenter, float radius, float intensity)
{
float currentDistance = distance(currentCoordinate, circleCenter);
float weight = currentDistance / radius;
weight = 1.0 - intensity * (1.0 - weight * weight);
weight = clamp(weight, 0.0, 1.0);
currentCoordinate = circleCenter + (currentCoordinate - circleCenter) * weight;
return currentCoordinate;
}
// 瘦脸
vec2 faceLift(vec2 currentCoordinate, float faceLength)
{
vec2 coordinate = currentCoordinate;
vec2 currentPoint = vec2(0.0);
vec2 destPoint = vec2(0.0);
float faceLiftScale = reshapeIntensity[INDEX_FACE_LIFT] * 0.05;
float radius = faceLength;
currentPoint = cartesianPoints[3];
destPoint = currentPoint + (cartesianPoints[44] - currentPoint) * faceLiftScale;
coordinate = curveWarp(coordinate, currentPoint, destPoint, radius);
currentPoint = cartesianPoints[29];
destPoint = currentPoint + (cartesianPoints[44] - currentPoint) * faceLiftScale;
coordinate = curveWarp(coordinate, currentPoint, destPoint, radius);
radius = faceLength * 0.8;
currentPoint = cartesianPoints[10];
destPoint = currentPoint + (cartesianPoints[46] - currentPoint) * (faceLiftScale * 0.6);
coordinate = curveWarp(coordinate, currentPoint, destPoint, radius);
currentPoint = cartesianPoints[22];
destPoint = currentPoint + (cartesianPoints[46] - currentPoint) * (faceLiftScale * 0.6);
coordinate = curveWarp(coordinate, currentPoint, destPoint, radius);
return coordinate;
}
// 削脸
vec2 faceShave(vec2 currentCoordinate, float faceLength)
{
vec2 coordinate = currentCoordinate;
vec2 currentPoint = vec2(0.0);
vec2 destPoint = vec2(0.0);
float faceShaveScale = reshapeIntensity[INDEX_FACE_SHAVE] * 0.12;
float radius = faceLength * 1.0;
// 下巴中心
vec2 chinCenter = (cartesianPoints[16] + cartesianPoints[93]) * 0.5;
currentPoint = cartesianPoints[13];
destPoint = currentPoint + (chinCenter - currentPoint) * faceShaveScale;
coordinate = curveWarp(coordinate, currentPoint, destPoint, radius);
currentPoint = cartesianPoints[19];
destPoint = currentPoint + (chinCenter - currentPoint) * faceShaveScale;
coordinate = curveWarp(coordinate, currentPoint, destPoint, radius);
return coordinate;
}
// 处理下巴
vec2 chinChange(vec2 currentCoordinate, float faceLength)
{
vec2 coordinate = currentCoordinate;
vec2 currentPoint = vec2(0.0);
vec2 destPoint = vec2(0.0);
float chinScale = reshapeIntensity[INDEX_CHIN] * 0.08;
float radius = faceLength * 1.25;
currentPoint = cartesianPoints[16];
destPoint = currentPoint + (cartesianPoints[46] - currentPoint) * chinScale;
coordinate = curveWarp(coordinate, currentPoint, destPoint, radius);
return coordinate;
}
void main()
{
vec2 coordinate = textureCoordinate.xy;
// 禁用美型处理或者鼻子不在图像中,则直接绘制
if (enableReshape == 0 || (cartesianPoints[46].x / float(textureWidth) <= 0.03)
|| (cartesianPoints[46].y / float(textureHeight)) <= 0.03) {
gl_FragColor = texture2D(inputTexture, coordinate);
return;
}
// 将坐标转成图像大小,这里是为了方便计算
coordinate = textureCoordinate * vec2(float(textureWidth), float(textureHeight));
float eyeDistance = distance(cartesianPoints[74], cartesianPoints[77]); // 两个瞳孔的距离
// 瘦脸
coordinate = faceLift(coordinate, eyeDistance);
// 削脸
coordinate = faceShave(coordinate, eyeDistance);
// 小脸 TODO 眼睛到下巴图像线性缩小
// 下巴
coordinate = chinChange(coordinate, eyeDistance);
// 额头
// 大眼
float eyeEnlarge = reshapeIntensity[INDEX_EYE_ENLARGE] * 0.12; // 放大倍数
if (eyeEnlarge > 0.0) {
float radius = eyeDistance * 0.33; // 眼睛放大半径
coordinate = enlargeEye(coordinate, cartesianPoints[74] + (cartesianPoints[77] - cartesianPoints[74]) * 0.05, radius, eyeEnlarge);
coordinate = enlargeEye(coordinate, cartesianPoints[77] + (cartesianPoints[74] - cartesianPoints[77]) * 0.05, radius, eyeEnlarge);
}
// 眼距
// 眼角
// 瘦鼻
// 鼻翼
// 长鼻
// 嘴型
// 转变回原来的纹理坐标系
coordinate = coordinate / vec2(float(textureWidth), float(textureHeight));
// 输出图像
gl_FragColor = texture2D(inputTexture, coordinate);
}
具体的实现,可参考GLImageFaceReshapeFilter的实现。部分脸型调节效果如下:
图中可以看到,调节之后,离关键点的为有一定的偏移。这就是瘦脸大眼等脸型调节处理过程。实现起来也没什么难度。
详细过程,可以参考本人的开源项目:
CainCamera
来源:oschina
链接:https://my.oschina.net/u/2621781/blog/3097216