【Ngnix】
1、首先下载Ngnix安装包
wget https://nginx.org/download/nginx-1.14.0.tar.gz
· 如果没有安装wget 可以首先执行brew install wget 或者 liunx下 yum install wget

2、接下来我们解压
依次执行
tar -xzvf nginx-1.14.0.tar.gz
cd ngnix-1.14.0
./configure
--prefix=/usr/local/nginx
--sbin-path=/usr/local/nginx/bin/nginx
--with-cc-opt='-I/usr/local/opt/pcre/include
-I/usr/local/opt/openssl/include'
--with-ld-opt='-L/usr/local/opt/pcre/lib -L/usr/local/opt/openssl/lib'
--conf-path=/usr/local/etc/nginx/nginx.conf
--pid-path=/usr/local/var/run/nginx.pid
--lock-path=/usr/local/var/run/nginx.lock
--http-client-body-temp-path=/usr/local/var/run/nginx/client_body_temp
--http-proxy-temp-path=/usr/local/var/run/nginx/proxy_temp
--http-fastcgi-temp-path=/usr/local/var/run/nginx/fastcgi_temp
--http-uwsgi-temp-path=/usr/local/var/run/nginx/uwsgi_temp
--http-scgi-temp-path=/usr/local/var/run/nginx/scgi_temp
--http-log-path=/usr/local/var/log/nginx/access.log
--error-log-path=/usr/local/var/log/nginx/error.log
--with-debug
--with-http_addition_module
--with-http_auth_request_module
--with-http_dav_module
--with-http_degradation_module
--with-http_flv_module
--with-http_gunzip_module
--with-http_gzip_static_module
--with-http_mp4_module
--with-http_random_index_module
--with-http_realip_module
--with-http_secure_link_module
--with-http_slice_module
--with-http_ssl_module
--with-http_stub_status_module
--with-http_sub_module
--with-http_v2_module
--with-ipv6
--with-mail
--with-mail_ssl_module
--with-pcre --with-pcre-jit
--with-stream
--with-stream_realip_module
--with-stream_ssl_module
--with-stream_ssl_preread_module
make
make install查看 nginx 版本
执行 :nginx -v
![]()
启动:
cd到nginx 目录 执行:sudo nginx
重启:
cd到nginx目录 执行: sudo ./nginx -s reload
停止 :
ps -ef|grep nginx 找到master对应的进程号6015
kill -quit6015 (从容的停止,即不会立刻停止)
Kill -term6015 (立刻停止)
Kill -int 6015 (和上面一样,也是立刻停止)
【Apache】
1、首先下载apache安装包、apr、apr-util
- wget http://mirrors.tuna.tsinghua.edu.cn/apache//httpd/httpd-2.4.41.tar.gz
- wget http://mirror.bit.edu.cn/apache//apr/apr-1.7.0.tar.gz
- wget http://mirror.bit.edu.cn/apache//apr/apr-util-1.6.1.tar.gz
2、解压三者
tar -xzvf httpd-2.4.41.tar.gz
tar -xzvf apr-1.7.0.tar.gz
tar -xzvf apr-util-1.6.1.tar.gz
3、将apr 、apr-util 移动到httpd目录下的srclib目录
mv ./apr-1.7.0 ./httpd-2.4.41/srclib/apr
mv ./apr-util-1.6.1.tar.gz ./httpd-2.4.41/srclib/apr-util

4、编译安装
cd <httpd_source_path> --这里填写httpd的下载目录
autoconf --force
./configure

configure 完成
make && make install

完成
【mysql】
1、下载mysql 安装包
wget http://ftp.ntu.edu.tw/pub/MySQL/Downloads/MySQL-5.7/mysql-boost-5.7.17.tar.gz
2、解压
tar -xzvf mysql-boost-5.7.17.tar.gz
3、进入mysql目录
cd ../mysql-5.7.17
4、使用cmake安装
cmake -DCMAKE_INSTALL_PREFIX=/usr/local/mysql -DMYSQL_UNIX_ADDR=/tmp/mysql.sock -DDEFAULT_CHARSET=utf8 -DDEFAULT_COLLATION=utf8_general_ci -DWITH_INNOBASE_STORAGE_ENGINE=1-DWITH_ARCHIVE_STORAGE_ENGINE=1 -DWITH_BLACKHOLE_STORAGE_ENGINE=1 -DWITH_PARTITION_STORAGE_ENGINE=1 -DENABLED_LOCAL_INFILE=1 -DMYSQL_USER=_mysql -DMYSQL_TCP_PORT=3306 -DMYSQL_DATADIR=/usr/local/mysql/db_data -DDOWNLOAD_BOOST=1 -DWITH_BOOST=/Users/xiechunping/Softwares/mysql-5.7.17/boost
5、配置数据库目录权限
chown -R _mysql:_mysql /usr/local/mysql/db_data
6、编译安装
make&&make install
7、安装数据库启动
cd /usr/local/mysql
bin/mysql_install_db --user=mysql --datadir=/usr/local/mysql/db_data
support-files/mysql.server start
8、数据库关闭
support-files/mysql.server stop
【PHP】
1、下载安装包
wget -c http://mirrors.sohu.com/php/php-7.1.8.tar.gz2、解压并编译
tar -zxvf php-7.1.8.tar.gz

./configure --prefix=/usr/local/php/7.1.8 \
--with-config-file-path=/usr/local/php/7.1.8/etc \
--with-config-file-scan-dir=/usr/local/php/7.1.8/etc/conf.d \
--with-apxs2=/usr/sbin/apxs \
--enable-fpm \
--with-fpm-user=www \
--with-fpm-group=www \
--with-mysqli \
--with-pdo-mysql \
--with-iconv-dir \
--with-freetype-dir \
--with-zlib \
--with-jpeg-dir \
--with-png-dir \
--with-libxml-dir=/usr/bin/xml2-config \
--enable-xml \
--disable-rpath \
--enable-bcmath \
--enable-shmop \
--enable-sysvsem \
--enable-inline-optimization \
--with-curl \
--enable-mbregex \
--enable-mbstring \
--with-mcrypt \
--enable-ftp \
--with-gd \
--enable-gd-native-ttf \
--with-openssl \
--with-mhash \
--enable-pcntl \
--enable-sockets \
--with-xmlrpc \
--enable-zip \
--enable-soap \
--without-pear \
--with-gettext \
--disable-fileinfo \
--enable-maintainer-zts \
--enable-mysqlnd
3、更新openssl
brew install openssl --with-openssl=/usr/local/Cellar/openssl@1.1/1.1.0e4、安装gettext
brew install gettext5、libiconv问题,报错如下:
checking for iconv... no
checking for libiconv... no
configure: error: Please specify the install prefix of iconv with --with-iconv=<DIR>
解决方案:
安装 libiconv (字符编码转换库)
网站地址: http://www.gnu.org/software/libiconv/
当前版本: https://ftp.gnu.org/pub/gnu/libiconv/libiconv-1.15.tar.gz
$ wget [https://ftp.gnu.org/pub/gnu/libiconv/libiconv-1.15.tar.gz
$ tar zxvf libiconv-1.15.tar.gz
$ cd libiconv-1.15
$ ./configure --prefix=/usr/local/lib/libiconv
$ make
$ sudo make install
【swoole 扩展安装】
1、下载swoole 扩展包
git clone http://git.oschina.net/swoole/swoole
2、执行phpize
phpize

3、执行configure
./configure

4、 编译安装
sudo make && make install

5、 编译php.ini扩展目录,添加swoole.so

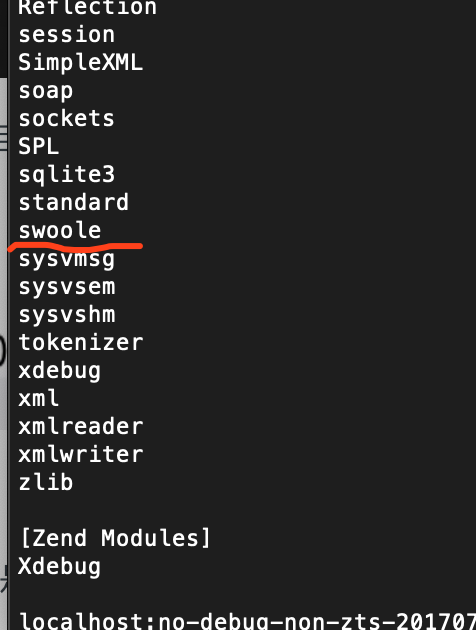
6、执行php -m 查看是否安装完成

ok
【redis】
1、下载redis安装包
wget https://github.com/phpredis/phpredis/archive/develop.zip
2、解压zip,执行phpize
phpize

3、执行configure
./configure
![]()
4、执行编译
sudo make && make install

5、修改 php.ini 文件添加so 文件路径

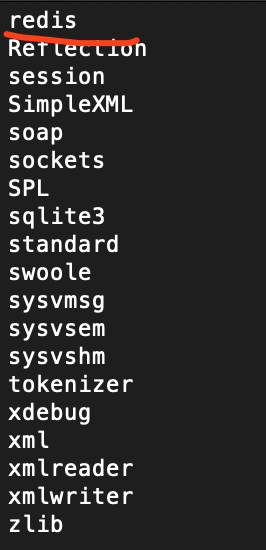
6、测试扩展是否启用
php -m

完成!