1,在安装了Node.js后使用其中自带的包管理工具npm。或者使用淘宝镜像cnpm(这里不做说明)
1-1,下载vue3.0脚手架(如果之前装vue-cli3x之前的版本,先卸载 npm uninstall vue-cli -g)
npm install -g @vue/cli
1-2,下载sass
npm install node-sass --save-dev
npm install sass-loader --save-dev
1-3,使用vue命令创建my-project项目
vue create my-project(vue init webpack my-project)
1-4,进入项目
cd my-project
1-5,启动项目
npm run serve启动项目
2,目录图片如下在组件componets下新建组件(可以建个文件夹放一个系列组件,便于项目管理)

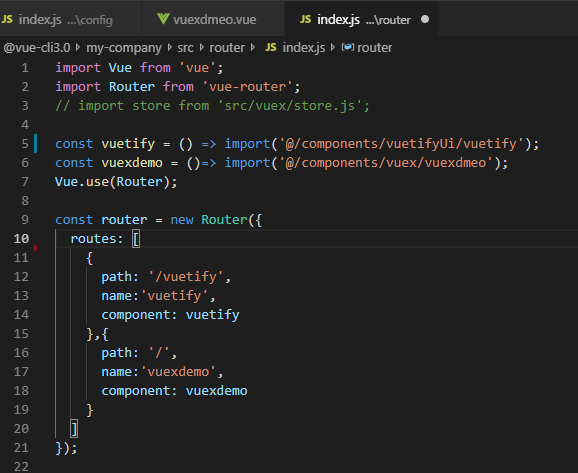
2-1,在路由中引入组件(没有安装router记得install下,判断方法:可以在package.json文件下
dependencies是否含有vue-router,没有的话执行 npm install vue-router -S;或者直接在依赖写
"vue-router": "^3.0.6" 然后npm install),
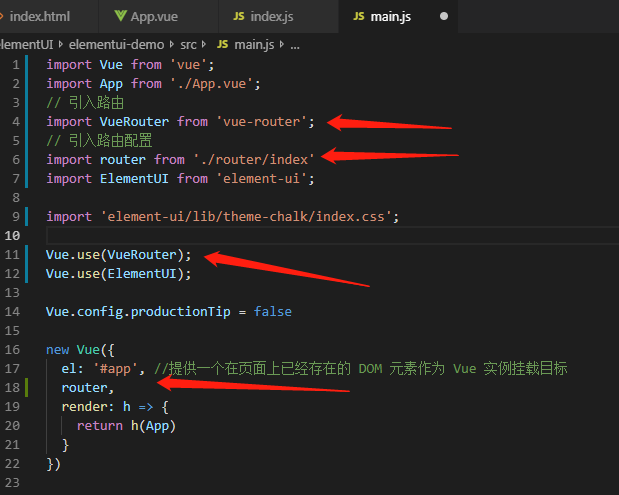
使用:在路由文件中 实例化配置路由后暴露出去 export default router。最后在入口文件main.js里注入路由vue.use(vue-router),然后将导入的router配置挂载到实例的vue中。
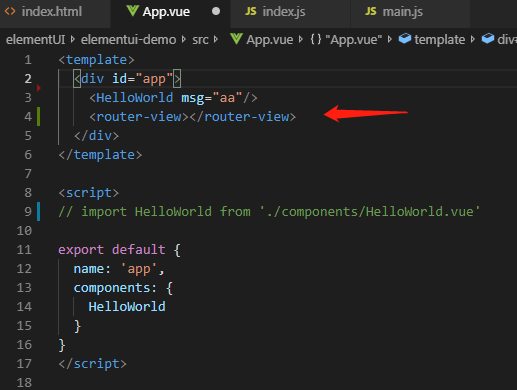
最后在组件中
设置路由出口, 路由匹配到的组件将渲染的位置<router-view></router-view>


2-3,然后就可以在你的组件里声明下css类型 <style lang="scss" type="text/css" scoped> 就可以愉快的使用sass了
2-4,cnpm install axios --save-dev 安装请求模块
|
1
2
|
入口文件main.js<br>
import
Axios from
'axios'
Vue.prototype.$axios = Axios
//挂载到vue上<br><br>组件使用<br>this.axios({method, url, data, res})
|
2-5,扩展说明,以前build下的配置,现在放到./node_modules\@vue\cli-service\lib
3,这里罗列下常用的sass
3-1,
<style lang="scss" type="text/css" scoped>
/* 导入文件是 .sass或者.scss会被合并进来,是.css则是引用
 @import url('common/css/reset.css'); */
$vw_base: 375;
$pink: pink !default;
$pink: blue; //下面的层级高
@function vw($px) {
    @return ($px / 375) * 100vw;
}
.center-left{
    width:vw(375/2);
    background: $pink;
    $color: red;
    color: $color;
}
.flex{
    display:flex;
    width: vw(50);
    // 子选择器嵌套
    .red{
        color: $pink;
    }
    // 属性嵌套
    border: {
        top: 5px solid green;
        bottom: 5px solid orange
    }
    // & 伪类嵌套 .flex:after{}
    &:after{
      content: ".";
      display: block;
      height: 0;
      clear: both;
      visibility: hidden;
    }
}
// 属性继承@extend
.btn {
    border: 1px solid $pink;
    padding: 6px 10px;
}
.btn-primary {
    background-color: #f36;
    @extend .btn;
}
// 混合指令通过@mixin来定义,@include来调用(参数若是没有传时,可以使用默认值)
@mixin div-border ($direct: right, $color: red){
    border-#{$direct}: 1px solid $color
}
.btn {
    @include div-border(top, yellow);   //border-top:1px solid yellow
    @include div-border()   //border-right:1px solid red
}

//占位符号 % color1并没有存在于基类,只是额外声明,不会产生代码,只有在@extend继承是才会编译成css
%color1{
    color: yellow
}
.color-tatal{
    @extend %color1;
}

// sass中的数组用空格或逗号作分隔符,length($color-arr):返回一个列表的长度值3。以下循环只写其中一位
// 关于加减乘除运算,单位要相同
// 插值#{}: 变量替换
$color-arr: red yellow, green;
$color-map: (h1:16px, h2:32px, h3:64px);
@each $color in $color-arr{ // .item-red{color:red}
    @warn "输出: #{$color}";   //@error, @debug
    .item-#{$color}{
        color: $color;
    }
}
@each $key, $value in $color-map {  //h1{font-size:16px;color:red}
    #{$key}{
        font-size: $value
    }
    @if $key == h1 {
        #{$key}{
            color: red
        }
    }
}
@for $i from 0 through 3 {  //.item-1{font-size:12px}
    @if $i != 0{
        .item.#{$i} {
            font-size: round($i* 12)/2; //四舍五入后除法运算
        }
    }
}

$types : 0;
$type-width : "10"+"px";    // “+”将两个字符连接
@while $types < 3 {     // while2{width:12px}
    .while-#{$types} {
        width : $type-width + $types;
    }
    $types : $types + 1;
}
// 函数
.test1 {
    content: unquote("'Hello Sass!'");  //删除函数前后单(双)引号 content:"Hello Sass"
}
.test2 {
    content:quote('Hello') + "Sass" //将字符创转成双引号
}
.test3{
    content: to-upper-case(aAa); //将字符串转大小,To-lower-case()小写
}
.test4{
    width : precentage(20px / 200px);   //将一个不带单位的数转换成百分比值
}
.test5{
    width: ceil(12.3)   //取整大于本身(13); floor取整小于本身; abs返回一个数的绝对值
}
.test6{
    width:random() *100px // 用来获取一个随机数
}
</style>
