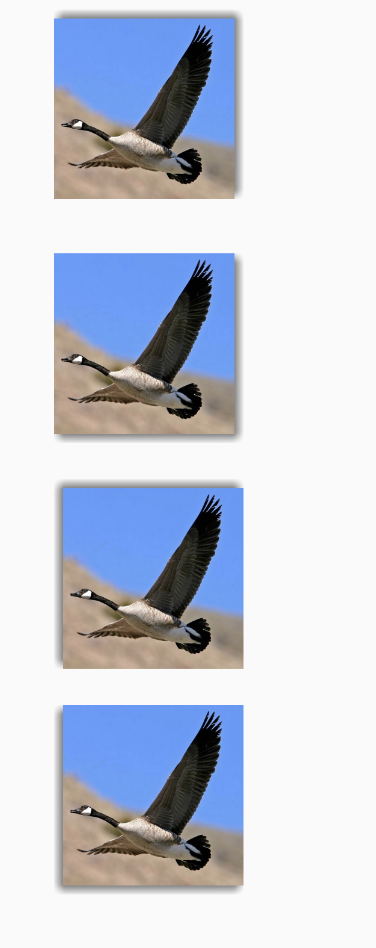
一、可行性分析
Android中可以使用CardView实现阴影效果,但是也有一些不足,比如不支持X,Y轴,此外不支持阴影颜色的修改。因此需要一款灵活性相对较高的布局来实现上述需求。

技术方面:
public void setShadowLayer(float radius, float dx, float dy, int color)
- radius:模糊半径,radius越大越模糊,越小越清晰,但是如果radius设置为0,则阴影消失不见
- dx:阴影的横向偏移距离,正值向右偏移,负值向左偏移
- dy:阴影的纵向偏移距离,正值向下偏移,负值向上偏移
- color: 绘制阴影的画笔颜色,即阴影的颜色(对图片阴影无效)
注意:这里有一点需要非常注意的是setShadowLayer只有文字绘制阴影支持硬件加速,其它都不支持硬件加速,所以为了方便起见,我们需要在自定义控件中禁用硬件加速
用法相对简单
       paint.setColor(Color.RED);
        paint.setStrokeWidth(2);
        paint.setAntiAlias(true);
        paint.setTextSize(50);
        paint.setShadowLayer(5, 15, 20, Color.GREEN);
        canvas.drawText("demo", 100, 100, paint);
        canvas.drawCircle(200, 200, 50, paint);
        canvas.drawBitmap(bitmap, null, new RectF(200, 300, 200 + bitmap.getWidth(), 300 + bitmap.getHeight()), paint);

综上,实现阴影效果其实是可行的。
二、实现阴影布局
实现代码如下:
public class ShadowLayout extends FrameLayout {

    private Paint mShadowPaint;
    private final float DEFAULT_SHADOW_EFFECT = 1;
    private int mShadowColor; //阴影颜色
    private int mBgColor;  //背景色
    private RectF mRect; //绘制区域
    private float mShadowX; //x方向偏移量,可以为负值
    private float mShadowY; //y方向偏移量,可以为负值
    private float mRadius = 1;  //阴影转角半径


    public ShadowLayout(Context context) {
        this(context, null);
    }

    public ShadowLayout(Context context, AttributeSet attrs) {
        this(context, attrs, 0);
    }

    public ShadowLayout(Context context, AttributeSet attrs, int defStyleAttr) {
        super(context, attrs, defStyleAttr);
        if (attrs == null) {
            return;
        }
        TypedArray a = context.obtainStyledAttributes(attrs, R.styleable.ShadowLayout);
        mShadowColor = a.getColor(R.styleable.ShadowLayout_shadow_color, 0x99333333);
        mBgColor = a.getColor(R.styleable.ShadowLayout_shadow_background_color, Color.WHITE);
        mRadius = a.getDimension(R.styleable.ShadowLayout_shadow_radius, 0);
        mShadowX = a.getDimension(R.styleable.ShadowLayout_shadow_x,0);
        mShadowY = a.getDimension(R.styleable.ShadowLayout_shadow_y,0);

        if(mShadowX==0 && mShadowY==0){
            mShadowX = mShadowY = DEFAULT_SHADOW_EFFECT;
        }
        a.recycle();
        init();
    }

    private void init() {
        mShadowPaint = new Paint(Paint.ANTI_ALIAS_FLAG);
        mShadowPaint.setColor(mBgColor);
        mShadowPaint.setStyle(Paint.Style.FILL);
        mShadowPaint.setAntiAlias(true);

        setWillNotDraw(false); //开启viewgroup 绘制模式

        setLayerType(LAYER_TYPE_SOFTWARE, null);

        int left = 0;
        int right = 0;
        if(mShadowX<0){
            left = (int) mShadowX*(-1);
        }else{
            right = (int) mShadowX;
        }
        int top = 0;
        int bottom = 0;
        if(mShadowY<0){
            top = (int) mShadowY* (-1);
        }else{
            bottom = (int) mShadowY;
        }
        setPadding(left,top,right,bottom);
    }

    @Override
    protected void onLayout(boolean changed, int left, int top, int right, int bottom) {
        super.onLayout(changed, left, top, right, bottom);

        int childCount = getChildCount();
        if(childCount==0) return;

        View view = getChildAt(0);

        //这里分为4种情况,此外,shadow的半径mRadius占一定的空间,根据情况增减
        if(mShadowY>=0 && mShadowX>=0) {
            mRect = new RectF(view.getX()-mRadius, view.getY()-mRadius,view.getX() + view.getWidth() - getPaddingRight()/2, view.getY() + view.getHeight() - getPaddingBottom()/2);
        }else if(mShadowY<0 && mShadowX<0){
            mRect = new RectF(view.getX()+getPaddingLeft()/2, view.getY()+getPaddingTop()/2, view.getX() + view.getWidth()+mRadius, view.getY() + view.getHeight()+mRadius);
        }else if(mShadowY>=0 && mShadowX<0){
            mRect = new RectF(view.getX()+getPaddingLeft()/2,view.getY()-mRadius, view.getX() + view.getWidth()+mRadius, view.getY() + view.getHeight()- getPaddingBottom()/2);
        }else if(mShadowY<0 && mShadowX>=0){
            mRect = new RectF(view.getX()-mRadius, view.getY()+getPaddingTop()/2, view.getX() + view.getWidth()-getPaddingRight()/2, view.getY() + view.getHeight()+mRadius);
        }
        mShadowPaint.setShadowLayer(mRadius, mShadowX, mShadowY, mShadowColor);
    }


    @Override
    public void addView(View child, int index, ViewGroup.LayoutParams params) {
        int childCount = getChildCount();

        if(childCount>1) throw new RuntimeException("child count > 1 ! ");
        super.addView(child, index, params);
    }

    @Override
    protected boolean addViewInLayout(View child, int index, ViewGroup.LayoutParams params) {
        int childCount = getChildCount();
        if(childCount>1) throw new RuntimeException("child count > 1 ! ");
        return super.addViewInLayout(child, index, params);
    }

    @Override
    protected void dispatchDraw(Canvas canvas) {
        if(mShadowPaint==null) {
            super.dispatchDraw(canvas);
            return;
        }
        canvas.drawRoundRect(mRect, mRadius, mRadius, mShadowPaint);
        //先绘制阴影,否则阴影可能被绘制到child上【参考水波纹效果】
        super.dispatchDraw(canvas);
    }
}
属性
 <declare-styleable name="ShadowLayout">
        <attr name="shadow_radius" format="dimension"/>
        <attr name="shadow_y" format="dimension"/>
        <attr name="shadow_x" format="dimension"/>
        <attr name="shadow_background_color" format="color|reference"/>
        <attr name="shadow_color" format="color|reference"/>
    </declare-styleable>
三、使用方式
<?xml version="1.0" encoding="utf-8"?>
<LinearLayout xmlns:android="http://schemas.android.com/apk/res/android"
    xmlns:app="http://schemas.android.com/apk/res-auto"
    xmlns:tools="http://schemas.android.com/tools"
    android:layout_width="match_parent"
    android:layout_height="match_parent"
    android:gravity="center"
    android:orientation="vertical"
    tools:context=".ShadowActivity">

    <LinearLayout
        android:layout_width="wrap_content"
        android:layout_height="wrap_content"
        android:orientation="horizontal">

        <com.cn.scrolllayout.view.ShadowLayout
            android:layout_width="wrap_content"
            android:layout_height="wrap_content"
            android:layout_gravity="center"
            android:layout_margin="20dp"
            app:shadow_radius="3dp"
            app:shadow_x="5dp"
            app:shadow_y="-5dp">

            <ImageView
                android:layout_width="100dp"
                android:layout_height="100dp"
                android:scaleType="centerCrop"
                android:src="@drawable/img_bird" />
        </com.cn.scrolllayout.view.ShadowLayout>

        <com.cn.scrolllayout.view.ShadowLayout
            android:layout_width="wrap_content"
            android:layout_height="wrap_content"
            android:layout_gravity="center"
            android:layout_margin="10dp"
            app:shadow_radius="3dp"
            app:shadow_x="5dp"
            app:shadow_y="5dp">

            <ImageView
                android:layout_width="100dp"
                android:layout_height="100dp"
                android:scaleType="centerCrop"
                android:src="@drawable/img_bird" />
        </com.cn.scrolllayout.view.ShadowLayout>
    </LinearLayout>


    <LinearLayout
        android:layout_width="wrap_content"
        android:layout_height="wrap_content"
        android:orientation="horizontal">

        <com.cn.scrolllayout.view.ShadowLayout
            android:layout_width="wrap_content"
            android:layout_height="wrap_content"
            android:layout_gravity="center"
            android:layout_margin="10dp"
            app:shadow_radius="3dp"
            app:shadow_x="-5dp"
            app:shadow_y="-5dp">

            <ImageView
                android:layout_width="100dp"
                android:layout_height="100dp"
                android:scaleType="centerCrop"
                android:src="@drawable/img_bird" />
        </com.cn.scrolllayout.view.ShadowLayout>

        <com.cn.scrolllayout.view.ShadowLayout
            android:layout_width="wrap_content"
            android:layout_height="wrap_content"
            android:layout_gravity="center"
            android:layout_margin="10dp"
            app:shadow_radius="3dp"
            app:shadow_x="-5dp"
            app:shadow_y="5dp">

            <ImageView
                android:layout_width="100dp"
                android:layout_height="100dp"
                android:scaleType="centerCrop"
                android:src="@drawable/img_bird" />
        </com.cn.scrolllayout.view.ShadowLayout>
    </LinearLayout>
</LinearLayout>
来源:oschina
链接:https://my.oschina.net/ososchina/blog/4358033