接着上一篇,openfst已经编译好。
首先,使用git clone下载kaldi的项目
git clone https://github.com/kaldi-asr/kaldi.git kaldi用4G网络会快很多
 1.
1.
这里有两种选择来使用BLAS,Intel® MKL and OpenBLAS.Intel® MKL is made by Intel and is optimised for their processors.It isn't free, but you can get Community Licensing for Intel® Performance Libraries or as part of Intel product suite if you qualify as students, educators, academic researchers, and open source contributors. OpenBLAS is free alternative with similar performance.(大致是说MKL不是免费的,但如果你是学生、教育工作者、搞学术研究的可以用社区版)(--要验证很麻烦--)所以openBLAS是免费的可替代的,有着相似功能。
-
If using Intel® MKL, install it.
-
If using OpenBLAS, download the binary packages.
(kaldi)/tools$ curl -L -O http://sourceforge.net/projects/openblas/files/v0.2.14/OpenBLAS-v0.2.14-Win64-int32.zip
 (kaldi)/tools$ curl -L -O http://sourceforge.net/projects/openblas/files/v0.2.14/mingw64_dll.zip
 (kaldi)/tools$ unzip OpenBLAS-v0.2.14-Win64-int32.zip
 (kaldi)/tools$ unzip mingw64_dll.zip
Be careful to download "Win64-int32" and not "Win64-int64"!
一定要下32位的。http://sourceforge.net/projects/openblas/files/v0.2.14/OpenBLAS-v0.2.14-Win64-int32.zip/download
http://sourceforge.net/projects/openblas/files/v0.2.14/mingw64_dll.zip/download

或者直接复制指令

然后解压。
For now, we do not support CUDA, nor provide any kind of assistance in getting it work. If you want enabled CUDA support, download and install NVIDIA CUDA SDK. Be careful and strive for as standard install as possible. The installer set certain environment variables on which the MSVC Build rules rely.(大意,迄今为止,我们不支持CUDA,或是提供任意一种帮助让它运行。如果你想使CUDA能够支持,下载并安装CUDA SDK。保持小心并且尽可能使用标准安装。安装器要在MSVC编译规则依赖的地方,设置确定的环境变量)
If you call "set" in the command line, you should see:
(kaldi)/tools $ set | grep CUDA
 CUDA_PATH='C:\Users\Yenda\Downloads\cuda'
 CUDA_PATH_V7_0='C:\Users\Yenda\Downloads\cuda'
 NVCUDASAMPLES7_0_ROOT='C:\Users\Yenda\Downloads\cuda'
 NVCUDASAMPLES_ROOT='C:\Users\Yenda\Downloads\cuda'
The first one (CUDA_PATH) is particularly important.
去官网下载CUDA

5.Enter the (kaldi)/windows directory
Example: (kaldi)/$ cd windows (kaldi)/windows $ pwd
6.Copy variables.props.dev to variables.props. Then modify the file variables.props to reflect the correct paths, using your favorite text editor. Don't worry, it's a text file, even though you have to be careful to keep the structure itself intact(将variables.props.dev复制一份,另存为variables.props; 然后打开后者,编辑使它映射到正确的路径,并且保持结构完整)
If you plan to use MKL, you can ignore the OPENBLASDIR path. If you plan to use OpenBLAS, you can ignore the MKLDIR path. No matter what you plan to use, set OPENFST* variable correctly.
(用MKL的话,忽略OPENBLASDIR路径。用OpenBLAS,则忽略MKLDIR路径。无论用哪个,都要设置正确的OPENFST*变量)
For OpenBLAS support, copy the file kaldiwin_openblas.props to kaldiwin.props
For MKL support, copy the kaldiwin_mkl.props to kaldiwin.props
没修改之前是这个样子的

修改成自己软件所在的地址,没有的不用改
<!-- Change the following paths so they are correct on your machine -->
    <!-- Do not modify anything before this line -->
    <MKLDIR>C:\Program Files (x86)\IntelSWTools\compilers_and_libraries\windows\mkl\</MKLDIR>
    <OPENBLASDIR>D:\mc\kaldi-1\OpenBLAS-v0.2.14-Win64-int32</OPENBLASDIR>
    <OPENFST>D:\mc\kaldi-1\openfst</OPENFST>
    <OPENFSTLIB>D:\mc\kaldi-1\openfst\build64</OPENFSTLIB>
    <CUBDIR>C:\Program Files\NVIDIA GPU Computing Toolkit\CUDA\v10.2</CUBDIR>
    <NVTOOLSDIR>C:\Program Files\NVIDIA Corporation\NvToolsExt</NVTOOLSDIR>
    <!-- Do not modify anything after this line -->
复制相应的文件
For OpenBLAS support, copy the file kaldiwin_openblas.props to kaldiwin.props
For MKL support, copy the kaldiwin_mkl.props to kaldiwin.props
生成解决方案
Call the script that generates the MSVC solution
generate_solution.pl --vsver <default|vs2017|vs2015> [--enable-cuda] [--enable-openblas] [--enable-mkl] --enable-mkl is the default so you shouldn't need to use it. If --enable-openblas is passed it disables MKL support. CUDA is disabled by default. The default Visual Studio version is 15.0 (Visual Studio 2017). Please note that while we support generating the project for Visual Studio 2015, the C++11 support for that compiler is rather sub-par, i.e. it won't probably compile. When choosing Visual Studio 2015, you are on your own!
简单来说<>中是单选,[]中参数可有可无,你有相应软件就加上参数
例如,for a build using OpenBLAS and VS 2017 you would run:
(kaldi)/windows$ generate_solution.pl --vsver vs2017 --enable-openblasAnother example, for OpenBLAS, VS 2017 and CUDA support:
(kaldi)/windows$ generate_solution.pl --vsver vs2017 --enable-cuda --enable-openblas我这里用的是第二条指令。

会生成一个kaldiwin_projguids.txt文件,则表示完成
Run the script (kaldi)/windows/get_version.pl:
(kaldi)/windows$ get_version.pl

文件内容如下,主要是把版本写入version文件,没有输出表示一切正常


 1 #!/usr/bin/env perl
 2 #===============================================================================
 3 # Copyright 2017  (Author: Yenda Trmal <jtrmal@gmail.com>)
 4 #
 5 # Licensed under the Apache License, Version 2.0 (the "License");
 6 # you may not use this file except in compliance with the License.
 7 # You may obtain a copy of the License at
 8 #
 9 #  http://www.apache.org/licenses/LICENSE-2.0
10 #
11 # THIS CODE IS PROVIDED *AS IS* BASIS, WITHOUT WARRANTIES OR CONDITIONS OF ANY
12 # KIND, EITHER EXPRESS OR IMPLIED, INCLUDING WITHOUT LIMITATION ANY IMPLIED
13 # WARRANTIES OR CONDITIONS OF TITLE, FITNESS FOR A PARTICULAR PURPOSE,
14 # MERCHANTABLITY OR NON-INFRINGEMENT.
15 # See the Apache 2 License for the specific language governing permissions and
16 # limitations under the License.
17 #===============================================================================
18
19 use strict;
20 use warnings;
21 use utf8;
22
23 open(my $F, "<", "../src/.version") or do {
24   print "$!\n";
25   print "The file ../src/.version does not exist\n";
26   print "Either you are not running this script from within\n";
27   print "the windows/ directory or you have accidently \n";
28   print "delete the file\n";
29   exit 1;
30 };
31
32 open(my $H, ">", "../src/base/version.h") or do {
33   print "$!\n";
34   print "Could not write to ../src/base/version.h\n";
35   print "Either you are not running this script from within\n";
36   print "the windows/ directory or there were some other \n";
37   print "issues\n";
38   exit 1;
39 };
40
41 my $kaldi_ver=<$F>; chomp $kaldi_ver;
42 print $H  "#define KALDI_VERSION \"${kaldi_ver}-win\"\n";
43 close($F);
44 close($H);Open the generated solution that was created in a subfolder (kaldi)/kaldiwin_vs_ in the visual studio and switch to Debug|x64 (or Release|x64) and build. Expect 10 projects to fail, majority of them will fail because of missing include portaudio.h. The tests will fail to compile too -- this is because of deficiency of the script generate_solution.pl. We might fix it later on.
编译有错误。
如果sln都打不开,检查第6步cuda路径是否写错了
没写错,但还是打不开
vs2017提示看输出,输出里会提示提示:未找到导入的项目“C:\Program Files (x86)\MSBuild\Microsoft.Cpp\v4.0\BuildCustomizations\CUDA 7.0.props
解决方法:https://blog.csdn.net/xianhua7877/article/details/80795279
但是,把CUDA 7.0修改为自己的版本保存,不太可行,因为有1,286 个文件,639 个文件夹,所以反向操作一遍,打开VS提示的路径,发现里面有CUDA 10.2.props,也就是前面在官网下载的,复制一份改成CUDA 7.0,输入重定向,然后就能打开了

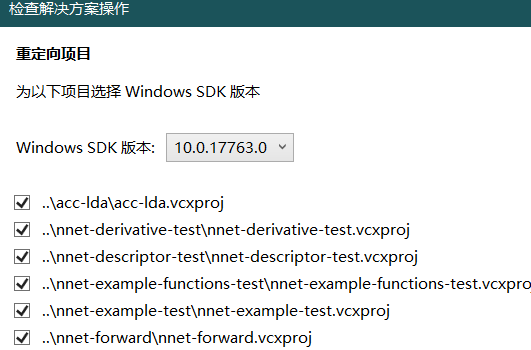
将win32改成x64,生成项目,然后一堆红


Expect 10 projects to fail。总共10个需要升级,手动重定向一下,然后重新生成解决方案,
然后,只有这10个好了,其他几百个都要升级,要不装SDK8.1,要不全升级一遍

这里改好后,编译online-wav-gmm-decode-fast 还是有许多问题,如下

提示没有mkl库,安装方法参见:https://blog.csdn.net/zb1165048017/article/details/70141432
没有portaudio,到官网去下载:http://portaudio.com/download.html
最后SSIZE_T重定义,单击找到type.h中ssize_t定义的位置
C2371:“identifier”:重定义;不同的基类型
已声明该标识符。说明已经定义了不用重新定义


#ifdef _MSC_VER
// Not really Windows-specific: they should have used ptrdiff_t in the first
// place. But on Windows there has never been ssize_t.
using ssize_t = std::ptrdiff_t;
#endif // _MSC_VER打开kaldi-types.h 发现第35行 define ssize_t SSIZE_T 使用了这个标识符,从而
导致types.h里的声明失效,直接注释掉这一行,重新编译生成,结果成功生成项目
来源:oschina
链接:https://my.oschina.net/u/4302665/blog/3313093