WPF提供了可应用于任何元素的可视化效果。效果的目标是提供一种简单的声明式方法,从而改进文本、图像、按钮以及其他控件的外观。不是编写自己的绘图代码,而是使用某个继承自Effect的类(位于System.Windows.Media.Effects名称空间中)以立即获得诸如模糊、辉光以及阴影等效果。
下表列出了可供使用的的效果类:
表 效果类

勿将上表列出的Effect类的派生类和位图效果类相混淆,位图效果派生类自BitmapEffect类,该类和Effect类位于相同的名称空间中。尽管位图效果具有类似的编程模型,但他们存在价格严重的局限性:
- 位图效果不支持像素着色器,像素着色器是创建可重用效果的最强大、最灵活的方式。
- 位图效果是用非托管的代码实现的,从而需要完全信任的应用程序。所以,在基于浏览器的XBAP应用程序中不能使用位图效果。
- 位图效果总使用软件进行渲染,不使用显卡资源。这使得它们的速度较慢,当处理大量元素或具有较大可视化表面的元素时尤其如此。
BitmapEffect类是在WPF的第一个版本中引入的,该版本没有提供Effect类。为了向后兼容,仍保留了位图效果。
接下里的几节深入分析效果模型,并演示上三个继承自Effect的类:BlurEffect、DropShadowEffect以及ShaderEffect。
一、BlurEffect类
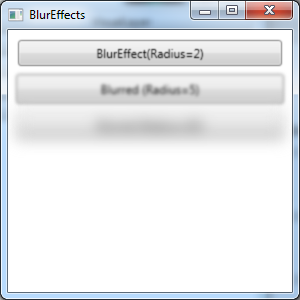
最简单的WPF效果是BlurEffect类。该类模糊元素的内容,就想通过失焦透镜观察到得效果。通过增加Radiu属性的值(默认值是5)可增加模糊程度。
为使用任何效果,需要创建适当的效果对象并设置相应元素的Effect属性:
<Button Content="BlurEffect(Radius=2)" Margin="5" Padding="3">
            <Button.Effect>
                <BlurEffect Radius="2"></BlurEffect>
            </Button.Effect>
        </Button>

        <Button Content="Blurred (Radius=5)" Padding="5" Margin="3">
            <Button.Effect>
                <BlurEffect Radius="5"></BlurEffect>
            </Button.Effect>
        </Button>

        <Button Content="Blurred (Radius=20)" Padding="5" Margin="3">
            <Button.Effect>
                <BlurEffect Radius="20"></BlurEffect>
            </Button.Effect>
        </Button>
下图显示了应用到一组按钮的三个不同程度的模糊效果(Radiu属性值分别为2、5和20)。

二、DropShadowEffect类
DropShadowEffect类在元素背后添加了轻微的偏移阴影。可使用该类的几个属性,如下表所示:
表 DropShadowEffect类的属性

下面是实现这些阴影效果的标记:
<TextBlock FontSize="20" Margin="5">
            <TextBlock.Effect>
                <DropShadowEffect></DropShadowEffect>
            </TextBlock.Effect>
            <TextBlock.Text>Basic DropShawEffect</TextBlock.Text>
        </TextBlock>

        <TextBlock FontSize="20" Margin="5">
            <TextBlock.Effect>
                <DropShadowEffect Color="Blue"></DropShadowEffect>
            </TextBlock.Effect>
            <TextBlock.Text>Blue Color DropShawEffect</TextBlock.Text>
        </TextBlock>

        <TextBlock FontSize="20" Foreground="White" Margin="5">
            <TextBlock.Effect>
                <DropShadowEffect  BlurRadius="15"></DropShadowEffect>
            </TextBlock.Effect>
            <TextBlock.Text>Blurred Dropshadow with White text</TextBlock.Text>
        </TextBlock>

        <TextBlock FontSize="20" Foreground="Magenta" Margin="5">
            <TextBlock.Effect>
                <DropShadowEffect   ShadowDepth="0"></DropShadowEffect>
            </TextBlock.Effect>
            <TextBlock.Text>Close dropshadow</TextBlock.Text>
        </TextBlock>

        <TextBlock FontSize="20" Foreground="Magenta" Margin="5">
            <TextBlock.Effect>
                <DropShadowEffect   ShadowDepth="25"></DropShadowEffect>
            </TextBlock.Effect>
            <TextBlock.Text>Distant dropshadow</TextBlock.Text>
        </TextBlock>
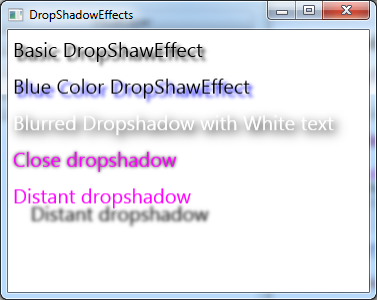
效果图如下所示:

没有提供用来组合效果的类,这意味着一次只能为一个元素应用一个效果。然而,有时可通过将元素添加到高层的容器中模拟多个效果(例如,为TextBlock元素使用阴影效果,然后将其放入使用模糊效果的StackPanel面板中)。大多数情况下,应避免这种变通方法,因为这种方法会成倍地增加渲染工作量并会降低性能。相反,应当查找能够完成所有内容的单个效果。
三、ShaderEffect类
ShaderEffect类没有提供就绪的效果。相反,它是一个抽象类,可继承该类以创建自己的自定义像素着色器。通过使用ShaderEffect类(或从该类派生的自定义效果),可实现更多的效果,而不仅局限于模糊和阴影。
可能与你所期望的相反,实现像素着色器的逻辑不是直接在效果类中使用C#代码编写的。相反,像素着色器使用高级着色语言(High Level Shader Lanaguage,HLSL)编写的,该语言是Mircrosoft DirectX的一部分(使用这种语言的优点是很明显的——因为DirectX和HLSL已经存在许多年了,图形开发人员已经创建了许多可在代码中使用的像素着色器例程)。
为创建像素着色器,需要编写和编译HLSL代码。要执行编译,可使用WIndows SDK for Windows 8中的fxc.exe命令工具;注意,Windows SDK for Windows 8也支持Windows 7,这从名称中看不出来的。但更简便的选项是使用免费的Shazzam工具。Shazzam提供了用于HLSL文件的编辑器,可使用该工具在示例图像上尝试效果。该工具还提供了几个像素着色器示例,可将它们作为自定义效果的基础。
尽管制作自己的HLSL文件超出本章范围,但下面将使用一个已有的HLSL文件。一旦将HLSL文件编译成.ps文件,就可以在项目中使用它了。只需要将文件添加到已有的WPF项目中,在Solution Explorer中选择该文件,并将它的Build Action属性设置为Resource。最后必须创建一个继承自ShaderEffect的自定义类并使用该资源。
例如,如果正在使用自定义像素着色器(已经编译到名为Effect.ps的文件中),可使用以下代码:
public class CustomEffect:ShaderEffect
    {
        public CustomEffect()
        {
            Uri uri = new Uri("Effect.ps", UriKind.Relative);

            PixelShader = new PixelShader();
            PixelShader.UriSource = uri;
        }
    }
现在可以在任意窗口中使用这个自定义的像素着色器了。首先,通过如下所示的映射使名称空间可用:
xmlns:local="clr-namespace:Drawing"现在创建自定义效果类的一个实例,并用它设置元素的Effect属性:
<Image Name="img" Margin="5" Source="harpsichord.jpg">
            <Image.Effect>
                <local:CustomEffect></local:CustomEffect>
            </Image.Effect>
        </Image>
该示例完整代码如下所示:


using System;
using System.Collections.Generic;
using System.Linq;
using System.Text;
using System.Threading.Tasks;
using System.Windows;
using System.Windows.Media;
using System.Windows.Media.Effects;

namespace Drawing
{
    public class CustomEffect:ShaderEffect
    {
        public CustomEffect()
        {
            Uri uri = new Uri("Effect.ps", UriKind.Relative);

            PixelShader = new PixelShader();
            PixelShader.UriSource = uri;
            UpdateShaderValue(InputProperty);
        }

        public static readonly DependencyProperty InputProperty =
            ShaderEffect.RegisterPixelShaderSamplerProperty("Input", typeof(CustomEffect), 0 /* assigned to sampler register S0 */);

        public Brush Input
        {
            get { return (Brush)GetValue(InputProperty); }
            set { SetValue(InputProperty, value); }
        }
    }
}

<Window x:Class="Drawing.CustomPixelShader"
        xmlns="http://schemas.microsoft.com/winfx/2006/xaml/presentation"
        xmlns:x="http://schemas.microsoft.com/winfx/2006/xaml"
        xmlns:local="clr-namespace:Drawing"
        Title="CustomPixelShader" Height="600" Width="305.639">
    <StackPanel>
        <Image Name="img" Margin="5" Source="harpsichord.jpg">
            <Image.Effect>
                <local:CustomEffect></local:CustomEffect>
            </Image.Effect>
        </Image>
        <CheckBox Name="chkEffect" Margin="5" Content="Effect enabled" IsChecked="True" Click="chkEffect_Click"></CheckBox>

    </StackPanel>
</Window>

using System;
using System.Collections.Generic;
using System.Linq;
using System.Text;
using System.Threading.Tasks;
using System.Windows;
using System.Windows.Controls;
using System.Windows.Data;
using System.Windows.Documents;
using System.Windows.Input;
using System.Windows.Media;
using System.Windows.Media.Imaging;
using System.Windows.Shapes;

namespace Drawing
{
    /// <summary>
    /// CustomPixelShader.xaml 的交互逻辑
    /// </summary>
    public partial class CustomPixelShader : Window
    {
        public CustomPixelShader()
        {
            InitializeComponent();
        }

        private void chkEffect_Click(object sender, RoutedEventArgs e)
        {
            if (chkEffect.IsChecked != true)
                img.Effect = null;
            else
                img.Effect = new CustomEffect();
        }
    }
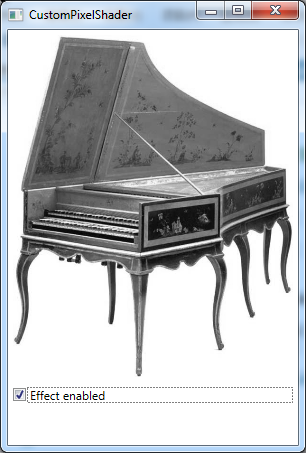
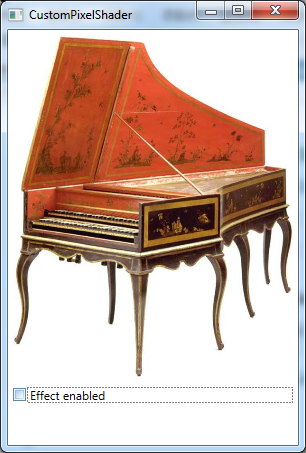
}最终效果图如下所示:


如果使用采用特定输入参数的像素着色器,需要做的工作笔上面的示例要更复杂一点。对与这种情况,需要通过调用RegisterPixelShaderSamplerProperty()静态方法创建相应的依赖性属性。
灵活的像素着色器就像在诸如Adobe Photoshop这样的图像软件中使用的插件一样强大。它可以执行任何工作,从添加基本的阴影乃至更富有挑战性的效果。如模糊、辉光、水波、浮雕和锐化等。当集合使用动画实时改变着色器的参数时,像素着色器还可以创建赏心悦目的效果。
来源:oschina
链接:https://my.oschina.net/u/4397642/blog/3273874