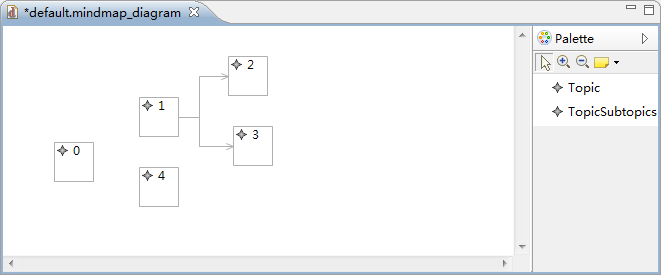
这一篇博客在上一篇的基础上,实现展开/折叠功能。期待的最终效果是,双击某一Node,其后面的Node与连线都隐藏;再双击时显示回来。并且折叠之后,保存关闭,下次打开时还处于折叠状态,可以正确展开。
有一个细节应当注意,如下图:

比如折叠了节点1之后再折叠节点0,之后再展开节点0的时候,节点1应当还是处于折叠状态。
具体步骤如下:
1、为了实现这个展开/折叠操作,并且方便以后实现图标的更换,可以在节点的模型文件中添加一个布尔型的变量expanded,用于标识展开状态。可以在模型文件中修改,然后重新生成Model Code以及Edit Code,具体操作可以参考这里的步骤1、2。注意,将expanded的默认值设为true。
2、创建一个Command,用于实现折叠或者展开。先在diagram工程下的src目录下新建一个package,名为org.eclipse.gmf.examples.mindmap.diagram.edit.commands.custom,在其中新建一个class文件,名为ExpandOrCollapseCommand,继承自RecordingCommand。
3、ExpandOrCollapseCommand的构造函数如下,获取
public ExpandOrCollapseCommand(
        TransactionalEditingDomain transactionalEditingDomain,
        TopicEditPart topicEditPart) {
    super(transactionalEditingDomain);
    this.sourceEdgeList = ((View) topicEditPart.getModel()).getSourceEdges();
    this.setLabel("Expand Or Collapse");
    this.topicModel = (Topic) ((View) topicEditPart.getModel()).getElement();
    this.isExpanded = topicModel.isExpanded();
    this.topicEditPart = topicEditPart;
}
4、重写doExecute()方法:
@Override
protected void doExecute() {
    if (this.sourceEdgeList.size() > 0) {
        this.topicModel.setExpanded(!this.isExpanded);
        this.doExpandOrCollapse(this.topicModel, this.sourceEdgeList, !this.isExpanded);
    }
}/**
* 执行展开或者折叠功能,并且将子节点的元素也要相应地展开或者折叠
*/
private void doExpandOrCollapse(Topic model, List edgeList, boolean visible) {
Iterator<ConnectorImpl> iter = edgeList.iterator();
while (iter.hasNext()) {
Edge conn = iter.next();
conn.getTarget().setVisible(visible);
Topic targetModel = (Topic) conn.getTarget().getElement();
List targetSourceEdgeList = conn.getTarget().getSourceEdges();
if (this.isExpanded) {
// 如果将要折叠,则应将子节点全部隐藏
doExpandOrCollapse(targetModel, targetSourceEdgeList, false);
} else if (!this.isExpanded && targetModel.isExpanded()) {
// 如果将要展开,则应将子节点中,在折叠之前处于展开状态的展开
doExpandOrCollapse(targetModel, targetSourceEdgeList, true);
}
}
}6、接下来则要使用这个命令。由于是双击,所以先要捕获对节点的双击事件。在TopicEditPart类中重写超类中的performRequest(Request request)方法:
/**
 * 捕获各种事件,如双击
 */
@Override
public void performRequest(Request request) {
    if (request.getType() == (RequestConstants.REQ_OPEN)) {
        // 双击时展开或者隐藏后面的节点
        Topic model = (Topic) ((View) this.getModel()).getElement();
        TransactionalEditingDomain domain = TransactionUtil
                .getEditingDomain(this.getModel());
        ExpandOrCollapseCommand command = new ExpandOrCollapseCommand(
                domain, this);
        domain.getCommandStack().execute(command);
    }
    super.performRequest(request);
}
7、现在运行,会发现已经可以展开/折叠了,但是,存在一个问题:当把某一节点折叠,保存关闭后,再打开图,然后再展开这个节点,与它直接相连的节点并不会马上显示,需要保存、关闭之后再打开才会显示,如下图:

8、解决上面的问题,需要在TopicEditPart中重写getModelSourceConnections()方法。如果在超类ShapeNodeEditPart中查看原始的getModelSourceConnections()方法,最终找到ViewUtil中的getSourceConnectionsConnectingVisibleViews(View view)方法,会发现其中有一个判断:
if (edge.isVisible() && isVisible(target)){
    sourceConnections.add(edge);
}而我们是要得到所有的edge,不管是否可见。我们虽然没有手动调用getModelSourceConnections(),但是在内部它是被调用的,所以,在TopicEditPart中重写getModelSourceConnections()方法如下:
/**
 * 重写getModelSourceConnections()方法
 */
@Override
protected List getModelSourceConnections() {
    View view = (View) this.getModel();
    if (!view.eIsSet(NotationPackage.Literals.VIEW__SOURCE_EDGES))
        return Collections.EMPTY_LIST;
    return view.getSourceEdges();
}
9、此时再运行,则不会出现上述问题。
最终代码在这里
来源:oschina
链接:https://my.oschina.net/u/164134/blog/153377