目录
1.LinkedBlockingQueue介绍
1.1BlockingQueue接口
1.2LinkedBlockingQueue
1.3LinkedBlockingQueue原理与数据结构
2.LinkedBlockingQueue源码分析
2.1创建
2.2put方法
2.3take方法
1.LinkedBlockingQueue介绍

1.1BlockingQueue接口
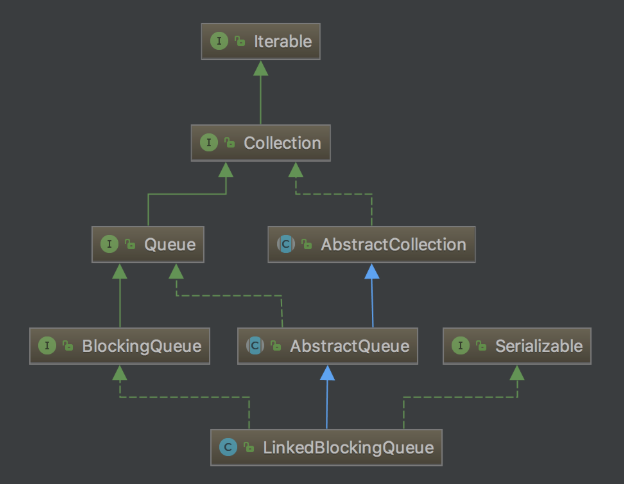
同ArrayBlockingQueue一样,LinkedBlockingQueue同样实现了BlockingQueue接口。
1.2LinkedBlockingQueue
LinkedBlockingQueue
LinkedBlockingQueue是一个单向链表实现的阻塞队列。
LinkedBlockingQueue可以在创建时指定容量大小,防止队列过度膨胀。如果未指定队列容量,默认容量大小为Integer.MAX_VALUE。
1.3LinkedBlockingQueue原理与数据结构

说明:
(01) head是链表的表头。取出数据时,都是从表头head处取出,出队。
(02) last是链表的表尾。新增数据时,都是从表尾last处插入,入队。
(03) count是链表的实际大小,即当前链表中包含的节点个数。
(04) capacity是列表的容量,它是在创建链表时指定的。
(05) putLock是插入锁,takeLock是取出锁;notEmpty是“非空条件”,notFull是“未满条件”。通过它们对链表进行并发控制。
LinkedBlockingQueue在实现“多线程对竞争资源的互斥访问”时,对于“插入”和“取出(删除)”操作分别使用了不同的锁。对于插入操作,通过“插入锁putLock”进行同步;对于取出操作,通过“取出锁takeLock”进行同步。

2.LinkedBlockingQueue源码分析
2.1创建
public LinkedBlockingQueue(int capacity) {
    if (capacity <= 0) throw new IllegalArgumentException();
    this.capacity = capacity;
    last = head = new Node<E>(null);
}
//队列容量, 如果创建时未指定,默认为Integer.MAX_VALUE
private final int capacity;
//队列中元素的数量
private final AtomicInteger count = new AtomicInteger();
//链表的头部(队头)
transient Node<E> head;
//链表的尾部(队尾)
private transient Node<E> last;
//用于控制“删除元素”的takeLock和锁对应的“非空条件”notEmpty
private final ReentrantLock takeLock = new ReentrantLock();
private final Condition notEmpty = takeLock.newCondition();
//用于控制“添加元素”的putLock和锁对应的“未满条件”notFull
private final ReentrantLock putLock = new ReentrantLock();
private final Condition notFull = putLock.newCondition();
static class Node<E> {
    E item;
    Node<E> next;
    Node(E x) { item = x; }
}
2.2 put方法
//put方法:若队列满,wait直到队列有空闲
public void put(E e) throws InterruptedException {
if (e == null) throw new NullPointerException();
// Note: convention in all put/take/etc is to preset local var
// holding count negative to indicate failure unless set.
int c = -1;
Node<E> node = new Node<E>(e);
final ReentrantLock putLock = this.putLock;
final AtomicInteger count = this.count;
//获得锁
putLock.lockInterruptibly();
try {
//如果队列满,当前(生产者)线程在notFull上阻塞等待
while (count.get() == capacity) {
notFull.await();
}
//元素进队
enqueue(node);
//将“队列中元素数量“+1,并返回“原有的元素数量”
c = count.getAndIncrement();
//如果元素进队之后,队列仍然未满,唤醒等待在notFull上的(生产者)线程
if (c + 1 < capacity)
notFull.signal();
} finally {
//释放锁
putLock.unlock();
}
//如果队列中原有的元素数量为0,则在元素进队后,唤醒等待在notEmpty上的(消费者)线程
if (c == 0)
signalNotEmpty();
}
private void enqueue(Node<E> node) {
// assert putLock.isHeldByCurrentThread();
// assert last.next == null;
last = last.next = node;
}
private void signalNotEmpty() {
final ReentrantLock takeLock = this.takeLock;
takeLock.lock();
try {
notEmpty.signal();
} finally {
takeLock.unlock();
}
}
2.3 take方法
//take方法:若队列空,wait直到队列非空
public E take() throws InterruptedException {
E x;
int c = -1;
final AtomicInteger count = this.count;
final ReentrantLock takeLock = this.takeLock;
//获得锁
takeLock.lockInterruptibly();
try {
//如果队列为空,当前(消费者)线程在notEmpty上阻塞等待
while (count.get() == 0) {
notEmpty.await();
}
//元素出队
x = dequeue();
//将“队列中元素数量“-1,并返回“原有的元素数量”
c = count.getAndDecrement();
//如果元素出队之后,队列仍有剩余元素,唤醒等待在notEmpty上的(消费者)线程
if (c > 1)
notEmpty.signal();
} finally {
//释放锁
takeLock.unlock();
}
//如果原来队列是满的,则在元素出队后,唤醒等待在notFull上的(生产者)线程
if (c == capacity)
signalNotFull();
return x;
}
private E dequeue() {
// assert takeLock.isHeldByCurrentThread();
// assert head.item == null;
Node<E> h = head;
Node<E> first = h.next;
h.next = h; // help GC
head = first;
E x = first.item;
first.item = null;
return x;
}
private void signalNotFull() {
final ReentrantLock putLock = this.putLock;
putLock.lock();
try {
notFull.signal();
} finally {
putLock.unlock();
}
}
来源:https://www.cnblogs.com/yeyang/p/12580619.html