简介
JWT是一种无状态的方式,用户的资料都保存在token里可以直接解析token拿到用户资料,无状态有两个问题1.续租,2.退出 这两个问题现在都没有什么好的解决办法,如果是普通的web项目建议不要使用JWT
使用JWT替换默认的令牌
(默认令牌使用UUID生成)只需要指定TokenStore为JwtTokenStore即可。
修改TokenStoreConfig配置类:
package com.spring.security;

import com.spring.security.properties.SecurityProperties;
import org.springframework.beans.factory.annotation.Autowired;
import org.springframework.boot.autoconfigure.condition.ConditionalOnProperty;
import org.springframework.context.annotation.Bean;
import org.springframework.context.annotation.Configuration;
import org.springframework.data.redis.connection.RedisConnectionFactory;
import org.springframework.security.oauth2.provider.token.TokenStore;
import org.springframework.security.oauth2.provider.token.store.JwtAccessTokenConverter;
import org.springframework.security.oauth2.provider.token.store.JwtTokenStore;
import org.springframework.security.oauth2.provider.token.store.redis.RedisTokenStore;

@Configuration
public class TokenStoreConfig {

    @Autowired
    private RedisConnectionFactory redisConnectionFactory;

    @Bean
    @ConditionalOnProperty(prefix = "hk.security.oauth2", name = "tokenStore", havingValue = "redis")
    public TokenStore redisTokenStore() {
        return new RedisTokenStore(redisConnectionFactory);
    }

    /**
     * 使用jwt时的配置,默认生效
     *
     * @author zhailiang
     *
     */
    @Configuration
    @ConditionalOnProperty(prefix = "hk.security.oauth2", name = "tokenStore", havingValue = "jwt", matchIfMissing = true)
    public static class JwtConfig {

        @Autowired
        private SecurityProperties securityProperties;

        /**
         * @return
         */
        @Bean
        public TokenStore jwtTokenStore() {
            return new JwtTokenStore(jwtAccessTokenConverter());
        }

        /**
         * @return
         */
        @Bean
        public JwtAccessTokenConverter jwtAccessTokenConverter(){
            JwtAccessTokenConverter converter = new JwtAccessTokenConverter();
           // 签名密钥
            converter.setSigningKey(securityProperties.getOauth2().getJwtSigningKey());
            return converter;
        }

    }
}
密钥已经配置到系统里,自行改造
在配置类里配置好TokenStoreConfig后,我们在认证服务器里指定它:
    //jwt模式才使用
    @Autowired(required = false)
    private JwtAccessTokenConverter jwtAccessTokenConverter;

    @Override
    public void configure(AuthorizationServerEndpointsConfigurer endpoints) {
        endpoints.tokenStore(tokenStore)
                .authenticationManager(authenticationManager)
                .userDetailsService(userDetailService);
        if (jwtAccessTokenConverter != null) {
            endpoints.accessTokenConverter(jwtAccessTokenConverter);
        }
    }
重启服务获取令牌,系统将返回如下格式令牌:
{
    "access_token": "eyJhbGciOiJIUzI1NiIsInR5cCI6IkpXVCJ9.eyJleHAiOjE1ODQ4ODcxNzAsInVzZXJfbmFtZSI6ImFkbWluIiwiYXV0aG9yaXRpZXMiOlsiYWRtaW4iXSwianRpIjoiNjU4MmYxOGUtMTYwZi00ZjAyLTgyNWItZTE5OTA4YjNjMjBkIiwiY2xpZW50X2lkIjoibXloazEiLCJzY29wZSI6WyJhbGwiLCJyZWFkIiwid3JpdGUiXX0.sOJkysiLDNVEh7fKgGSd_ksR3bEPSYqfOyeTnC9G718",
    "token_type": "bearer",
    "refresh_token": "eyJhbGciOiJIUzI1NiIsInR5cCI6IkpXVCJ9.eyJ1c2VyX25hbWUiOiJhZG1pbiIsInNjb3BlIjpbImFsbCIsInJlYWQiLCJ3cml0ZSJdLCJhdGkiOiI2NTgyZjE4ZS0xNjBmLTRmMDItODI1Yi1lMTk5MDhiM2MyMGQiLCJleHAiOjE1ODQ4ODcxNzAsImF1dGhvcml0aWVzIjpbImFkbWluIl0sImp0aSI6IjJiYWRiNDRhLWMyNjMtNDcxZi04ZThkLTkzMzU4MmQxODNiNSIsImNsaWVudF9pZCI6Im15aGsxIn0.RMPMiIlU4UW-fG-5sd2k5mXMmKis9WuCzGD5WJhQ5nY",
    "expires_in": 3599,
    "scope": "all read write",
    "jti": "6582f18e-160f-4f02-825b-e19908b3c20d"
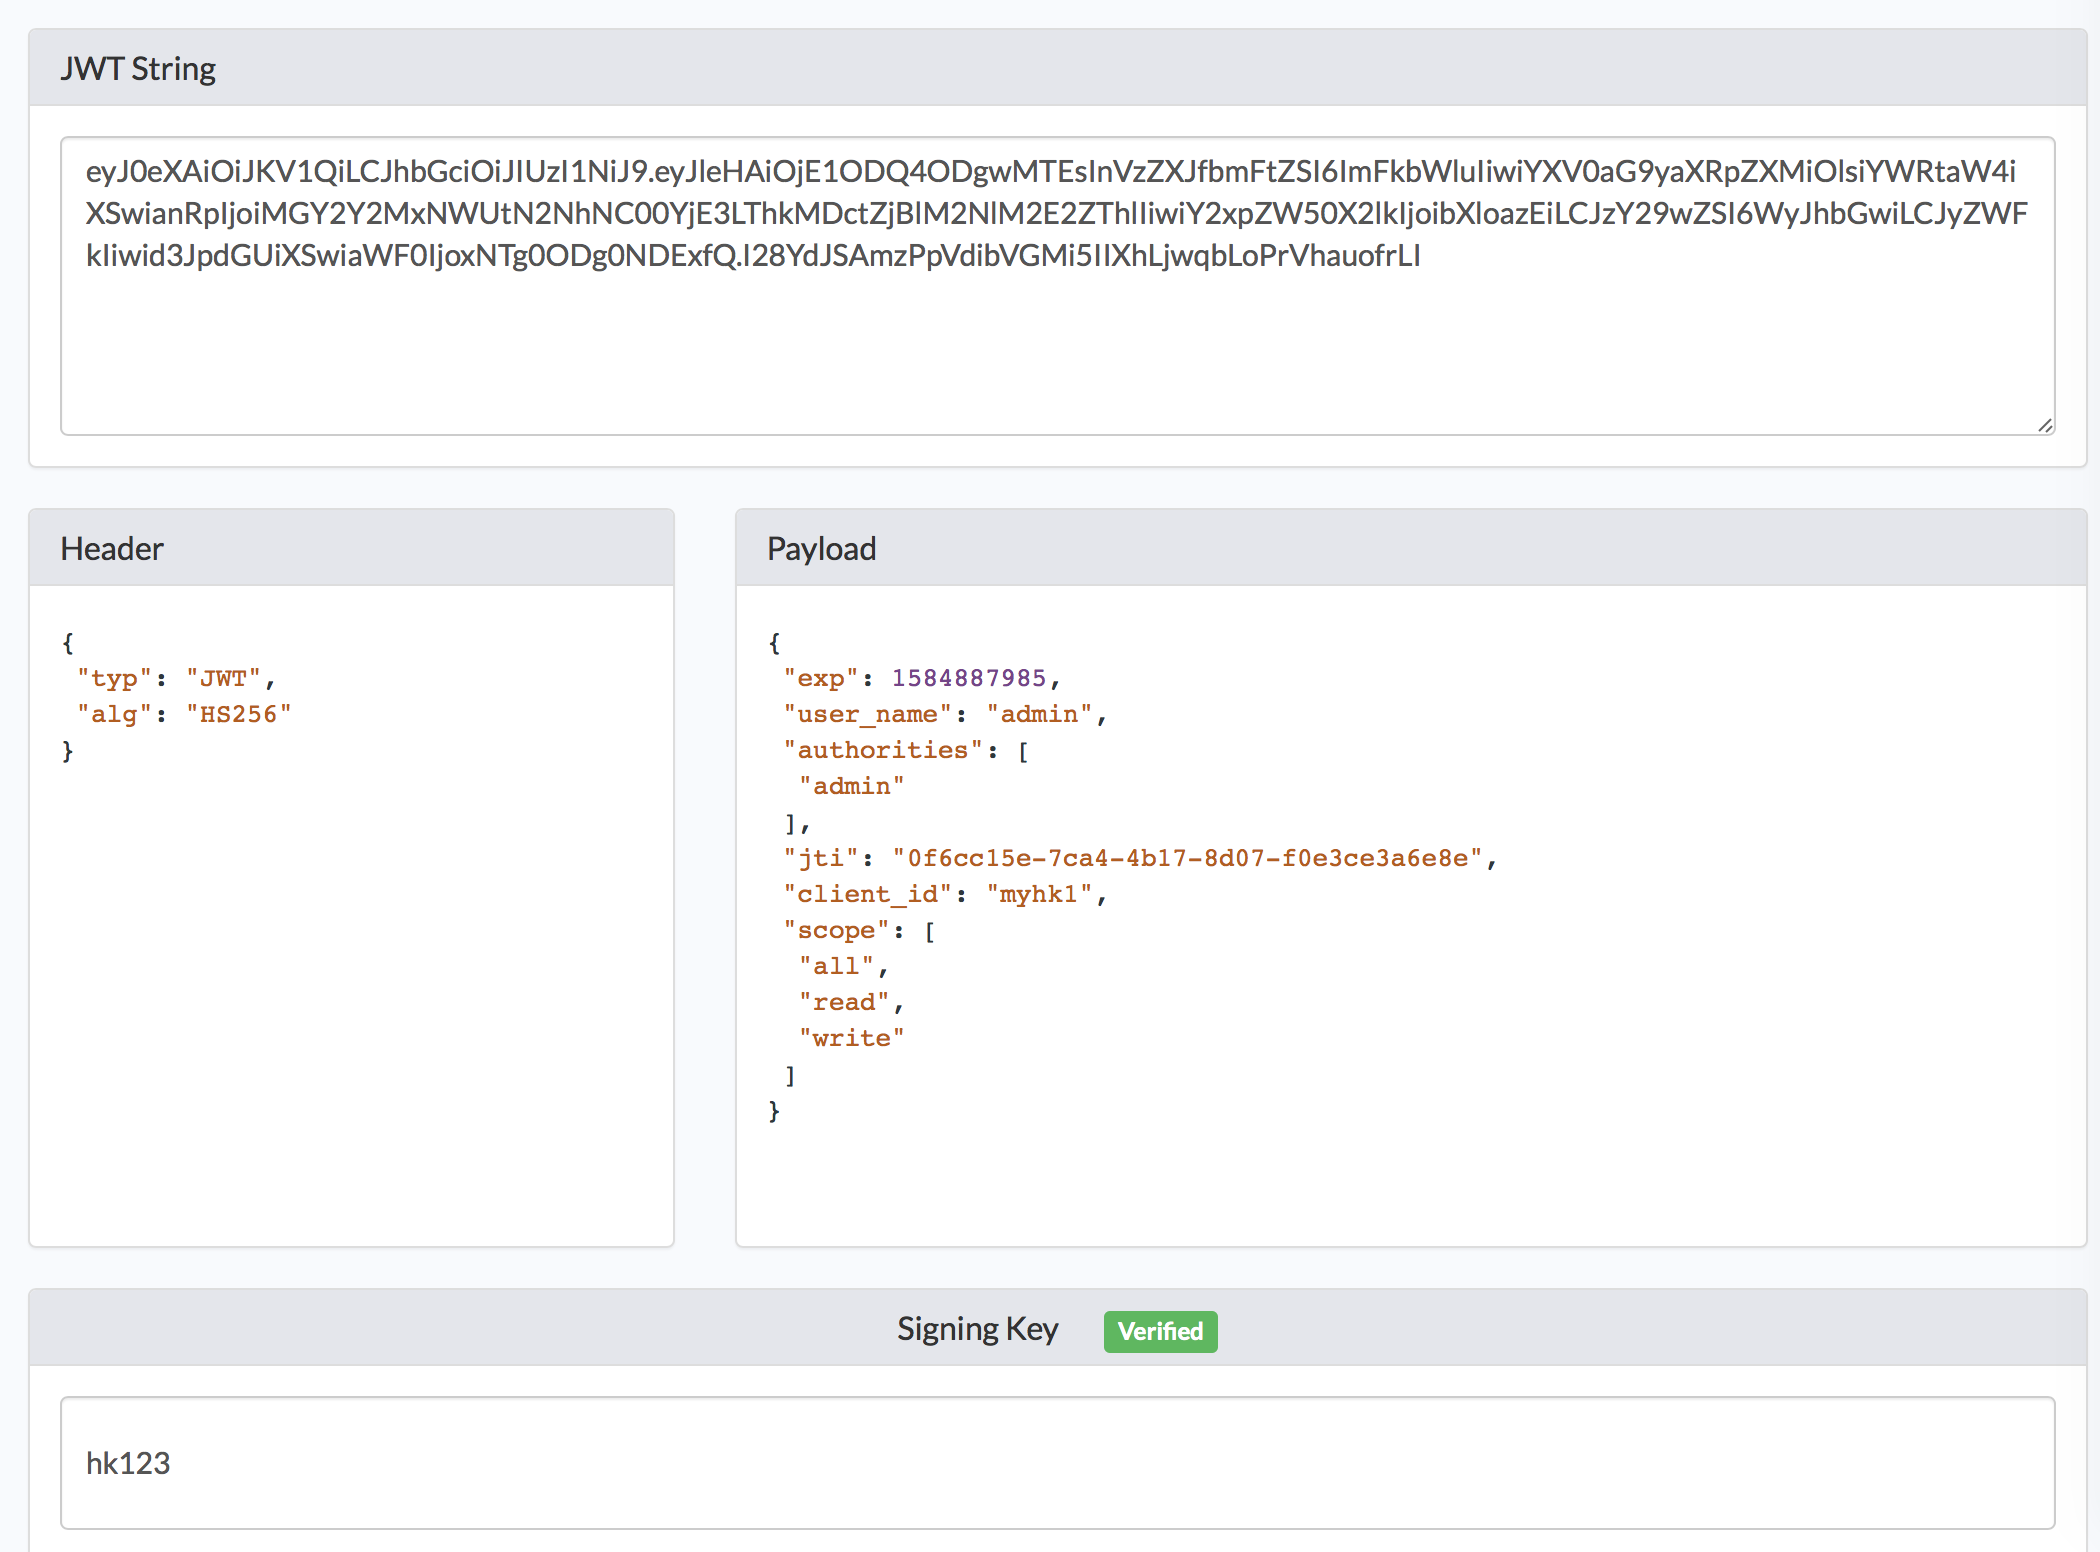
}将access_token中的内容复制到https://www.jsonwebtoken.io网站解析下:
获取资源:
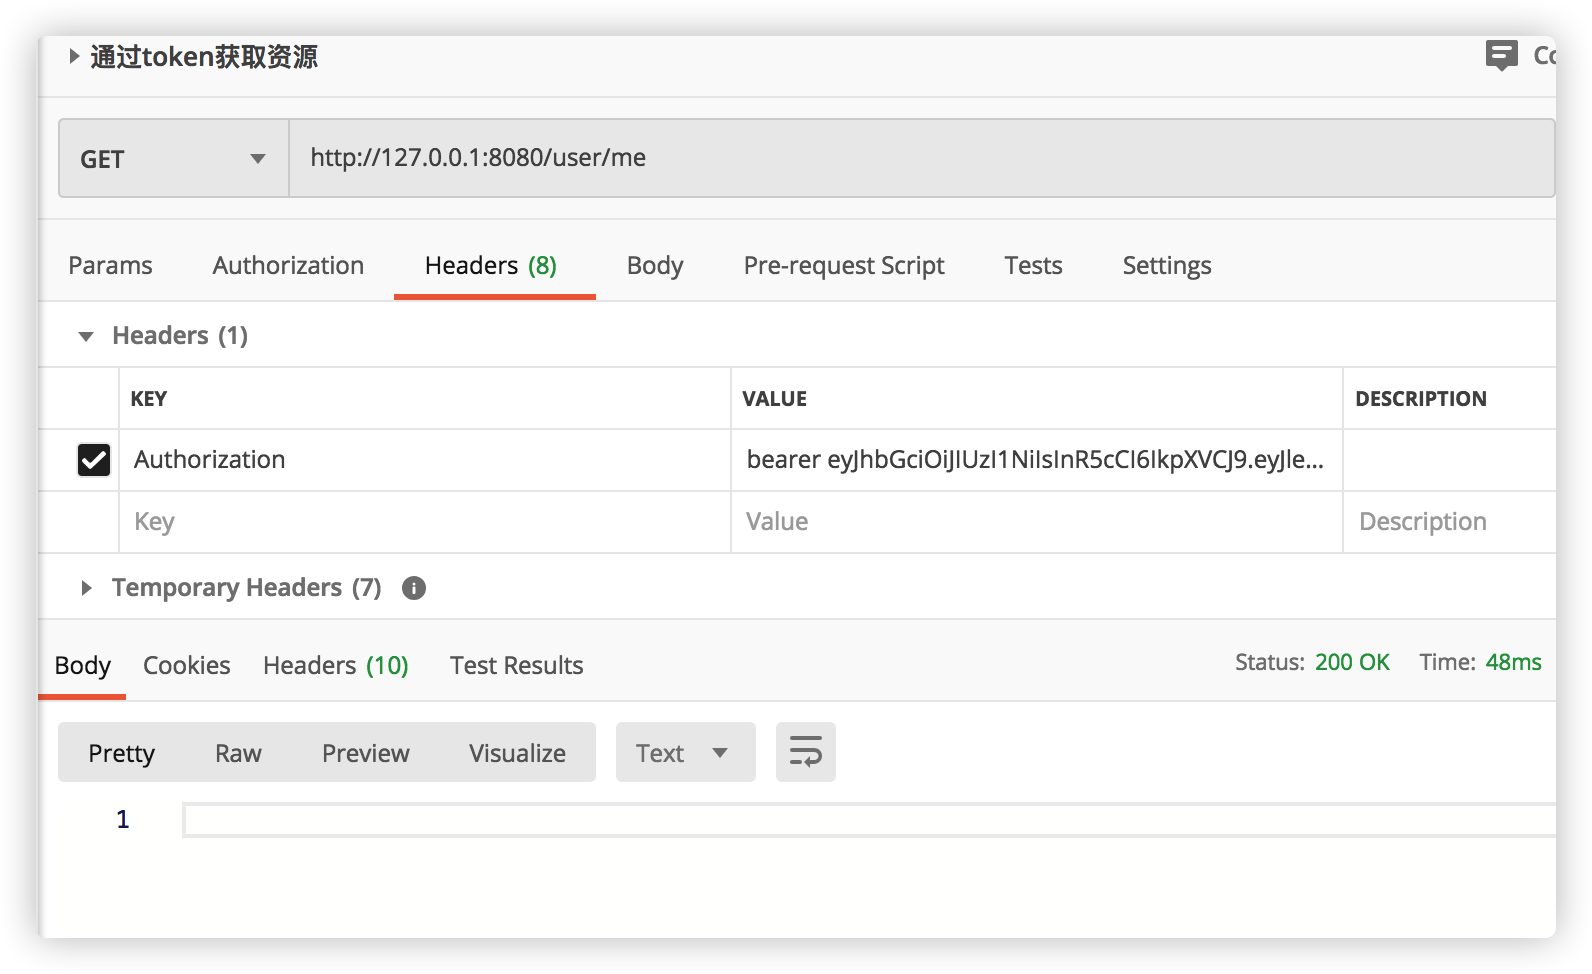
发现什么都没有返回去看一下/user/me方法:
    @GetMapping("/user/me")
    private Object getCurrentUser(@AuthenticationPrincipal UserDetails user) {
        return user;
    }
现在模式不是UserDetails:
    @GetMapping("/user/me")
    private Object getCurrentUser(Authentication user) {
        return user;
    }
重启项目测试,只要jwt的token没有过期就能用:
{
    "authorities": [
        {
            "authority": "admin"
        }
    ],
    "details": {
        "remoteAddress": "127.0.0.1",
        "sessionId": null,
        "tokenValue": "eyJhbGciOiJIUzI1NiIsInR5cCI6IkpXVCJ9.eyJleHAiOjE1ODQ4ODgxOTksInVzZXJfbmFtZSI6ImFkbWluIiwiYXV0aG9yaXRpZXMiOlsiYWRtaW4iXSwianRpIjoiODNmMzEwMjUtMGVlZC00YmYxLWJkNDktZmNiN2YyZjVkMjIyIiwiY2xpZW50X2lkIjoibXloazEiLCJzY29wZSI6WyJhbGwiLCJyZWFkIiwid3JpdGUiXX0._NWlXGYavY7ntdR0vTSxVTwrYZrtHZZidsU0v8F8kow",
        "tokenType": "bearer",
        "decodedDetails": null
    },
    "authenticated": true,
    "userAuthentication": {
        "authorities": [
            {
                "authority": "admin"
            }
        ],
        "details": null,
        "authenticated": true,
        "principal": "admin",
        "credentials": "N/A",
        "name": "admin"
    },
    "principal": "admin",
    "oauth2Request": {
        "clientId": "myhk1",
        "scope": [
            "all",
            "read",
            "write"
        ],
        "requestParameters": {
            "client_id": "myhk1"
        },
        "resourceIds": [],
        "authorities": [],
        "approved": true,
        "refresh": false,
        "redirectUri": null,
        "responseTypes": [],
        "extensions": {},
        "grantType": null,
        "refreshTokenRequest": null
    },
    "credentials": "",
    "clientOnly": false,
    "name": "admin"
}
拓展JWT
如果想在JWT中添加一些额外的信息,我们需要实现TokenEnhancer(Token增强器):
package com.spring.security.jwt;

import org.springframework.security.oauth2.common.DefaultOAuth2AccessToken;
import org.springframework.security.oauth2.common.OAuth2AccessToken;
import org.springframework.security.oauth2.provider.OAuth2Authentication;
import org.springframework.security.oauth2.provider.token.TokenEnhancer;

import java.util.HashMap;
import java.util.Map;

/**
 * JWT增强器
 */
public class HkJWTokenEnhancer implements TokenEnhancer {

    @Override
    public OAuth2AccessToken enhance(OAuth2AccessToken oAuth2AccessToken, OAuth2Authentication oAuth2Authentication) {
        Map<String, Object> info = new HashMap<>();
        //增强内容
        info.put("company", "baidu.com");
        ((DefaultOAuth2AccessToken) oAuth2AccessToken).setAdditionalInformation(info);
        return oAuth2AccessToken;
    }
}
我们在Token中添加了"company", "baidu.com"信息。然后在TokenStoreConfig里注册该Bean:
        /**
         * @return
         */
        @Bean
        @ConditionalOnBean(TokenEnhancer.class)
        public TokenEnhancer jwtTokenEnhancer(){
            return new HkJWTokenEnhancer();
        }
最后在认证服务器里配置该增强器:
    //jwt模式才使用
    @Autowired(required = false)
    private JwtAccessTokenConverter jwtAccessTokenConverter;

    @Autowired(required = false)
    private TokenEnhancer jwtTokenEnhancer;

    @Override
    public void configure(AuthorizationServerEndpointsConfigurer endpoints) {
        endpoints.tokenStore(tokenStore)
                .authenticationManager(authenticationManager)
                .userDetailsService(userDetailService);
        if (jwtAccessTokenConverter != null && jwtTokenEnhancer!=null) {
            //增强器
            TokenEnhancerChain enhancerChain = new TokenEnhancerChain();
            List<TokenEnhancer> enhancers = new ArrayList<>();
            enhancers.add(jwtTokenEnhancer);
            enhancers.add(jwtAccessTokenConverter);
            enhancerChain.setTokenEnhancers(enhancers);

            //
            endpoints.tokenEnhancer(enhancerChain)
                    .accessTokenConverter(jwtAccessTokenConverter);
        }
    }
重启项目,再次获取令牌,系统返回:
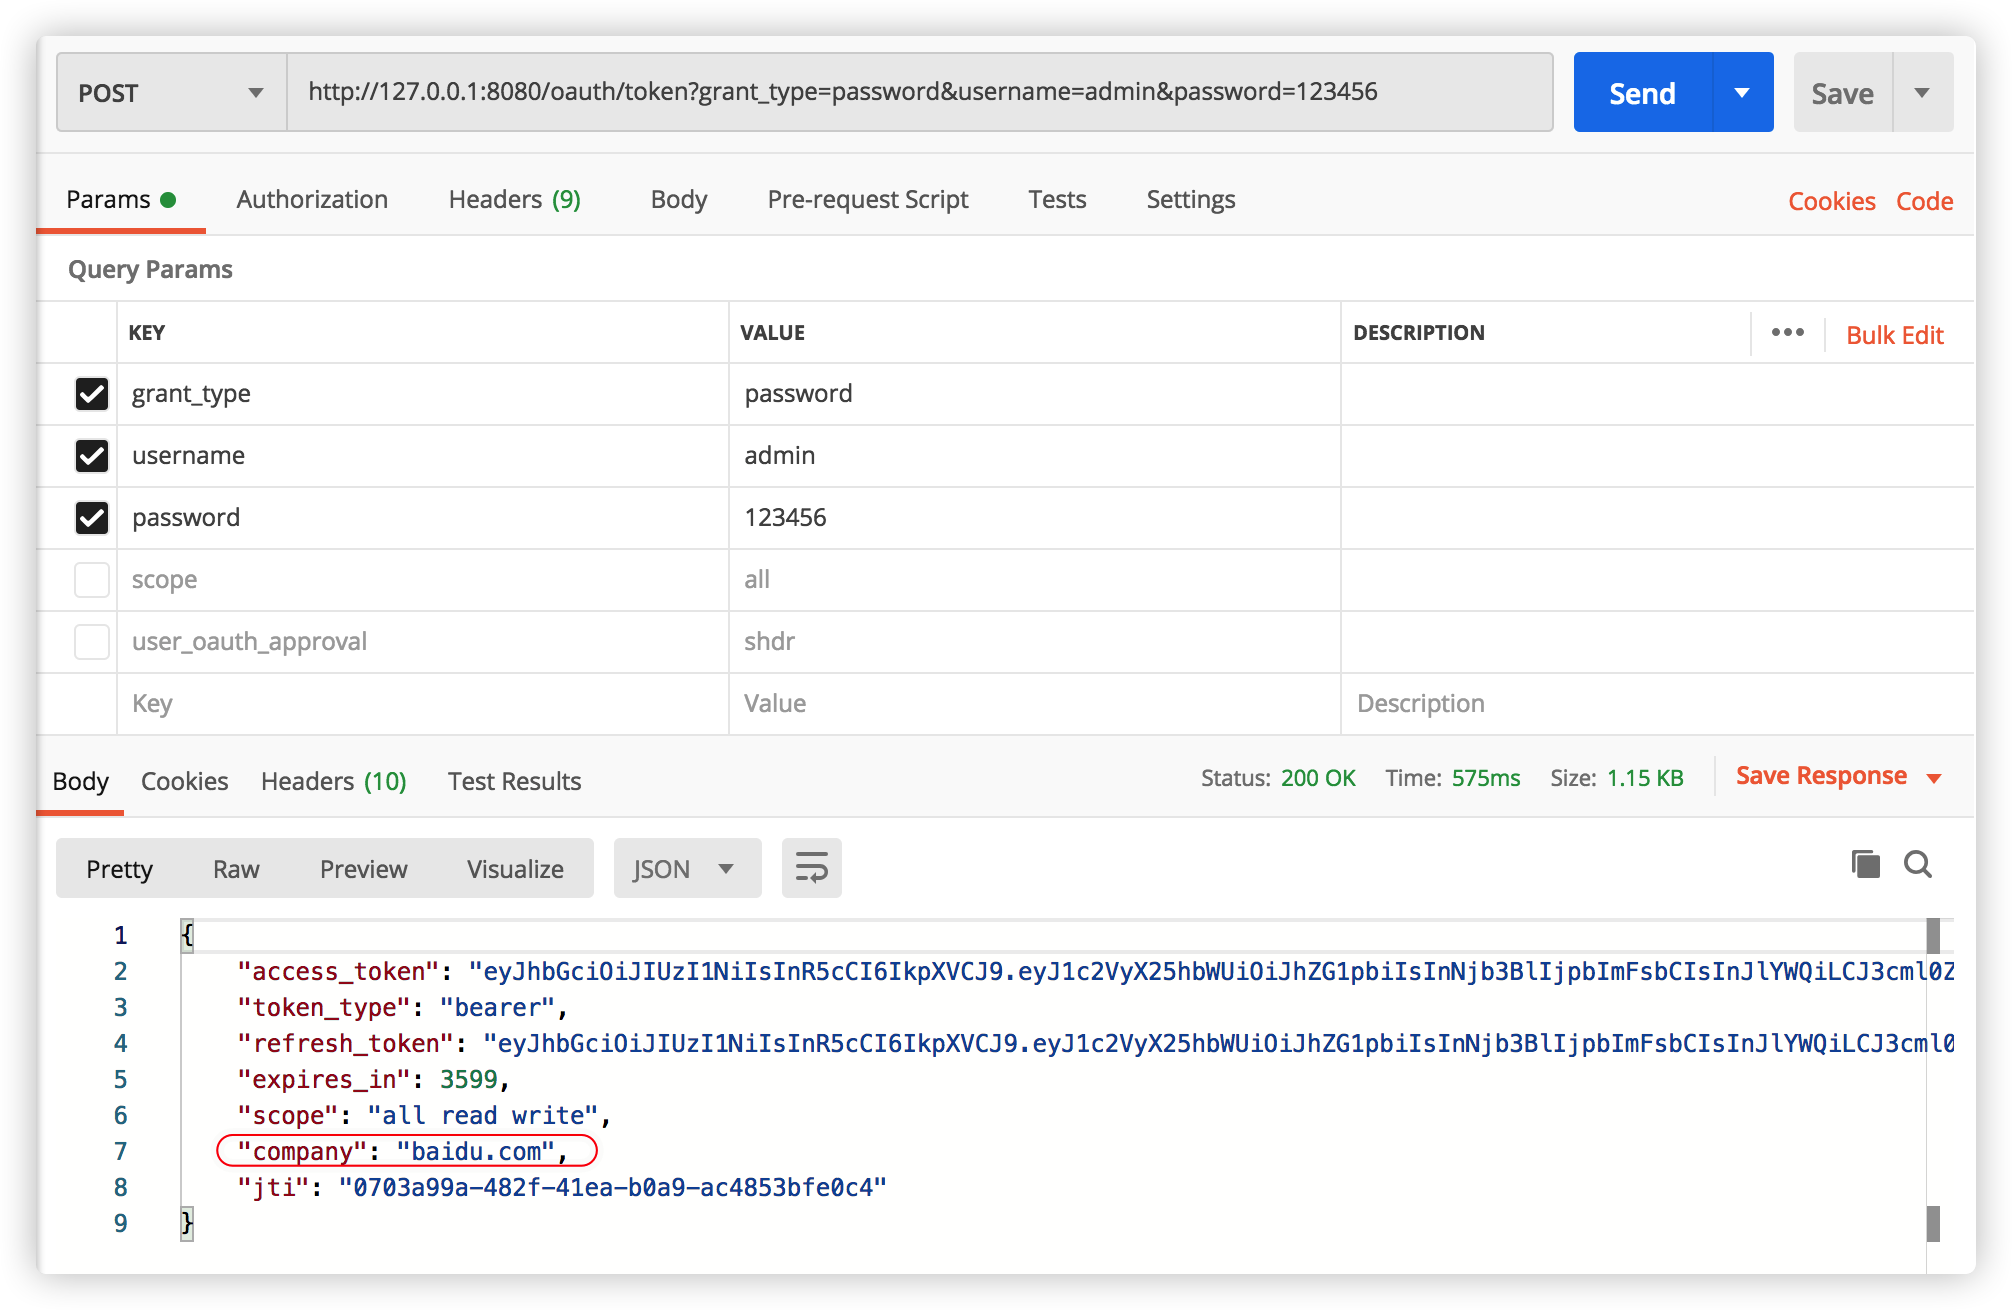
可以看到,在返回的JSON内容里已经多了我们添加的company信息,此外将access_token复制到https://www.jsonwebtoken.io网站解析,内容如下:
{
 "user_name": "admin",
 "scope": [
  "all",
  "read",
  "write"
 ],
 "company": "baidu.com",
 "exp": 1584889256,
 "authorities": [
  "admin"
 ],
 "jti": "0703a99a-482f-41ea-b0a9-ac4853bfe0c4",
 "client_id": "myhk1"
}
解析后的JWT也包含了我们添加的company信息。
Java中解析JWT
要在Java代码中解析JWT,需要添加如下依赖:
<dependency>
   <groupId>io.jsonwebtoken</groupId>
   <artifactId>jjwt</artifactId>
   <version>0.9.1</version>
</dependency>
修改/user/me:
    @GetMapping("/user/me")
    private Object getCurrentUser(Authentication user, HttpServletRequest request) {
        String header = request.getHeader("Authorization");
        String token = StringUtils.substringAfter(header, "bearer ");

        return Jwts.parser().setSigningKey(securityProperties.getOauth2().getJwtSigningKey().getBytes(StandardCharsets.UTF_8)).parseClaimsJws(token).getBody();
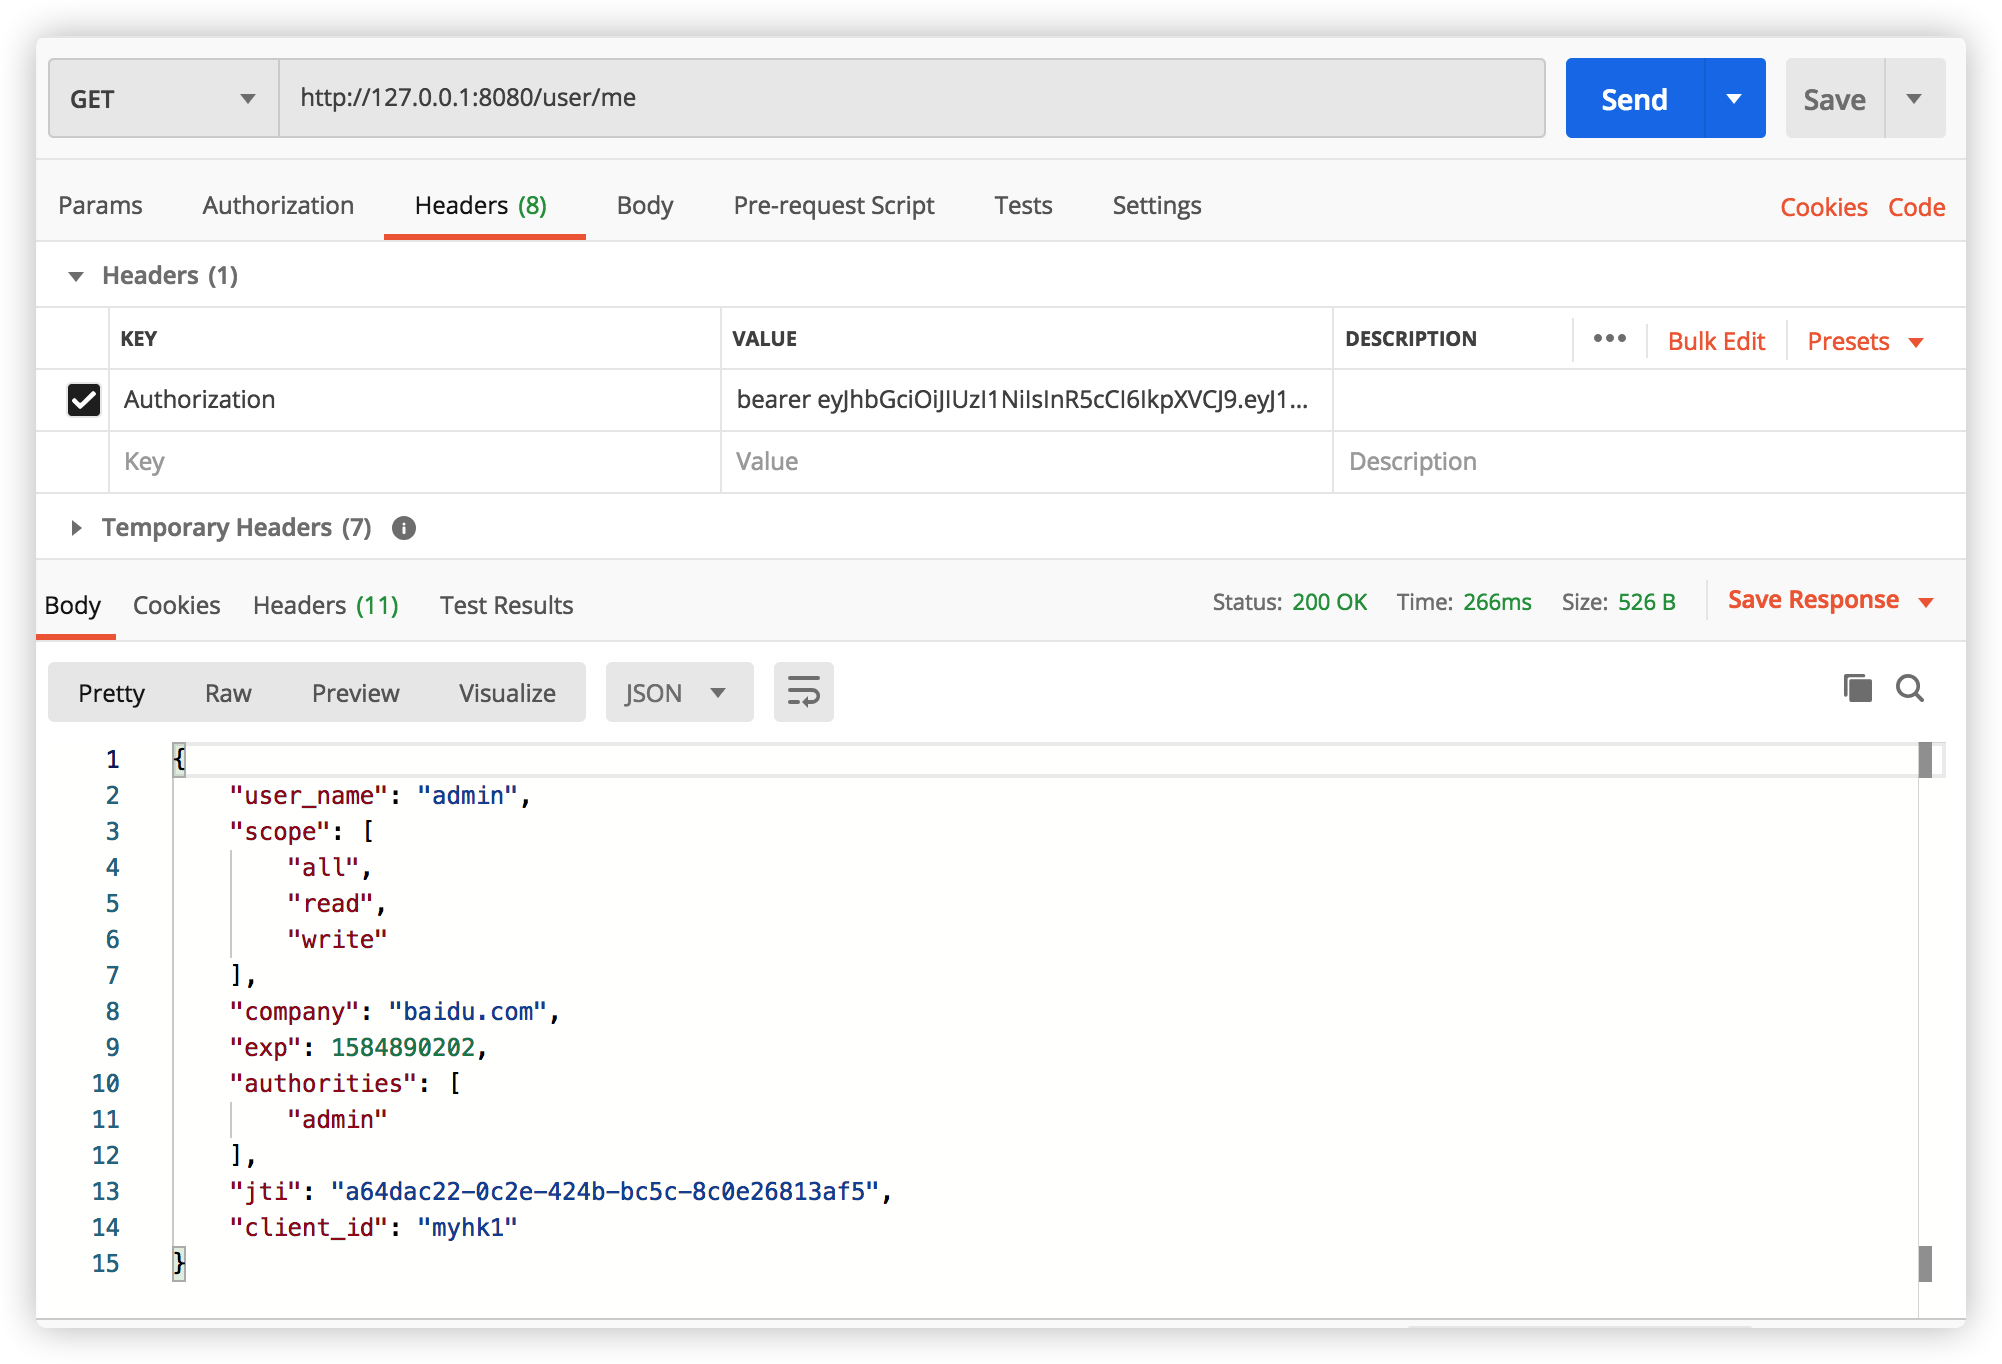
}signkey需要和TokenStoreConfig中指定的签名密钥一致。重启项目,获取令牌后访问/user/me,输出内容如下:
刷新令牌
令牌过期后我们可以使用refresh_token来从系统中换取一个新的可用令牌。让系统返回refresh_token,需要在认证服务器自定义配置里添加如下配置:
//授权模式
.authorizedGrantTypes("password", "authorization_code", "refresh_token");
假设现在access_token过期了,我们用refresh_token去换取新的令牌。使用postman发送如下请求:
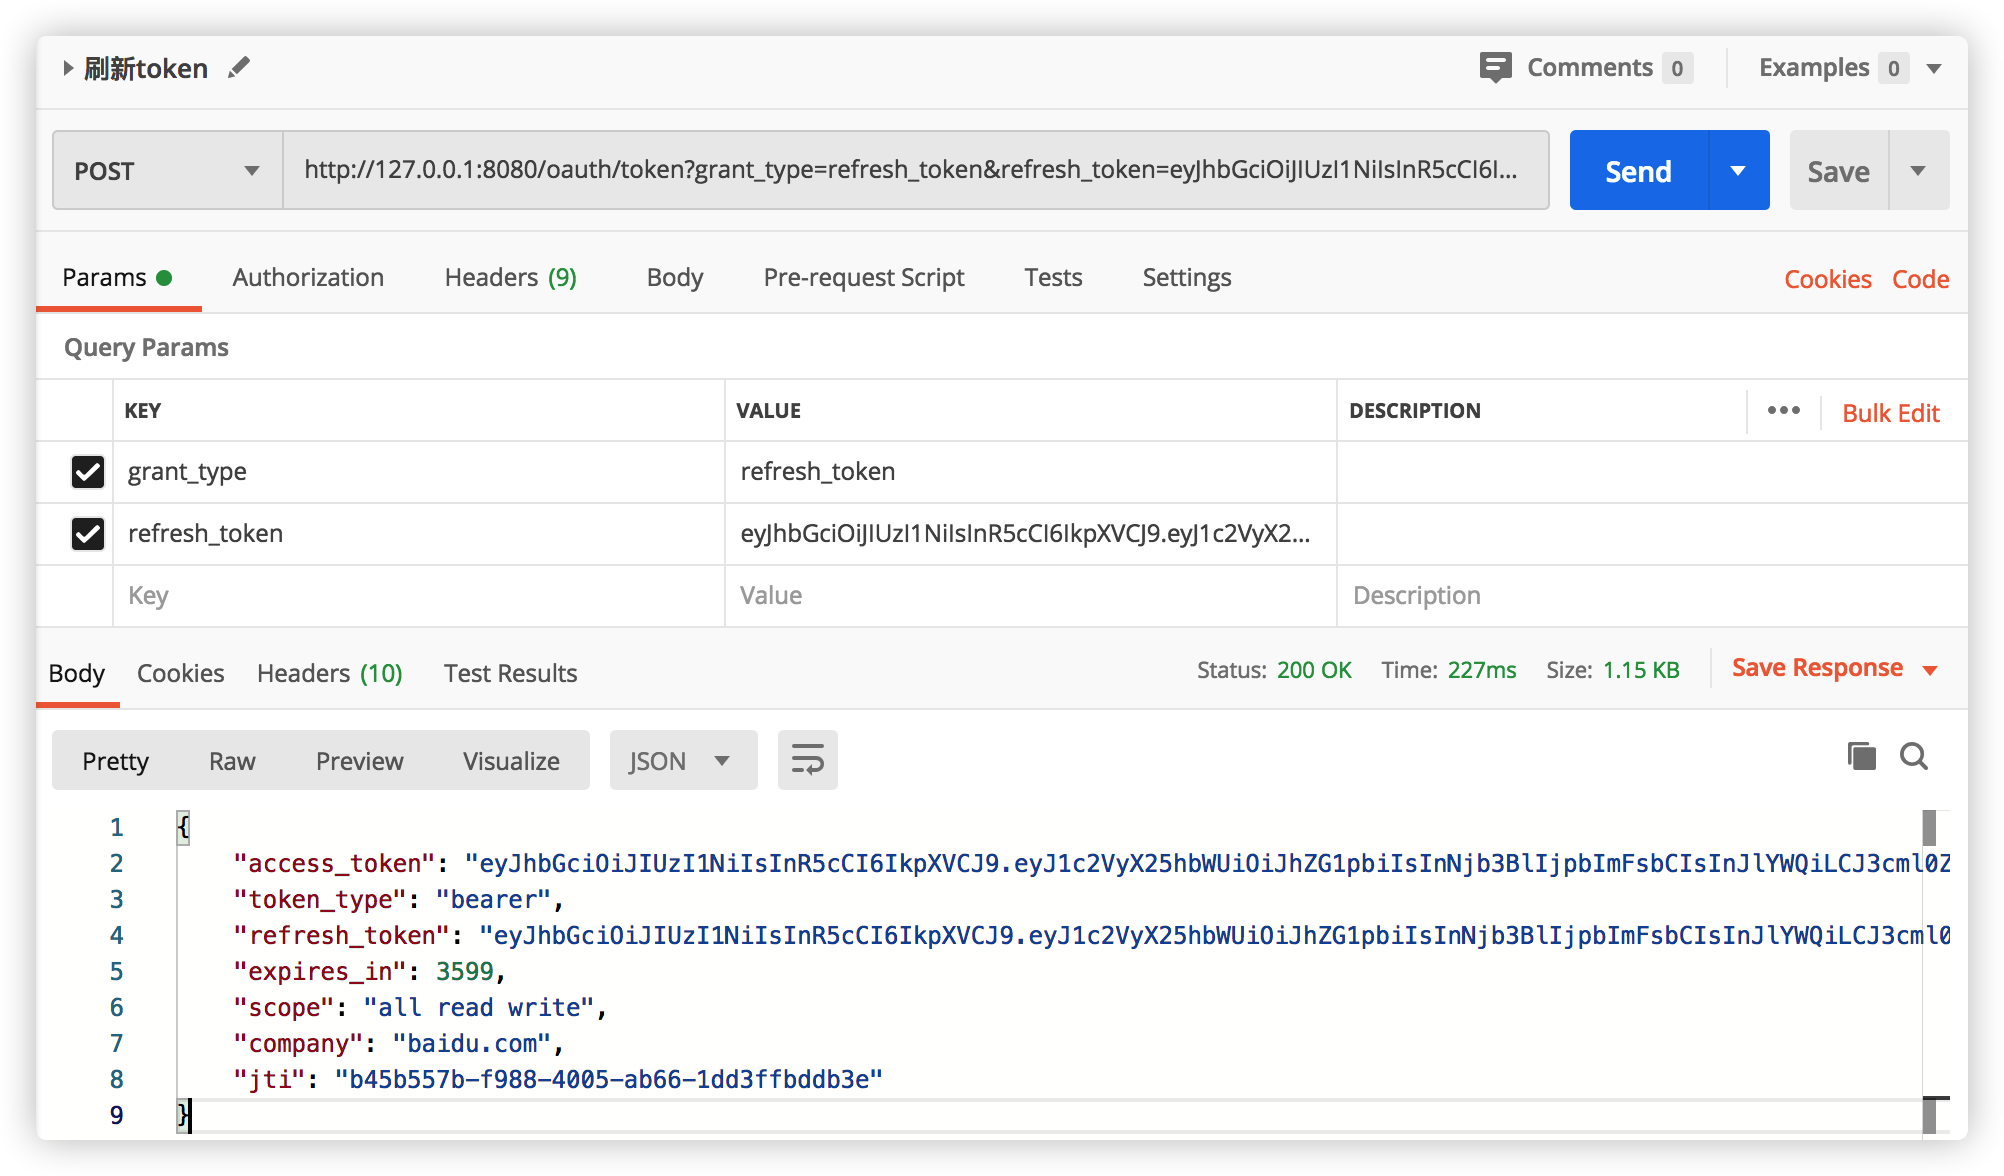
注意:JWT令牌是没有退出功能的。
来源:oschina
链接:https://my.oschina.net/u/1046143/blog/3208469
