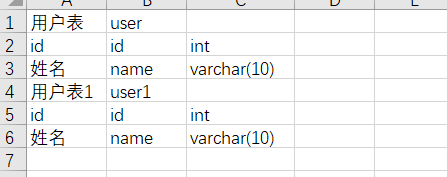
将数据结构按上图整理,支持同时多张表导入
打开PowerDesigner,新建模型,点击Tools|Execute Commands|Edit/Run Script菜单或按下快捷键Ctrl + Shift + X打开脚本窗口,输入示例VBScript脚本,修改其中的Excel模板路径及工作薄页签,点Run按钮执行即可。
'导入Excel表结构
'开始
Option Explicit

Dim mdl ' the current model
Set mdl = ActiveModel
If (mdl Is Nothing) Then
   MsgBox "There is no Active Model"
End If

Dim HaveExcel
Dim RQ
RQ = vbYes 'MsgBox("Is Excel Installed on your machine ?", vbYesNo + vbInformation, "Confirmation")
If RQ = vbYes Then
   HaveExcel = True

   ' Open & Create Excel Document
   Dim x1  '
   Set x1 = CreateObject("Excel.Application")
   x1.Workbooks.Open "C:\Users\Administrator\Desktop\11.xlsx"    '指定excel文档路径
   x1.Workbooks(1).Worksheets("Sheet1").Activate '指定要打开的sheet名称
Else
   HaveExcel = False
End If

a x1, mdl

Sub a(x1, mdl)
dim rwIndex
dim tableName
dim colname
dim table
dim col
dim count

'on error Resume Next
'set table = mdl.Tables.CreateNew '创建一个表实体
'table.Name = "xxx表" '指定表名,如果在Excel文档里有,也可以通过.Cells(rwIndex, 1).Value指定
'table.Code = "xxx"   '指定表Code,如果在Excel文档里有,也可以通过.Cells(rwIndex, 2).Value指定
'count = count + 1
For rwIndex = 1 To 200 step 1 '指定要遍历的Excel行标
        With x1.Workbooks(1).Worksheets("Sheet1")
            If .Cells(rwIndex, 1).Value = "" Then
               Exit For
            End If
            If .Cells(rwIndex, 3).Value = "" Then '指定表名
               set table = mdl.Tables.CreateNew
               table.Name = .Cells(rwIndex , 1).Value
               table.Code = .Cells(rwIndex , 2).Value
               table.Comment = .Cells(rwIndex , 1).Value
               count = count + 1
            Else
               'colName = .Cells(rwIndex, 1).Value
               set col = table.Columns.CreateNew '创建列
               'MsgBox .Cells(rwIndex, 1).Value, vbOK + vbInformation, "列"
               col.Name = .Cells(rwIndex, 1).Value '指定列名
               'MsgBox col.Name, vbOK + vbInformation, "列"
               col.Code = .Cells(rwIndex, 2).Value '指定列code

               col.Comment = .Cells(rwIndex,1).Value '指定列说明

               col.DataType = .Cells(rwIndex, 3).Value '指定列数据类型

               If .Cells(rwIndex, 4).Value = "否" Then
                  col.Mandatory = true'指定列是否可空,true为不可空
               End If

               If rwIndex = 2 Then
                  col.Primary = true'指定主键
               End If
            End If
        End With
Next

MsgBox "生成数据表结构共计" + CStr(count), vbOK + vbInformation, "张表"

Exit Sub
End Sub
来源:https://www.cnblogs.com/MisMe/p/12469551.html