根据VueRouter的执行流程,可以通过这三个步骤来理解它的设计思想:
- 第一步:我们new VueRouter创建VueRouter实例的时候会通过深度遍历把传入的router属性对应的数组给解析一下,保存到一个Map中,每个Map对应router的一个元素,我们称之为路由记录,解析的时候会给每个路由记录增加一个正则表达式,用于<vuerouter-link>组件在渲染时查找哪个路由记录可以与之匹配
- 第二步:解析<router-link></router-link>组件的时候首先获取名为to的props(例如<router-link to="/login"><a>登陆</a></router-link>里的to属性),然后会遍历第一步Map里的每个记录(路由记录),并用路由记录中的正则去匹配这个to值,看看该正则是否能匹配,如果能匹配则表示可以渲染这个路由记录对应的组件了,然后通过Vue内部的$createElement全局函数渲染一个原生DOM标签(默认为a标签,可以通过<router-link/>组件的tag这个props去修改它),渲染后会在这个DOM对象上绑定一个click事件,当click事件触发时,会调用VueRouter实例的push()方法去修改路由,注意,VueRouter是通过click事件来触发路由的,不是通过a的href属性来触发,如果通过event这个props传入了其它事件,则也会进行绑定
- 第三步:就是渲染<router-view><router-view/>组件了,它首先会获取当前<router-view></router-view>相对于最顶层的大Vue实例所嵌套的深度的层次数,然后this.$route.matched上保存了所有父链路由对应的component信息的(this.$route.matched是当前路由记录对应的所有嵌套路劲片段的路由记录,也就是所有父路由对象都在这个数组里面,包含了当前页面的路由信息),这样就可以通过这个对象获取当前需要渲染的组件了,this.$route对象是个响应式数据,根据不同的页面,都会变动的, 后面会再单独讲解一下$router和$route的区别
VueRouter里的路由有三种模式:
- hash 使用 URL hash 值来作路由
- history 依赖 HTML5 History API 和服务器配置
abstract支持所有 JavaScript 运行环境,如 Node.js 服务器端
writer by:大沙漠 QQ:22969969
这三种模式有很多共同点,所以VueRouter在实现的时候定义了一个History基类,在基类上定义共同方法,然后再定义三个子类,分别继承整个History类来实现,如下:
class History {
    //定义一些公共方法,例如跳转操作
}

class HashHistory extends History {
    //hash模式的差异实现,例如获取hash值,设置hash值
}

class HTML5History extends History {
    //html5模式的差异实现,例如获取当前地址,设置当前地址
}

class AbstractHistory extends History {
    //abstract模式的差异实现
}
vuerouter会根据当前的模式,来创建一个对应的History的实例,再在整个实例上进行一系列操作
VueRouter的加载过程
在VueRouter加载的时候,对于浏览器环境它会执行Vue.use(VueRouter)自动进行安装,如下:
if (inBrowser && window.Vue) {    //如果在浏览器环境下且window.Vue存在
  window.Vue.use(VueRouter);        //则调用window.Vue.use安装VueRouter,此时就会执行install方法
}
vue插件安装的时候就会执行对应的install方法,与加载有关的如下:
    function install(Vue) {                                 //Vue-router的安装方法
        /*略*/
        Vue.mixin({                                             //混入生命周期函数 注意函数内的上下文是Vue实例
            beforeCreate: function beforeCreate() {                 //beforeCreate生命周期函数
                    if (isDef(this.$options.router)) {                  //如果this.$options.router存在    ;就是在创建Vue实例时传入的router对象
                        this._routerRoot = this;                            //在Vue实例上添加一个_routerRoot指向自己,即Vue实例
                        this._router = this.$options.router;                //在Vue实例上添加一个_router指向构造时的vue-router实例
                        this._router.init(this);                            //vue-router实例调用init()进行初始化,参数为Vue实例
                        Vue.util.defineReactive(this, '_route', this._router.history.current);  //通过Vue的defineReactive把_router变成响应式,等于this._router.history.current
                    } else {                                            //非根组件
                        this._routerRoot = (this.$parent && this.$parent._routerRoot) || this; //如果this.$options.router则设置$this._routerRoot为占位符节点的_routerRoot,这样就可以访问到vue-rooter实例了
                    }
                    registerInstance(this, this);
                },
            destroyed: function destroyed() {                       //销毁生命周期函数
                registerInstance(this);
            }
        });
        /*略*/
        Vue.component('RouterView', View);                      //注册RouterView组件
        Vue.component('RouterLink', Link);                      //注册RouterLink逐渐

    }
我们可以看到通过mixin混入在vue的beforeCreate生命周期函数内插入了一段代码,会通过this.$options.router.init(this)执行初始化代码(this.$options.router就是我们执行new Vue()时传入的VueRouter实例),这样就会执行VueRouter的init()方法了,另外还会执行Vue.component()方法将RouterView和RouterLink组件注册为全局组件。
VueRouter的init方法就是初始化路由,如果当前页面没有路由(例如http://test.com/)则初始化为根地址/(例如http://test.com/#/),就是执行基类的transitionTo方法进行跳转的过程,具体就不贴代码了,一贴就太多代码了。
VueRouter的执行过程
我们以上一篇文章https://www.cnblogs.com/greatdesert/p/12398443.html为例,依次整理一下VueRouter的执行过程
上面是加载的过程,对于例子里们我们执行new Vuerouter的时候:
    const routes = [                                                         //定义路由指向
        {path:'/login',component:login},
        {path:'/hello',name:'user',component:hello},
        {path:'/info/:id',component:info},
    ]

    var router = new VueRouter({                                             //创建一个VueRouter实例
        routes
    })
会执行vue-router的构造函数:
var VueRouter = function VueRouter (options) {         //构造函数
  if ( options === void 0 ) options = {};                 //如果option为undefined,则修正为空对象

  this.app = null;
  this.apps = [];
  this.options = options;
  this.beforeHooks = [];
  this.resolveHooks = [];
  this.afterHooks = [];
  this.matcher = createMatcher(options.routes || [], this);         //将路由信息转换为一个对象信息,返回一个对象,含有match和addRoutes属性,分别对应两个函数

  //初始化/修正mode
  var mode = options.mode || 'hash';                                                         //如果没有传mode,则默认为hash模式
  this.fallback = mode === 'history' && !supportsPushState && options.fallback !== false;     //如果当前为history模式,但是浏览器不支持PushState,则fallback不为false 则设置fallback为true
  if (this.fallback) {
    mode = 'hash';
  }
  if (!inBrowser) {
    mode = 'abstract';
  }
  this.mode = mode;

  switch (mode) {                                                 //根据不同的模式,对this.history做出实例化
    case 'history':
      this.history = new HTML5History(this, options.base);
      break
    case 'hash':
      this.history = new HashHistory(this, options.base, this.fallback);
      break
    case 'abstract':
      this.history = new AbstractHistory(this, options.base);
      break
    default:
      {
        assert(false, ("invalid mode: " + mode));
      }
  }
};
createMatcher函数会解析我们传入的router值,该函数逻辑如下:
function createMatcher (routes,router) {
  var ref = createRouteMap(routes);                              //创建一个Map,就是上面第一步说的路由记录
  var pathList = ref.pathList;
  var pathMap = ref.pathMap;
  var nameMap = ref.nameMap;

  function addRoutes (routes) {
    createRouteMap(routes, pathList, pathMap, nameMap);
  }

  function match (raw,currentRoute,redirectedFrom) {/**/}
  function redirect (record,location) { /**/ }

  function alias (record,location,matchAs) { /**/ }
  function _createRoute (record,location,redirectedFrom) { /**/ }

  return {match: match,addRoutes: addRoutes}                 //返回这一个对象,我们可以通过直接执行这两个键对应的函数来匹配路由记录
}
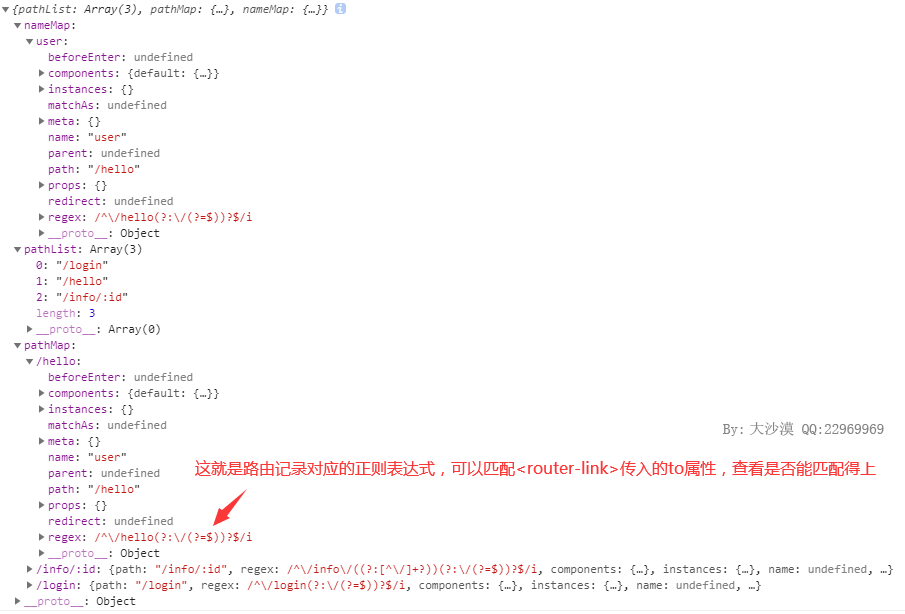
对于例子里来说,执行到这里创建的路由记录如下:

nameMap是给命名路由用的,pathList是存储所有的路劲,pathMap才是所有路由记录的地方。
有了路由记录,vue-link和vue-view组件就可以大展手脚了,这两个组件后面再单独详解
来源:https://www.cnblogs.com/greatdesert/p/12420635.html