NIO入门
1、理论知识
一个线程从某个通道(一个线程可以管理多个通道)发送请求或者读取数据,但是它仅能得到目前可用的数据,如果目前没有数据可以使用,那么就什么都不会获取,而不是保持线程阻塞,所以直至数据变得可以读取之前,该线程就可以继续做其他的事情。
2、案例
完整代码:
public class BasicBuffer {
    public static void main(String[] args) {

        //创建一个buffer 大小为5 5个int(不同的类型对应不同的buffer,int char 等,不同的类型对应不同的等级,不同的数据放在不同的buffer里面,提高效率)
        IntBuffer intBuffer=IntBuffer.allocate(5);
        //向bufffer中纺织数据
        for(int i=0;i<intBuffer.capacity();i++){
            intBuffer.put(i*2);
        }
        //将bufer转换,读写转换(!!!!)
        intBuffer.flip();
        while (intBuffer.hasRemaining()){
            //每次get之后就往后移动一次
            System.out.println(intBuffer.get());
        }
    }
}

说明:
(1)每一个channel对应一个buffer
(2)每一个selector(对应在程序中就是一个对象)就是一个线程,一个线程对应多个channel(一个channel就是一个连接)
(3)seletor处于监听状态,程序切换到哪个channel是由事件(Event)决定的
(4)seletor会根据不同的事件,再各个通道上切换
(5)bufffer就是一个内存块,底层是有一个数组
(7)数据的读取写入是通过Buffer,这个和BIO,BIO要么是输入流、要么是输出流,不能双向,但是NIO的buffer可读可写,但是需要flip切换
(8)channel是双向的,可以返回底层操作系统的情况,例如linux,底层的操作系统通道就是双向的
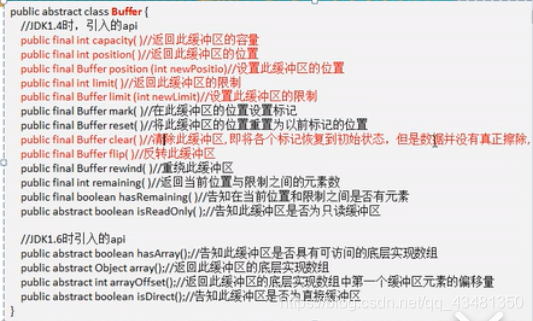
3、buffer
程序和文件数据之间不能直接读取,必须通过buffer
缓冲区本质上是一个可以读写数据的内存块,可以理解是一个容器对象(含数组)
(1)buffer程序参数
-
mark:标记
-
position:buffer的编号(数组的索引),表示下一个要读写的元素的索引
-
limit:表示缓冲区的当前终点,不能对缓冲区超过极限(小于极限数字,并且不等于)的位置进行读写操作,但是极限是可以修改的,因为buffer可读可写
-
capaticy:长度(容量),是固定大小的,例如以上程序
IntBuffer.allocate(5)就是指定此buffer的容量是5,且以后不能改变
(2)存在buffer中的数据,实际是存在数组中
4、channel
通道可以同时进行读写、可以实现异步读写数据、可以向缓冲区读写数据,以下是基于TCP
(1)channel的建立
当客户端发起一次请求时,首先请求到达服务器,服务器利用本身具有的SeverSocketChannel会产生一个SocketChannel(即产生一个与当前客户端对应的channel),之后的数据交换就是利用此channel进行交互
(2)程序中的channel
实际上在我们进行编写程序时,SeverSocketChannel是通过ServerSocketChannelImpl实现的,产生的socketchannel是通过SocketChannelImpl实现的
(3)FileChannel
public int read(ByteBuffer dst);
以上代码是指从通道读取数据并放到缓冲区中,即针对channel来说,buffer在read (读)channel
public int write(ByteBuffer dst);
以上代码是指将缓冲区的数据写到通道中,针对channel来说,buffer在向channel写数据
public long transferFrom(ReadableByteChannel src, long position, long count)
以上代码是指从目标通道中复制数据到当前通道,其中src为源通道(目标通道)
public long transferTo(long position, long count, WritableByteChannel target)
以上代码是指把数据从当前通道复制给目标通道,target为目标通道
(4)案例
写数据
import java.io.FileOutputStream;
import java.nio.ByteBuffer;
import java.nio.channels.FileChannel;

public class NIOFileChannel {
    public static void main(String[] args) throws Exception {
        String str="hello ndd";
        //创建一个输出流->channel
        FileOutputStream fileOutputStream=new FileOutputStream("e:\\file01.txt");

        //通过fileOutputStream 获取 对应的FileChannel
        //fileChannel的真实类型是 fileChannelimpl
        FileChannel fileChannel=fileOutputStream.getChannel();

        //创建一个缓冲区
        ByteBuffer byteBuffer=ByteBuffer.allocate(1024);

        //将字符串放入缓冲区中
        byteBuffer.put(str.getBytes());

        //现在字符串已经放入到了buffer中,下一步是从buffer中放入channel中,也就是读取buffer,所以要转换
        byteBuffer.flip();

        //将buffer中的数据写入channel
        fileChannel.write(byteBuffer);

        //关闭流
        fileOutputStream.close();

    }
}

执行后就会在e盘中出现一个新建的file01
读数据
import java.io.File;
import java.io.FileInputStream;
import java.nio.ByteBuffer;
import java.nio.channels.FileChannel;


public class NIOFileChannel02 {
    public static void main(String[] args) throws Exception{

        File file=new File("e:\\file01.txt");
        FileInputStream inputStream=new FileInputStream(file);
         FileChannel fileChannel=inputStream.getChannel();

         //新建一个buffer
        ByteBuffer byteBuffer=ByteBuffer.allocate((int) file.length());
        //channel中读取数据
        fileChannel.read(byteBuffer);

        byteBuffer.flip();

        //byteBuffer.array()返回buffer中的数组
        System.out.println(new String(byteBuffer.array()));
    }
}
从一个buffer中既读又写
创建两个channel,针对一个buffer进行又读又写
import java.io.FileInputStream;
import java.io.FileOutputStream;
import java.nio.ByteBuffer;
import java.nio.channels.FileChannel;

public class NIOFileChannel03 {
    public static void main(String[] args) throws Exception{

        FileInputStream fileInputStream = new FileInputStream("1.txt");
        FileChannel filechannel01 = fileInputStream.getChannel();

        FileOutputStream fileOutputStream = new FileOutputStream("2.txt");
        FileChannel fileChannel02 = fileOutputStream.getChannel();

        //新建一个buffer作为两个channel中间传输数据的作用
        ByteBuffer byteBuffer =ByteBuffer.allocate(1024);
        //循环读取
        while(true){

            /*注意要清空*/
            byteBuffer.clear();//如果不清空就会一直循环读取,如果不清空 在上一次之后就会position=limit,就会一直循环

            //向buffer中写入数据(从channel中读出数据)
            int read=filechannel01.read(byteBuffer);
            if(read==-1) break;
            byteBuffer.flip();
            fileChannel02.write(byteBuffer);
        }
    }
}
来源:CSDN
作者:三三和七七
链接:https://blog.csdn.net/qq_43481350/article/details/104576159