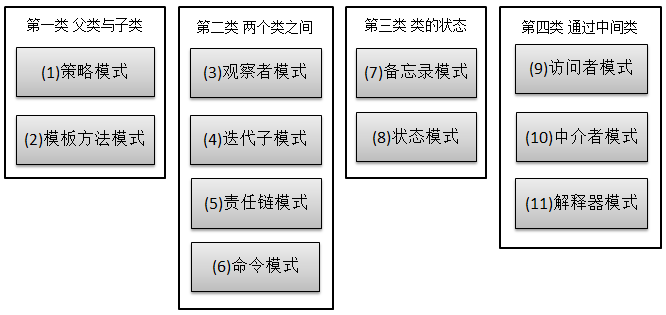
其实每个设计模式都是很重要的一种思想,看上去很熟,其实是因为我们在学到的东西中都有涉及,尽管有时我们并不知道,其实在Java本身的设计之中处处都有体现,像AWT、JDBC、集合类、IO管道或者是Web框架,里面设计模式无处不在。因为我们篇幅有限,很难讲每一个设计模式都讲的很详细,不过我会尽我所能,尽量在有限的空间和篇幅内,把意思写清楚了,更好让大家明白。本章不出意外的话,应该是设计模式最后一讲了,首先还是上一下上篇开头的那个图:

本章讲讲第三类和第四类。
19、备忘录模式(Memento)
主要目的是保存一个对象的某个状态,以便在适当的时候恢复对象,个人觉得叫备份模式更形象些,通俗的讲下:假设有原始类A,A中有各种属性,A可以决定需要备份的属性,备忘录类B是用来存储A的一些内部状态,类C呢,就是一个用来存储备忘录的,且只能存储,不能修改等操作。做个图来分析一下:

Original类是原始类,里面有需要保存的属性value及创建一个备忘录类,用来保存value值。Memento类是备忘录类,Storage类是存储备忘录的类,持有Memento类的实例,该模式很好理解。直接看源码:
- public class Original {
- private String value;
- public String getValue() {
- return value;
- }
- public void setValue(String value) {
- this.value = value;
- }
- public Original(String value) {
- this.value = value;
- }
- public Memento createMemento(){
- return new Memento(value);
- }
- public void restoreMemento(Memento memento){
- this.value = memento.getValue();
- }
- }
public class Original {

	private String value;

	public String getValue() {
		return value;
	}

	public void setValue(String value) {
		this.value = value;
	}

	public Original(String value) {
		this.value = value;
	}

	public Memento createMemento(){
		return new Memento(value);
	}

	public void restoreMemento(Memento memento){
		this.value = memento.getValue();
	}
}- public class Memento {
- private String value;
- public Memento(String value) {
- this.value = value;
- }
- public String getValue() {
- return value;
- }
- public void setValue(String value) {
- this.value = value;
- }
- }
public class Memento {

	private String value;

	public Memento(String value) {
		this.value = value;
	}

	public String getValue() {
		return value;
	}

	public void setValue(String value) {
		this.value = value;
	}
}- public class Storage {
- private Memento memento;
- public Storage(Memento memento) {
- this.memento = memento;
- }
- public Memento getMemento() {
- return memento;
- }
- public void setMemento(Memento memento) {
- this.memento = memento;
- }
- }
public class Storage {

	private Memento memento;

	public Storage(Memento memento) {
		this.memento = memento;
	}

	public Memento getMemento() {
		return memento;
	}

	public void setMemento(Memento memento) {
		this.memento = memento;
	}
}
测试类:
- public class Test {
- public static void main(String[] args) {
- // 创建原始类
- Original origi = new Original("egg");
- // 创建备忘录
- Storage storage = new Storage(origi.createMemento());
- // 修改原始类的状态
- System.out.println("初始化状态为:" + origi.getValue());
- origi.setValue("niu");
- System.out.println("修改后的状态为:" + origi.getValue());
- // 回复原始类的状态
- origi.restoreMemento(storage.getMemento());
- System.out.println("恢复后的状态为:" + origi.getValue());
- }
- }
public class Test {

	public static void main(String[] args) {

		// 创建原始类
		Original origi = new Original("egg");

		// 创建备忘录
		Storage storage = new Storage(origi.createMemento());

		// 修改原始类的状态
		System.out.println("初始化状态为:" + origi.getValue());
		origi.setValue("niu");
		System.out.println("修改后的状态为:" + origi.getValue());

		// 回复原始类的状态
		origi.restoreMemento(storage.getMemento());
		System.out.println("恢复后的状态为:" + origi.getValue());
	}
}
输出:
初始化状态为:egg
修改后的状态为:niu
恢复后的状态为:egg
简单描述下:新建原始类时,value被初始化为egg,后经过修改,将value的值置为niu,最后倒数第二行进行恢复状态,结果成功恢复了。其实我觉得这个模式叫“备份-恢复”模式最形象。
20、状态模式(State)
核心思想就是:当对象的状态改变时,同时改变其行为,很好理解!就拿QQ来说,有几种状态,在线、隐身、忙碌等,每个状态对应不同的操作,而且你的好友也能看到你的状态,所以,状态模式就两点:1、可以通过改变状态来获得不同的行为。2、你的好友能同时看到你的变化。看图:

State类是个状态类,Context类可以实现切换,我们来看看代码:
- package com.xtfggef.dp.state;
- /**
- * 状态类的核心类
- * 2012-12-1
- * @author erqing
- *
- */
- public class State {
- private String value;
- public String getValue() {
- return value;
- }
- public void setValue(String value) {
- this.value = value;
- }
- public void method1(){
- System.out.println("execute the first opt!");
- }
- public void method2(){
- System.out.println("execute the second opt!");
- }
- }
package com.xtfggef.dp.state;

/**
 * 状态类的核心类
 * 2012-12-1
 * @author erqing
 *
 */
public class State {

	private String value;

	public String getValue() {
		return value;
	}

	public void setValue(String value) {
		this.value = value;
	}

	public void method1(){
		System.out.println("execute the first opt!");
	}

	public void method2(){
		System.out.println("execute the second opt!");
	}
}- package com.xtfggef.dp.state;
- /**
- * 状态模式的切换类 2012-12-1
- * @author erqing
- *
- */
- public class Context {
- private State state;
- public Context(State state) {
- this.state = state;
- }
- public State getState() {
- return state;
- }
- public void setState(State state) {
- this.state = state;
- }
- public void method() {
- if (state.getValue().equals("state1")) {
- state.method1();
- } else if (state.getValue().equals("state2")) {
- state.method2();
- }
- }
- }
package com.xtfggef.dp.state;

/**
 * 状态模式的切换类   2012-12-1
 * @author erqing
 *
 */
public class Context {

	private State state;

	public Context(State state) {
		this.state = state;
	}

	public State getState() {
		return state;
	}

	public void setState(State state) {
		this.state = state;
	}

	public void method() {
		if (state.getValue().equals("state1")) {
			state.method1();
		} else if (state.getValue().equals("state2")) {
			state.method2();
		}
	}
}
测试类:
- public class Test {
- public static void main(String[] args) {
- State state = new State();
- Context context = new Context(state);
- //设置第一种状态
- state.setValue("state1");
- context.method();
- //设置第二种状态
- state.setValue("state2");
- context.method();
- }
- }
public class Test {

	public static void main(String[] args) {

		State state = new State();
		Context context = new Context(state);

		//设置第一种状态
		state.setValue("state1");
		context.method();

		//设置第二种状态
		state.setValue("state2");
		context.method();
	}
}
输出:
execute the first opt!
execute the second opt!
根据这个特性,状态模式在日常开发中用的挺多的,尤其是做网站的时候,我们有时希望根据对象的某一属性,区别开他们的一些功能,比如说简单的权限控制等。
21、访问者模式(Visitor)
访问者模式把数据结构和作用于结构上的操作解耦合,使得操作集合可相对自由地演化。访问者模式适用于数据结构相对稳定算法又易变化的系统。因为访问者模式使得算法操作增加变得容易。若系统数据结构对象易于变化,经常有新的数据对象增加进来,则不适合使用访问者模式。访问者模式的优点是增加操作很容易,因为增加操作意味着增加新的访问者。访问者模式将有关行为集中到一个访问者对象中,其改变不影响系统数据结构。其缺点就是增加新的数据结构很困难。—— From 百科
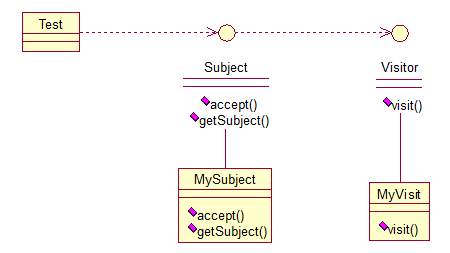
简单来说,访问者模式就是一种分离对象数据结构与行为的方法,通过这种分离,可达到为一个被访问者动态添加新的操作而无需做其它的修改的效果。简单关系图:

来看看原码:一个Visitor类,存放要访问的对象,
- public interface Visitor {
- public void visit(Subject sub);
- }
public interface Visitor {
	public void visit(Subject sub);
}- public class MyVisitor implements Visitor {
- @Override
- public void visit(Subject sub) {
- System.out.println("visit the subject:"+sub.getSubject());
- }
- }
public class MyVisitor implements Visitor {

	@Override
	public void visit(Subject sub) {
		System.out.println("visit the subject:"+sub.getSubject());
	}
}
Subject类,accept方法,接受将要访问它的对象,getSubject()获取将要被访问的属性,
- public interface Subject {
- public void accept(Visitor visitor);
- public String getSubject();
- }
public interface Subject {
	public void accept(Visitor visitor);
	public String getSubject();
}- public class MySubject implements Subject {
- @Override
- public void accept(Visitor visitor) {
- visitor.visit(this);
- }
- @Override
- public String getSubject() {
- return "love";
- }
- }
public class MySubject implements Subject {

	@Override
	public void accept(Visitor visitor) {
		visitor.visit(this);
	}

	@Override
	public String getSubject() {
		return "love";
	}
}
测试:
- public class Test {
- public static void main(String[] args) {
- Visitor visitor = new MyVisitor();
- Subject sub = new MySubject();
- sub.accept(visitor);
- }
- }
public class Test {

	public static void main(String[] args) {

		Visitor visitor = new MyVisitor();
		Subject sub = new MySubject();
		sub.accept(visitor);
	}
}
输出:visit the subject:love
该模式适用场景:如果我们想为一个现有的类增加新功能,不得不考虑几个事情:1、新功能会不会与现有功能出现兼容性问题?2、以后会不会再需要添加?3、如果类不允许修改代码怎么办?面对这些问题,最好的解决方法就是使用访问者模式,访问者模式适用于数据结构相对稳定的系统,把数据结构和算法解耦,
22、中介者模式(Mediator)
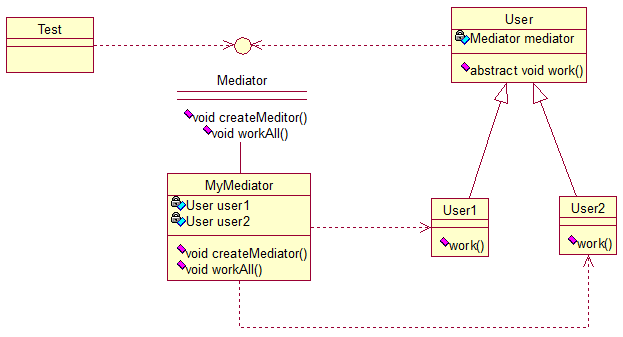
中介者模式也是用来降低类类之间的耦合的,因为如果类类之间有依赖关系的话,不利于功能的拓展和维护,因为只要修改一个对象,其它关联的对象都得进行修改。如果使用中介者模式,只需关心和Mediator类的关系,具体类类之间的关系及调度交给Mediator就行,这有点像spring容器的作用。先看看图:

User类统一接口,User1和User2分别是不同的对象,二者之间有关联,如果不采用中介者模式,则需要二者相互持有引用,这样二者的耦合度很高,为了解耦,引入了Mediator类,提供统一接口,MyMediator为其实现类,里面持有User1和User2的实例,用来实现对User1和User2的控制。这样User1和User2两个对象相互独立,他们只需要保持好和Mediator之间的关系就行,剩下的全由MyMediator类来维护!基本实现:
- public interface Mediator {
- public void createMediator();
- public void workAll();
- }
public interface Mediator {
	public void createMediator();
	public void workAll();
}- public class MyMediator implements Mediator {
- private User user1;
- private User user2;
- public User getUser1() {
- return user1;
- }
- public User getUser2() {
- return user2;
- }
- @Override
- public void createMediator() {
- user1 = new User1(this);
- user2 = new User2(this);
- }
- @Override
- public void workAll() {
- user1.work();
- user2.work();
- }
- }
public class MyMediator implements Mediator {

	private User user1;
	private User user2;

	public User getUser1() {
		return user1;
	}

	public User getUser2() {
		return user2;
	}

	@Override
	public void createMediator() {
		user1 = new User1(this);
		user2 = new User2(this);
	}

	@Override
	public void workAll() {
		user1.work();
		user2.work();
	}
}- public abstract class User {
- private Mediator mediator;
- public Mediator getMediator(){
- return mediator;
- }
- public User(Mediator mediator) {
- this.mediator = mediator;
- }
- public abstract void work();
- }
public abstract class User {

	private Mediator mediator;

	public Mediator getMediator(){
		return mediator;
	}

	public User(Mediator mediator) {
		this.mediator = mediator;
	}

	public abstract void work();
}- public class User1 extends User {
- public User1(Mediator mediator){
- super(mediator);
- }
- @Override
- public void work() {
- System.out.println("user1 exe!");
- }
- }
public class User1 extends User {

	public User1(Mediator mediator){
		super(mediator);
	}

	@Override
	public void work() {
		System.out.println("user1 exe!");
	}
}- public class User2 extends User {
- public User2(Mediator mediator){
- super(mediator);
- }
- @Override
- public void work() {
- System.out.println("user2 exe!");
- }
- }
public class User2 extends User {

	public User2(Mediator mediator){
		super(mediator);
	}

	@Override
	public void work() {
		System.out.println("user2 exe!");
	}
}
测试类:
- public class Test {
- public static void main(String[] args) {
- Mediator mediator = new MyMediator();
- mediator.createMediator();
- mediator.workAll();
- }
- }
public class Test {

	public static void main(String[] args) {
		Mediator mediator = new MyMediator();
		mediator.createMediator();
		mediator.workAll();
	}
}
输出:
user1 exe!
user2 exe!
23、解释器模式(Interpreter)
解释器模式是我们暂时的最后一讲,一般主要应用在OOP开发中的编译器的开发中,所以适用面比较窄。

Context类是一个上下文环境类,Plus和Minus分别是用来计算的实现,代码如下:
- public interface Expression {
- public int interpret(Context context);
- }
public interface Expression {
	public int interpret(Context context);
}- public class Plus implements Expression {
- @Override
- public int interpret(Context context) {
- return context.getNum1()+context.getNum2();
- }
- }
public class Plus implements Expression {

	@Override
	public int interpret(Context context) {
		return context.getNum1()+context.getNum2();
	}
}- public class Minus implements Expression {
- @Override
- public int interpret(Context context) {
- return context.getNum1()-context.getNum2();
- }
- }
public class Minus implements Expression {

	@Override
	public int interpret(Context context) {
		return context.getNum1()-context.getNum2();
	}
}- public class Context {
- private int num1;
- private int num2;
- public Context(int num1, int num2) {
- this.num1 = num1;
- this.num2 = num2;
- }
- public int getNum1() {
- return num1;
- }
- public void setNum1(int num1) {
- this.num1 = num1;
- }
- public int getNum2() {
- return num2;
- }
- public void setNum2(int num2) {
- this.num2 = num2;
- }
- }
public class Context {

	private int num1;
	private int num2;

	public Context(int num1, int num2) {
		this.num1 = num1;
		this.num2 = num2;
	}

	public int getNum1() {
		return num1;
	}
	public void setNum1(int num1) {
		this.num1 = num1;
	}
	public int getNum2() {
		return num2;
	}
	public void setNum2(int num2) {
		this.num2 = num2;
	}


}- public class Test {
- public static void main(String[] args) {
- // 计算9+2-8的值
- int result = new Minus().interpret((new Context(new Plus()
- .interpret(new Context(9, 2)), 8)));
- System.out.println(result);
- }
- }
public class Test {

	public static void main(String[] args) {

		// 计算9+2-8的值
		int result = new Minus().interpret((new Context(new Plus()
				.interpret(new Context(9, 2)), 8)));
		System.out.println(result);
	}
}
最后输出正确的结果:3。
基本就这样,解释器模式用来做各种各样的解释器,如正则表达式等的解释器等等!
设计模式基本就这么大概讲完了,总体感觉有点简略,的确,这么点儿篇幅,不足以对整个23种设计模式做全面的阐述,此处读者可将它作为一个理论基础去学习,通过这四篇博文,先基本有个概念,虽然我讲的有些简单,但基本都能说明问题及他们的特点,如果对哪一个感兴趣,可以继续深入研究!同时我也会不断更新,尽量补全遗漏、修正不足,欢迎广大读者及时提出好的建议,我们一起学习!项目中涉及到的代码,已经放到了我的资源里:http://download.csdn.net/detail/zhangerqing/4835830(因为我不喜欢不劳而获,所以没有免积分,只设置了5个,如果有人实在没积分又急要,那么联系我吧,我给你发过去)。
在阅读的过程中,有任何问题,请联系:egg。
邮箱:xtfggef@gmail.com 微博:http://weibo.com/xtfggef
- 顶
- 11
- 踩
- 0
- 相关博文推荐
- java的obcik转航母
- 安装JBPM6运行环境(JBPM6学习之...
- 要点Java3 编译运行Hello Wo...
- url传中文乱码
- java(22) - 异常详解
- 创建第一个JBPM6项目并且运行自带的h...
- 黑马程序员----IO流
- 利用Java计算String的MD5
- 5楼 zhuanyeying 2013-10-26 15:19发表 [回复] [引用] [举报]
-

- 你好,想问下。这个中介者模式和代理模式应该是一样的模式?只不过您之前的代理模式的例子只持有了一个对象的引用,而这个中介者模式持有了两个对象的应用。
- 4楼 java_ganbin 2013-06-21 16:38发表 [回复] [引用] [举报]
来源:oschina
链接:https://my.oschina.net/u/1455030/blog/202918