测试框架有很多,比如常用的
- UI自动化测试框架
- java+selenium/appium+testNG/Junit+Maven/Ant/Gradle+Jenkins+MySQL+testlink/redmine
- python+selenium/appium+unittest/pytest+Git+Jenkins+MySQL+testlink/redmine
- python+rebot framework+unittest/pytest+Git+Jenkins+MySQL+testlink/redmine
- 接口自动化框架
- java+testNG/Junit+Maven/Ant/Gradle+Jenkins+MySQL+testlink/redmine
- python+unittest/pytest+Git+Jenkins+MySQL+testlink/redmine
- python+rebot framework+unittest/pytest+Git+Jenkins+MySQL+testlink/redmine
- jmeter+Maven/Ant+Jenkins+MySQL+testlink/redmine
由于我对java比较熟悉,所以就从TestNG框架开始学习自动化接口测试。和Junit相比,TestNG比较适合测试人员使用,因为
- TestNG比Junit涵盖功能更全面的测试
- Junit更适合隔离性比较强的单元测试
- TestNG更适合复杂的集成测试
TestNG的官方网址: https://testng.org/doc/index.html 。个人觉得学习一个新的框架,结合着官网的介绍更容易理解。
1. TestNG的引入:
我使用的Eclipse开发工具,所以引入TestNG需要安装Eclipse的TestNG插件,具体方法请参考https://testng.org/doc/download.html 。 这里给出了不同的开发环境的引入方法。这里就不再详细叙述,只记录如何使用TestNG测试框架进行项目的测试。
2. 创建一个Java Project. 在Eclipse中,点击 File->New->Java Project.
3.新建一个package,选择该package,点击右键->TestNG->Create TestNG class. 输入Class name点击finish。

4.添加TestNG库

5.在包含@Test注解的方法里完成测试过程。运行,并输出结果。这里简单的输出一个字符串。

以上是如何使用TestNG框架进行项目的测试。
接下来学习TestNG的基本知识点:注解。在新建TestNG类的时候,可以给该类添加很多注解。

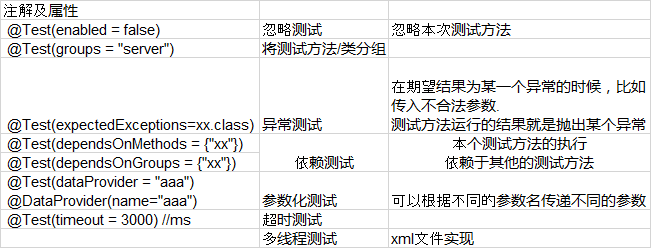
在MyFirstTestNG这个类中f()方法上的注解@Test是最基本的注解,用来将方法标记为测试方法。该注解很多属性,以下列举出一些常用的属性:

- 关于BeforeSuite和AfterSuite的解析如下:
假设有很多TestNG的class,其中一个SuiteConfig.class类中有BeforeSuite和AfterSuite注解的方法,
SuiteConfig.class
 1 public class SuiteConfig {
 2     @BeforeSuite
 3     public void beforeSuite() {
 4         System.out.println("BeforeSuite");
 5     }
 6     @AfterSuite
 7     public void afterSuite() {
 8         System.out.println("AfterSuite");
 9     }
10 }
loginTest.java
 1 public class LoginTest {
 2   @Test
 3   public void loginSuccess() {
 4       System.out.println("Login success test");
 5   }
 6   @Test
 7   public void loginFailed() {
 8       System.out.println("login failed test");
 9   }
10
11   @BeforeMethod
12   public void beforeMethod() {
13       System.out.println("before loginTest");
14   }
15
16   @AfterMethod
17   public void afterMethod() {
18       System.out.println("after loginTest");
19   }
20 }
PayTest.java
 1 public class PayTest {
 2   @Test
 3   public void payTest() {
 4       System.out.println("PayTest");
 5   }
 6   @BeforeMethod
 7   public void beforeMethod() {
 8       System.out.println("before payTest");
 9   }
10
11   @AfterMethod
12   public void afterMethod() {
13       System.out.println("after payTest");
14   }
15 }
FavTest.java
 1 public class FavTest {
 2   @Test
 3   public void favTest() {
 4       System.out.println("FavTest");
 5   }
 6
 7   @BeforeMethod
 8   public void beforeMethod() {
 9       System.out.println("before FavTest");
10   }
11
12   @AfterMethod
13   public void afterMethod() {
14       System.out.println("after FavTest");
15   }
16 }
新建一个suite.xml文件,并将LoginTest和PayTest放在同一个测试套件testSuite中:
 1 <?xml version="1.0" encoding="UTF-8"?>
 2 <suite name="Suite" parallel="false">
 3   <test name="Test">
 4     <classes>
 5       <class name="com.yywang.suite.SuiteConfig"/>
 6       <class name="com.yywang.suite.LoginTest"/>
 7       <class name="com.yywang.suite.PayTest"/>
 8     </classes>
 9   </test> <!-- Test -->
10 </suite> <!-- Suite -->
运行该suite.xml结果如下:
BeforeSuite
before loginTest
login failed test
after loginTest
before loginTest
Login success test
after loginTest
before payTest
PayTest
after payTest
AfterSuite
===============================================
Suite
Total tests run: 3, Failures: 0, Skips: 0
===============================================
由此可以看出,testSuite测试套件可以包含很多测试用例,并且beforeSuite和afterSuite是在所有的测试用例方法运行之前/后运行的。
- 常用注解及属性的实例
 1  @Test
 2     public void testCase1() {
 3         System.out.println("Test - This is testCase1 with @Test");
 4     }
 5
 6     @Test
 7     public void testCase2() {
 8         System.out.println("Test - This is testCase2 with @Test");
 9     }
10
11     @Test(enabled = false)
12     public void ignoreTest() {
13         System.out.println("ignoreTest - This testcase will be ignored");
14     }
15
16     @Test(expectedExceptions = RuntimeException.class)
17     public void runTimeExceptionFailed() {
18         System.out.println("This is a failed exception test");
19     }
20
21     @Test(expectedExceptions = RuntimeException.class)
22     public void runTimeExceptionSuccess() {
23         System.out.println("This is a success exception test");
24         throw new RuntimeException();
25     }
26
27     @Test
28     public void dependedTestCase() {
29         System.out.println("This is depended TestCase");
30     }
31
32     @Test(dependsOnMethods = {"dependedTestCase"})
33     public void dependTestCase() {
34         System.out.println("This is depend TestCase");
35     }
- DataProvider实例
 1 public class DataProviderTest {
 2
 3     @Test(dataProvider = "paramter")
 4     public void testDataProvider(String name, int age) {
 5         System.out.println("testDataProvider - name="+name +",age=" + age );
 6     }
 7
 8     @DataProvider(name="paramter")
 9     public  Object[][] dataProvider() {
10         System.out.println("dataProvider");
11         Object[][] obj = new Object[][] {
12             {"zhangsan", 10},{"lisi", 20},{"wangwu", 30}
13         };
14         return obj;
15     }
16
17     @Test(dataProvider = "methodParamter")
18     public void testMethodDataProvider1(String name, int age) {
19         System.out.println("testMethodDataProvider1 - name="+name +",age=" + age );
20     }
21     @Test(dataProvider = "methodParamter")
22     public void testMethodDataProvider2(String name, int age) {
23         System.out.println("testMethodDataProvider2 - name="+name +",age=" + age );
24     }
25
26     @DataProvider(name="methodParamter")
27     public  Object[][] methodDataProvider(Method method) {
28         System.out.println("methodDataProvider");
29         Object[][] obj = null;
30         if(method.getName().equals("testMethodDataProvider1")) {
31             obj = new Object[][] {
32                 {"bo", 10},{"hao", 20},{"yuan", 30}
33             };
34         }else if(method.getName().equals("testMethodDataProvider2")) {
35             obj = new Object[][] {
36                 {"chen", 10},{"long", 20},{"wang", 30}
37             };
38         }
39         return obj;
40     }
41 }
- xml文件实现的多线程测试实例
创建一个java测试类和xml文件
 1 public class MultThreadTest {
 2   @Test
 3   public void test1() {
 4       System.out.println("test1 " + Thread.currentThread().getId());
 5   }
 6   @Test
 7   public void test2() {
 8       System.out.println("test2 " + Thread.currentThread().getId());
 9   }
10   @Test
11   public void test3() {
12       System.out.println("test3 " + Thread.currentThread().getId());
13   }
14 }
 1 <?xml version="1.0" encoding="UTF-8"?>
 2 <suite name="Suite" parallel="tests" thread-count = "2">
 3 <!--
 4 parallel="methods": 所有用例都可以在不同的线程执行
 5
 6 parallel="tests": 不同的test tag下的用例可以在不同的线程执行,相同的test tag下的用例只能在相同的线程执行
 7
 8 parallel="classes": 不同的class下的用例可以在不同的线程执行,相同的class下的用例在相同的线程执行
 9
10 thread-count : 最大并发线程数
11  -->
12   <test name="Test">
13     <classes>
14       <class name="com.yywang.multthread.MultThreadTest"/>
15     </classes>
16   </test> <!-- Test -->
17
18
19    <test name="Test2">
20     <classes>
21       <class name="com.yywang.multthread.MultThreadTest"/>
22     </classes>
23   </test> <!-- Test -->
24
25 </suite> <!-- Suite -->
运行xml文件,可以看到在不同的parallel属性值下,输出的线程id是不一样的。
如果喜欢作者的文章,请关注"写代码的猿"订阅号以便第一时间获得最新内容。本文版权归作者所有,欢迎转载.

来源:https://www.cnblogs.com/yuan1225/p/10749782.html