Autoprefixer是一个后处理程序,不象Sass以及Stylus之类的预处理器。它适用于普通的CSS,可以实现css3代码自动补全。也可以轻松跟Sass,LESS及Stylus集成,在CSS编译前或编译后运行。详情见, https://github.com/postcss/autoprefixer
具体安装和配置:
1.首先当然是安装node.js;
(略)
2.安装Autoprefixer,
见 https://github.com/postcss/autoprefixer :
sudo npm install autoprefixer -g
要不要加 sudo ,或者是不是全局安装( -g )那就看你自己的环境了。
npm太慢,我是用淘宝的 NPM 镜像的 https://npm.taobao.org/
3.安装postcss-cli
Autoprefixer其实是postcss的插件,见 https://github.com/code42day/postcss-cli
sudo npm install postcss-cli -g
4.配置External Tools
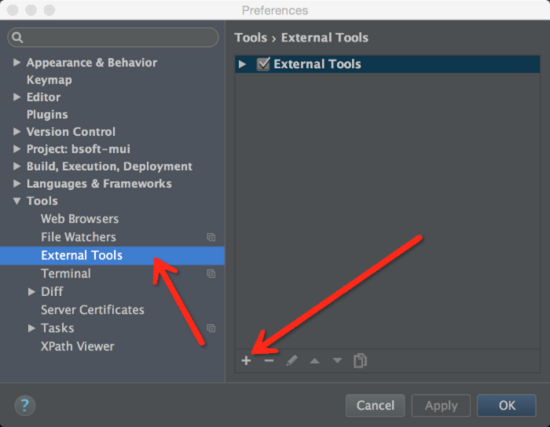
打开Webstorm设置,Preferences -> Tools -> External Tools ;点击新增按钮,如图:

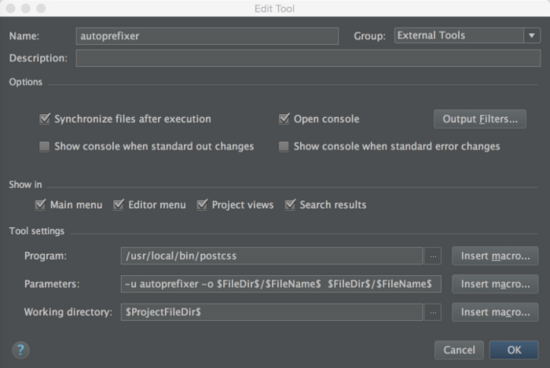
填写具体配置,例如我的配置,如图:

- Program:填入你的postcss-cli 的PATH;
- Parameters: -u autoprefixer -o $FileDir$/$FileName$ $FileDir$/$FileName$ ,你可以根据你自己的需要配置,具体参见 https://github.com/code42day/postcss-cli
- Working directory :$ProjectFileDir$
配置好后,你可以在css,或sass文件中右键,就可以在右键菜单中看到External Tools – autoprefixer,点击搞定,嘎嘎。
5.设置快捷键
右键太麻烦的话,可以设置个快捷键,打开Webstorm设置,Preferences -> Keymap , 搜索External Tools , 配置 autoprefixer即可。 不要和原来的冲突就可以了。
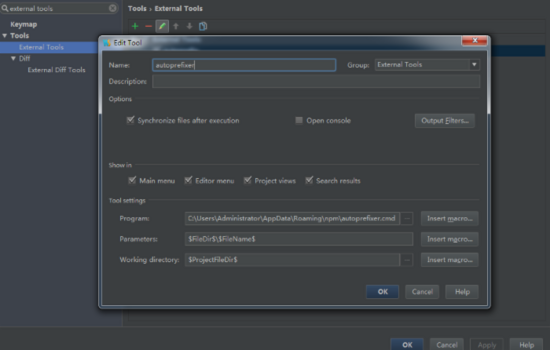
ps:windows下可以直接用autoprefixer的PATH,具体配置

来源:https://www.cnblogs.com/rain1874/p/6305835.html