SpringMVC
SSM:Mybatis + Spring + SpringMVC
MVC
- MVC是模型(Model)、视图(View)、控制器(Controller)的简写,是一种软件设计规范。
- 是将业务逻辑、数据、显示分离的方法来组织代码
- MVC主要作用是降低了视图与业务逻辑间的双向耦合
- MVC不是设计模式,是一种架构模式。不同的MVC存在差异
Model(模型):数据模型,提供要展示的数据,因此包含数据和行为,可以认为是领域模型或JavaBean组件(包含数据和行为),不过现在一般都分离开来:Value Object(数据Dao)和服务层(行为Service)。也就是模型提供了模型数据查询和模型数据的状态更新等功能,包括数据和业务。
View(视图):负责进行模型的展示,一般就是我们见到的用户界面,客户想看到的东西。
Colltroller(控制器):接收用户请求,委托给模型进行处理(状态改变),处理完毕后把返回代数据模型数据返回给视图,由视图负责展示。也就是说是控制器做了个调度员的工作
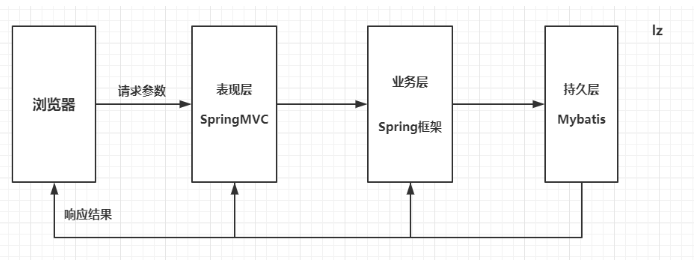
三层架构:
表现层,业务层,持久层
表现层(SpringMVC):
一般指web层。负责接收客户端请求,向客户端相应结果
表现层包括展示层和控制层!(控制层负责接收请求,展示层负责结果的展示)
表现层依赖于业务层,接收到客户端请求一般会调用业务层进行业务处理,并将结果返回给客户端。
表现层的设计一般使用MVC模型。(MVC是表现层的设计模型,和其他层没有关系)
业务层(Spring框架):
一般指service层,负责业务逻辑处理
表现层依赖业务层,但是业务层不依赖表现层
业务层在业务处理时,可能会依赖持久层,如果要对数据持久化需要保证事务一致性。
持久层(Mybatis框架):
一般指dao层,负责数据持久化
持久层包括数据库和数据访问层(数据库是载体,数据访问层是业务层和持久层交互的接口)
业务层通过数据访问层将数据持久化到数据库中。

比较典型的MVC模式:JSP+Servlet+JavaBean
MVC:模型(dao,service)视图(jsp)控制器(Servlet)
职责分析
controller:控制器
- 获得表单数据
- 调用业务逻辑
- 转向指定的页面
Model:模型
- 业务逻辑
- 保存数据的状态
View:视图
- 显示页面
MVC框架做的事情
- 将url映射到Java类或Java类的方法
- 封装用户提交的数据
- 处理请求--调用相关的业务处理--封装相应数据
- 将相应的数据进行渲染 .jso /html 等表示层数据
SpringMVC
SpringMVC是Spring Framework的一部分,是基于Java实现的MVC的轻量级Web框架
特点:
- 轻量级,简单易学
- 高效,基于请求相应的MVC框架
- 与Spring兼容性好,无缝结合
- 约定大于配置
- 功能强大:RESTful,数据验证,格式化,本地化,主题等
- 灵活
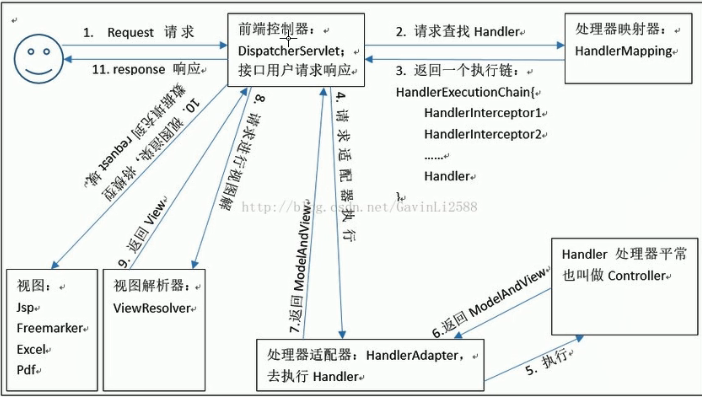
Spring的web框架围绕DispatcherServlet[调度Servlet]设计。
DispatcherServlet的作用是将请求分发到不同的处理器。
SpringMVC框架以请求为驱动,围绕一个中心Servlet分派请求及提供其他功能,DispatcherServlet是一个实际的Servlet(他继承自HttpServlet基类)
SpringMVC原理
发起请求时,被前置的控制器拦截到请求,根据请求参数生成代理请求,找到请求对应的实际控制器,控制器处理请求,创建数据模型,访问数据库,将模型响应给中心处理器,控制器使用模型与视图渲染图结果,将结果返回给中心控制器,再将结果返回给请求者。
入门程序
搭建环境
       <properties>
        <project.build.sourceEncoding>UTF-8</project.build.sourceEncoding>
        <maven.compiler.source>1.8</maven.compiler.source>
        <maven.compiler.target>1.8</maven.compiler.target>
        <spring.version>5.0.2.RELEASE</spring.version>
    </properties>

    <dependencies>
        <dependency>
            <groupId>org.springframework</groupId>
            <artifactId>spring-context</artifactId>
            <version>${spring.version}</version>
        </dependency>

        <dependency>
            <groupId>org.springframework</groupId>
            <artifactId>spring-web</artifactId>
            <version>${spring.version}</version>
        </dependency>

        <dependency>
            <groupId>org.springframework</groupId>
            <artifactId>spring-webmvc</artifactId>
            <version>${spring.version}</version>
        </dependency>

        <dependency>
            <groupId>javax.servlet</groupId>
            <artifactId>servlet-api</artifactId>
            <version>2.5</version>
            <scope>provided</scope>
        </dependency>

        <dependency>
            <groupId>javax.servlet.jsp</groupId>
            <artifactId>jsp-api</artifactId>
            <version>2.0</version>
            <scope>provided</scope>
        </dependency>

    </dependencies>
<servlet> <servlet-name>dispatcherServlet</servlet-name> <servlet-class>org.springframework.web.servlet.DispatcherServlet</servlet-class> <!-- 加载Spring的配置文件--> <init-param> <param-name>contextConfigLocation</param-name> <param-value>classpath:springmvc.xml</param-value> </init-param> <!-- --> <load-on-startup>1</load-on-startup> </servlet> <servlet-mapping> <servlet-name>dispatcherServlet</servlet-name> <!-- 发送任何请求都会经过Servlet--> <url-pattern>/</url-pattern> </servlet-mapping> <!-- springMVC自带过滤器--> <filter> <filter-name>encoding</filter-name> <filter-class>org.springframework.web.filter.CharacterEncodingFilter</filter-class> <init-param> <param-name>encoding</param-name> <param-value>utf-8</param-value> </init-param> </filter> <filter-mapping> <filter-name>encoding</filter-name> <url-pattern>/*</url-pattern> </filter-mapping><?xml version="1.0" encoding="UTF-8"?> <beans xmlns="http://www.springframework.org/schema/beans" xmlns:mvc="http://www.springframework.org/schema/mvc" xmlns:context="http://www.springframework.org/schema/context" xmlns:xsi="http://www.w3.org/2001/XMLSchema-instance" xsi:schemaLocation=" http://www.springframework.org/schema/beans http://www.springframework.org/schema/beans/spring-beans.xsd http://www.springframework.org/schema/mvc http://www.springframework.org/schema/mvc/spring-mvc.xsd http://www.springframework.org/schema/context http://www.springframework.org/schema/context/spring-context.xsd"> </beans><!-- 开启注解扫描--> <context:component-scan base-package="cn.imut"/><!-- 视图解析器--> <bean id="internalResourceViewResolver" class="org.springframework.web.servlet.view.InternalResourceViewResolver"> <!-- 文件所在目录--> <property name="prefix" value="/WEB-INF/jsp/"/> <!-- 文件的后缀名--> <property name="suffix" value=".jsp"/> </bean><!-- 开启SpringMVC注解支持--> <mvc:annotation-driven/> <bean class="org.springframework.web.servlet.handler.BeanNameUrlHandlerMapping"/> <bean class="org.springframework.web.servlet.mvc.SimpleControllerHandlerAdapter"/>编写程序
//控制器
@Controller
public class HelloController {

    @RequestMapping(path = "/hello")
    public String sayHello() {
        System.out.println("Hello StringMVC!");
        return null;
    }
}
过程
- 启动服务器,加载配置文件
- DispatcherServlet对象被创建
- springmvc.xml被加载
- HelloController被创建成对象
- 发送请求,后台处理请求
组件:
SpringMVC框架基于组件方式执行流程

@RequestMapping
属性:
- value:用于指定请求的URL。他和path属性的作用时一样的
- method:用于指定请求的方式
- params:用于指定限制请求参数的条件
控制器Controller:
- 控制器提供访问应用程序的行为,通常通过接口定义或者注解定义两种方式实现
- 控制器负责解析用户的请求并将其转换为一个模型
- 一个控制器可以包含多个方法
实现Controller接口
//定义控制器
//注意点:不要导错包,实现Controller接口,重写方法;
public class ControllerTest1 implements Controller {

    public ModelAndView handleRequest(HttpServletRequest httpServletRequest, HttpServletResponse httpServletResponse) throws Exception {
        //返回一个模型视图对象
        ModelAndView mv = new ModelAndView();
        mv.addObject("msg","Test1Controller");
        mv.setViewName("test");
        return mv;
    }
}
<bean name="/t1" class="com.kuang.controller.ControllerTest1"/>
注解
<!-- 自动扫描指定的包,下面所有注解类交给IOC容器管理 -->
<context:component-scan base-package="com.kuang.controller"/>
//@Controller注解的类会自动添加到Spring上下文中
@Controller
public class ControllerTest2{

    //映射访问路径
    @RequestMapping("/t2")
    public String index(Model model){
        //Spring MVC会自动实例化一个Model对象用于向视图中传值
        model.addAttribute("msg", "ControllerTest2");
        //返回视图位置
        return "test";
    }

}
RestFul 风格
概念
Restful就是一个资源定位及资源操作的风格。不是标准也不是协议,只是一种风格。基于这个风格设计的软件更简洁,更有层次,更易于实现缓存等机制。
功能
- 资源:互联网所有事物都可以被抽象为资源
- 资源操作:使用POST、DELETE、PUT、GET,使用不同的方法对资源进行操作
- 分别对应 添加、删除、修改、查询。
传统方式操作资源:通过不同的参数来实现不同的效果!方法单一,post和get
- http://127.0.0.1/item/queryltem.action?id=1 查询,GET
- http://127.0.0.1/item/saveltem.action 新增,POST
- http://127.0.0.1/item/updateItem.action 更新,POST
- http://127.0.0.1/item/deleteItem.action?id=1 删除,GET或POST
使用RESTful操作资源:可以通过不同的请求方式来实现不同的效果!如下:请求地址一样,但功能可以不同
- http://127.0.0.1/item/1 查询,GET
- http://127.0.0.1/item/1 新增,POST
- http://127.0.0.1/item/1 更新,PUT
- http://127.0.0.1/item/1 删除,DELETE

请求转发 forward
@Controller
public class ModelTest {

    @RequestMapping(path = "/m1/t1")
    public String test(Model model) {

        model.addAttribute("msg","ModelTest");
        return "forward:/WEB-INF/jsp/test.jsp";
    }
}
重定向 redirect
@Controller
public class ModelTest {

    @RequestMapping(path = "/m1/t1")
    public String test(Model model) {

        model.addAttribute("msg","ModelTest");
        return "redirect:/index.jsp";
    }
}
数据处理
处理提交数据
提交的域名称和处理方法的参数名一致
提交的域名称和处理方法的参数名不一致
@GetMapping("/t1")
    public String test1(@RequestParam("name1") String name, Model model) {
        //1.接收前端参数
        System.out.println("接收到前端的参数为:" + name);
        //2.将返回代结果传递给前端
        model.addAttribute("msg",name);
        //3.跳转视图
        return "test";
    }
提交的是一个对象
    @GetMapping("/t2")
    public String test2(User user) {
        System.out.println(user);
        return "test";
    }
http://localhost:8080/springmvc_03_servlet_war_exploded/user/t2?id=1&name=q&age=1
Model、ModelMap、ModeAndView的区别
- Model 只有个别方法,适合存储数据,简化
- ModelMap 继承了 LinkedMap,除了实现自身方法,还可以使用LinkedMap的方法与特性
- ModelAndView 可以在存储数据的同时,进行设置返回的逻辑视图,进行控制展示层的跳转
乱码问题

解决方案一、过滤器
public class EncodingFilter implements Filter {
    @Override
    public void init(FilterConfig filterConfig) throws ServletException {

    }

    @Override
    public void doFilter(ServletRequest servletRequest, ServletResponse servletResponse, FilterChain filterChain) throws IOException, ServletException {
        servletRequest.setCharacterEncoding("utf-8");
        servletResponse.setCharacterEncoding("utf-8");

        filterChain.doFilter(servletRequest,servletResponse);
    }

    @Override
    public void destroy() {

    }
}
    <filter>
        <filter-name>encoding</filter-name>
        <filter-class>cn.imut.filter.EncodingFilter</filter-class>
    </filter>

    <filter-mapping>
        <filter-name>encoding</filter-name>
        <!-- 过滤所有的请求-->
        <url-pattern>/*</url-pattern>
    </filter-mapping>
@Controller
public class EncodingController {

    //过滤器解决乱码
    @PostMapping("/e/t1")
    public String test1(String name, Model model) {
        model.addAttribute("msg",name);
        return "test";
    }
}
解决方案二、SpringMVC自带过滤器
    <!-- springMVC自带过滤器-->
    <filter>
        <filter-name>encoding</filter-name>
        <filter-class>org.springframework.web.filter.CharacterEncodingFilter</filter-class>

        <init-param>
            <param-name>eccoding</param-name>
            <param-value>utf-8</param-value>
        </init-param>
    </filter>
    <filter-mapping>
        <filter-name>encoding</filter-name>
        <url-pattern>/*</url-pattern>
    </filter-mapping>
JSON
前后端分离
后端部署后端,提供接口:提供接口
JSON
前端独立部署,负责渲染后端的数据:
JSON(JavaScript Object Notation,JS 对象标记)是一种轻量级的数据交换格式
JSON采用完全独立于编程语言的文本格式来存储和表示数据
简洁和清晰的层次结构使得JSON成为理想的数据交换语言
易于人阅读和编写,同时也易于机器解析和生成。并有效的提升网络传输效率
在JavaScript语言中,一切都是对象。因此,任何JavaScript支持的类型都可以通过JSON来表示,例如字符串、数字、对象、数组等。
- 对象为键值对时,数据由逗号分隔
- 花括号保存对象
- 方括号保存数组
JSON键值对是用来保存JavaScript对象的一种方式,和JavaScript对象的写法也大同小异,键/值对组合中的键名写在前面并用双引号 "" 包裹,使用冒号:分隔,然后紧接着值:
{"name":    "Qinjiang"}

{"age": "3"}

{"sex": "男"}
JSON和JavaScript对象的关系
- JSON是JavaScript对象的字符串表示法,它使用文本表示一个JS对象的信息,本质是一个字符串
var obj = {a: 'hello', b: 'world'};             //对象
var json = '{"a" : "Hello", "b": "world"}';     //JSON字符串
JSON和JavaScript对象互转
- 要实现从JSON字符串转换为JavaScript对象,使用JSON.parse()方法:
var obj = JSON.parse('{"a": "hello, "b": "world"}'); //结果为 " "
- 要实现从JavaScript对象转换为JSON字符串,使用JSON.stringify()方法:
var json = JSON.stringify({a: 'hello', b: 'world'}); //结果为 ' '
测试
<script type="text/javascript">
        //编写一个JavaScript对象
        var user = {
            name : "张磊",
            age : 3,
            sex: "男"
        };
        //将js对象转换为JSON对象
        var json = JSON.stringify(user);
        console.log(json);

        console.log("================");
        //将JSON对象转换为JavaScript对象
        var obj = JSON.parse(json);
        console.log(obj)
    </script>
Controller返回JSON数据
- Jackson应该是目前比较好的json解析工具了
- 当然工具不止这一个,比如还有阿里巴巴的fastjson等等
- 我们这里使用Jackson,使用它还需要导入它的jar包
        <!-- https://mvnrepository.com/artifact/com.fasterxml.jackson.core/jackson-databind -->
        <dependency>
            <groupId>com.fasterxml.jackson.core</groupId>
            <artifactId>jackson-databind</artifactId>
            <version>2.10.2</version>
        </dependency>
乱码解决:
    <!-- JSON乱码-->
    <mvc:annotation-driven>
        <mvc:message-converters>
            <bean class="org.springframework.http.converter.StringHttpMessageConverter">
                <property name="supportedMediaTypes">
                    <bean class="org.springframework.http.converter.json.Jackson2ObjectMapperFactoryBean">
                        <property name="failOnEmptyBeans" value="false"/>
                    </bean>
                </property>
            </bean>
        </mvc:message-converters>
    </mvc:annotation-driven>
@Controller
public class UserController {

    @RequestMapping("/j1")
    @ResponseBody       //不会走视图解析器,直接返回一个字符串
    public String json1() throws JsonProcessingException {
        //jackson, ObjectMapper
        ObjectMapper mapper = new ObjectMapper();
        //创建一个对象
        User user = new User("张磊",22,"男");
        String s = mapper.writeValueAsString(user);
        return s;
    }
}
FastJson
fastjson.jar是阿里开发的一款专门用于Java开发的包,可以方便的实现json对象与JavaBean对象的转换,实现JavaBean对象与json字符串的转换,实现json对象与json字符串的转换。实现json的转换方法很多,最后的实现结果都是一样的。
依赖
<dependency>
    <groupId>com.alibaba</groupId>
    <artifactId>fastjson</artifactId>
    <version>1.2.60</version>
</dependency>
 System.out.println("*******Java对象 转 JSON字符串*******");
        String str1 = JSON.toJSONString(list);
        System.out.println("JSON.toJSONString(list)==>"+str1);
        String str2 = JSON.toJSONString(user1);
        System.out.println("JSON.toJSONString(user1)==>"+str2);

        System.out.println("\n****** JSON字符串 转 Java对象*******");
        User jp_user1=JSON.parseObject(str2,User.class);
        System.out.println("JSON.parseObject(str2,User.class)==>"+jp_user1);

        System.out.println("\n****** Java对象 转 JSON对象 ******");
        JSONObject jsonObject1 = (JSONObject) JSON.toJSON(user2);
        System.out.println("(JSONObject) JSON.toJSON(user2)==>"+jsonObject1.getString("name"));

        System.out.println("\n****** JSON对象 转 Java对象 ******");
        User to_java_user = JSON.toJavaObject(jsonObject1, User.class);
        System.out.println("JSON.toJavaObject(jsonObject1, User.class)==>"+to_java_user);
SSM整合
环境要求
- IDEA
- MySQL 5.7
- Tomcat 9
- Maven 3.6

1.数据库环境
use `ssmbuild`;

create table books (
    `bookID` int(10) not null auto_increment comment '书id',
    `bookName` varchar(100) not null comment '书名',
    `bookCounts` int(11) not null comment '数量',
    `detail` varchar(200) not null comment '描述',
    key `bookID` (`bookID`)
)engine = InnoDB default charset = utf8;

insert into books values
                         (1,'Java',1,'从入门到放弃'),
                         (2,'MySQL',10,'从删库到跑路'),
                         (3,'Linux',5,'从进门到进牢');

select * from books;
2.基本环境
<dependencies>
        <!-- 依赖:junit,数据库驱动,连接池,servlet,jsp,mybatis,mybatis-spring,spring-->
        <dependency>
            <groupId>junit</groupId>
            <artifactId>junit</artifactId>
            <version>4.13</version>
        </dependency>
        <dependency>
            <groupId>mysql</groupId>
            <artifactId>mysql-connector-java</artifactId>
            <version>5.1.47</version>
        </dependency>
        <!-- https://mvnrepository.com/artifact/com.mchange/c3p0 -->
        <dependency>
            <groupId>com.mchange</groupId>
            <artifactId>c3p0</artifactId>
            <version>0.9.5.5</version>
        </dependency>

        <dependency>
            <groupId>javax.servlet</groupId>
            <artifactId>servlet-api</artifactId>
            <version>2.5</version>
        </dependency>
        <!-- https://mvnrepository.com/artifact/javax.servlet/javax.servlet-api -->
        <dependency>
            <groupId>javax.servlet</groupId>
            <artifactId>javax.servlet-api</artifactId>
            <version>4.0.1</version>
        </dependency>

        <dependency>
            <groupId>javax.servlet.jsp</groupId>
            <artifactId>jsp-api</artifactId>
            <version>2.0</version>
            <scope>provided</scope>
        </dependency>
        <!-- https://mvnrepository.com/artifact/javax.servlet/jstl -->
        <dependency>
            <groupId>javax.servlet</groupId>
            <artifactId>jstl</artifactId>
            <version>1.2</version>
        </dependency>

        <!-- https://mvnrepository.com/artifact/org.mybatis/mybatis -->
        <dependency>
            <groupId>org.mybatis</groupId>
            <artifactId>mybatis</artifactId>
            <version>3.5.3</version>
        </dependency>

        <!-- https://mvnrepository.com/artifact/org.mybatis/mybatis-spring -->
        <dependency>
            <groupId>org.mybatis</groupId>
            <artifactId>mybatis-spring</artifactId>
            <version>2.0.3</version>
        </dependency>
        <!-- https://mvnrepository.com/artifact/org.springframework/spring-webmvc -->
        <dependency>
            <groupId>org.springframework</groupId>
            <artifactId>spring-webmvc</artifactId>
            <version>5.2.3.RELEASE</version>
        </dependency>
        <!-- https://mvnrepository.com/artifact/org.springframework/spring-jdbc -->
        <dependency>
            <groupId>org.springframework</groupId>
            <artifactId>spring-jdbc</artifactId>
            <version>5.2.3.RELEASE</version>
        </dependency>
        <dependency>
            <groupId>org.projectlombok</groupId>
            <artifactId>lombok</artifactId>
            <version>1.18.8</version>
        </dependency>
    </dependencies>


<!-- 静态资源导出-->
<build>
    <resources>
        <resource>
            <directory>src/main/java</directory>
            <includes>
                <include>**/*.properties</include>
                <include>**/*.xml</include>
            </includes>
            <filtering>false</filtering>
        </resource>
        <resource>
            <directory>src/main/resources</directory>
            <includes>
                <include>**/*.properties</include>
                <include>**/*.xml</include>
            </includes>
            <filtering>false</filtering>
        </resource>
    </resources>
</build>
url
jdbc.url = jdbc:mysql://localhost:3306/mybatis?useSSL=false&useUnicode=true&characterEncoding=UTF-8&serverTimezone=UTC
mybatis-config.xml
<?xml version="1.0" encoding="UTF-8" ?>
<!DOCTYPE configuration
        PUBLIC "-//mybatis.org//DTD Config 3.0//EN"
        "http://mybatis.org/dtd/mybatis-3-config.dtd">
<!-- 核心配置文件-->
<configuration>
    <!-- 配置数据源,交给Spring去做-->
    <!-- 别名-->
    <typeAliases>
        <package name="cn.imut.pojo"/>
    </typeAliases>

    <mappers>
        <mapper resource="cn/imut/dao/BookMapper.xml"/>
    </mappers>

</configuration>
spring-dao.xml
<?xml version="1.0" encoding="UTF-8"?>
<beans xmlns="http://www.springframework.org/schema/beans"
       xmlns:mvc="http://www.springframework.org/schema/mvc"
       xmlns:context="http://www.springframework.org/schema/context"
       xmlns:xsi="http://www.w3.org/2001/XMLSchema-instance" xmlns:jdbc="http://www.springframework.org/schema/jdbc"

       xsi:schemaLocation="http://www.springframework.org/schema/beans
        http://www.springframework.org/schema/beans/spring-beans.xsd
        http://www.springframework.org/schema/mvc
        http://www.springframework.org/schema/mvc/spring-mvc.xsd
        http://www.springframework.org/schema/context
        http://www.springframework.org/schema/context/spring-context.xsd http://www.springframework.org/schema/jdbc http://www.springframework.org/schema/jdbc/spring-jdbc.xsd">


    <!-- 1.关联数据库配置文件-->
    <context:property-placeholder location="classpath:database.properties"/>

    <bean id="dataSource" class="com.mchange.v2.c3p0.ComboPooledDataSource">
        <property name="driverClass" value="${jdbc.driver}"/>
        <property name="jdbcUrl" value="${jdbc.url}"/>
        <property name="user" value="${jdbc.username}"/>
        <property name="password" value="${jdbc.password}"/>
    </bean>

    <!-- 3.配置SqlSessionFactory对象 -->
    <bean id="sqlSessionFactory" class="org.mybatis.spring.SqlSessionFactoryBean">
        <!-- 注入数据库连接池 -->
        <property name="dataSource" ref="dataSource"/>
        <!-- 配置Mybatis全局配置文件:mybatis-config.xml -->
        <property name="configLocation" value="classpath:mybatis-config.xml"/>
    </bean>

    <!-- 4.配置dao接口扫描包,动态的实现Dao接口可以注入到Spring容器中-->
    <bean class="org.mybatis.spring.mapper.MapperScannerConfigurer">
        <!-- 注入 sqlSessionFactory-->
        <property name="sqlSessionFactoryBeanName" value="sqlSessionFactory"/>
        <!-- 扫描dao包-->
        <property name="basePackage" value="cn.imut.dao"/>
    </bean>

</beans>
spring-service.xml
<?xml version="1.0" encoding="UTF-8"?>
<beans xmlns="http://www.springframework.org/schema/beans"
       xmlns:mvc="http://www.springframework.org/schema/mvc"
       xmlns:context="http://www.springframework.org/schema/context"
       xmlns:xsi="http://www.w3.org/2001/XMLSchema-instance"
       xsi:schemaLocation="
        http://www.springframework.org/schema/beans
        http://www.springframework.org/schema/beans/spring-beans.xsd
        http://www.springframework.org/schema/mvc
        http://www.springframework.org/schema/mvc/spring-mvc.xsd
        http://www.springframework.org/schema/context
        http://www.springframework.org/schema/context/spring-context.xsd">

    <!-- 扫描service下的包-->
    <context:component-scan base-package="cn.imut.service"/>

    <!-- 将业务类注入-->
    <bean id="bookServiceImpl" class="cn.imut.service.Impl.BookServiceImpl">
        <property name="bookMapper" ref="bookMapper"/>
    </bean>

    <!-- 声明式事务-->
    <bean id="transactionManager" class="org.springframework.jdbc.datasource.DataSourceTransactionManager">
        <!-- 注入数据源-->
        <property name="dataSource" ref="dataSource"/>
    </bean>

    <!-- aop横切事务-->

</beans>
spring-mvc.xml
<?xml version="1.0" encoding="UTF-8"?>
<beans xmlns="http://www.springframework.org/schema/beans"
       xmlns:mvc="http://www.springframework.org/schema/mvc"
       xmlns:context="http://www.springframework.org/schema/context"
       xmlns:xsi="http://www.w3.org/2001/XMLSchema-instance"
       xsi:schemaLocation="
        http://www.springframework.org/schema/beans
        http://www.springframework.org/schema/beans/spring-beans.xsd
        http://www.springframework.org/schema/mvc
        http://www.springframework.org/schema/mvc/spring-mvc.xsd
        http://www.springframework.org/schema/context
        http://www.springframework.org/schema/context/spring-context.xsd">

    <!-- 注解驱动-->
    <mvc:annotation-driven/>
    <!-- 静态资源过滤-->
    <mvc:default-servlet-handler/>
    <!-- 扫描包-->
    <context:component-scan base-package="cn.imut.controller"/>
    <!-- 视图解析器-->
    <bean id="internalResourceViewResolver" class="org.springframework.web.servlet.view.InternalResourceViewResolver">
        <!-- 文件所在目录-->
        <property name="prefix" value="/WEB-INF/JSP/"/>
        <!-- 文件的后缀名-->
        <property name="suffix" value=".jsp"/>
    </bean>
</beans>
applicationContext.xml
<?xml version="1.0" encoding="UTF-8"?>
<beans xmlns="http://www.springframework.org/schema/beans"
       xmlns:mvc="http://www.springframework.org/schema/mvc"
       xmlns:context="http://www.springframework.org/schema/context"
       xmlns:xsi="http://www.w3.org/2001/XMLSchema-instance"
       xsi:schemaLocation="
        http://www.springframework.org/schema/beans
        http://www.springframework.org/schema/beans/spring-beans.xsd
        http://www.springframework.org/schema/mvc
        http://www.springframework.org/schema/mvc/spring-mvc.xsd
        http://www.springframework.org/schema/context
        http://www.springframework.org/schema/context/spring-context.xsd">

    <import resource="classpath:spring-dao.xml"/>
    <import resource="classpath:spring-service.xml"/>
    <import resource="classpath:spring-mvc.xml"/>
</beans>

文件上传
准备工作
文件上传是项目开发中最常见的功能之一 ,springMVC 可以很好的支持文件上传,但是SpringMVC上下文中默认没有装配MultipartResolver,因此默认情况下其不能处理文件上传工作。如果想使用Spring的文件上传功能,则需要在上下文中配置MultipartResolver。
前端表单要求:为了能上传文件,必须将表单的method设置为POST,并将enctype设置为multipart/form-data。只有在这样的情况下,浏览器才会把用户选择的文件以二进制数据发送给服务器;
<!--文件上传-->
<dependency>
    <groupId>commons-fileupload</groupId>
    <artifactId>commons-fileupload</artifactId>
    <version>1.3.3</version>
</dependency>
<!--servlet-api导入高版本的-->
<dependency>
    <groupId>javax.servlet</groupId>
    <artifactId>javax.servlet-api</artifactId>
    <version>4.0.1</version>
</dependency>
    <!-- 文件上传-->
    <bean id="multipartResolver" class="org.springframework.web.multipart.commons.CommonsMultipartResolver">
        <property name="defaultEncoding" value="utf-8"/>
        <property name="maxUploadSize" value="10485760"/>
        <property name="maxInMemorySize" value="40968"/>
    </bean>
@RequestMapping("/upload")
    public String fileUpload(@RequestParam("file") CommonsMultipartFile file , HttpServletRequest request) throws IOException {

        //获取文件名 : file.getOriginalFilename();
        String uploadFileName = file.getOriginalFilename();

        //如果文件名为空,直接回到首页!
        if ("".equals(uploadFileName)){
            return "redirect:/index.jsp";
        }
        System.out.println("上传文件名 : "+uploadFileName);

        //上传路径保存设置
        String path = request.getServletContext().getRealPath("/upload");
        //如果路径不存在,创建一个
        File realPath = new File(path);
        if (!realPath.exists()){
            realPath.mkdir();
        }
        System.out.println("上传文件保存地址:"+realPath);

        InputStream is = file.getInputStream(); //文件输入流
        OutputStream os = new FileOutputStream(new File(realPath,uploadFileName)); //文件输出流

        //读取写出
        int len=0;
        byte[] buffer = new byte[1024];
        while ((len=is.read(buffer))!=-1){
            os.write(buffer,0,len);
            os.flush();
        }
        os.close();
        is.close();
        return "redirect:/index.jsp";
    }
/*
     * 采用file.Transto 来保存上传的文件
     */
    @RequestMapping("/upload2")
    public String  fileUpload2(@RequestParam("file") CommonsMultipartFile file, HttpServletRequest request) throws IOException {

        //上传路径保存设置
        String path = request.getServletContext().getRealPath("/upload");
        File realPath = new File(path);
        if (!realPath.exists()){
            realPath.mkdir();
        }
        //上传文件地址
        System.out.println("上传文件保存地址:"+realPath);

        //通过CommonsMultipartFile的方法直接写文件(注意这个时候)
        file.transferTo(new File(realPath +"/"+ file.getOriginalFilename()));

        return "redirect:/index.jsp";
    }

来源:https://www.cnblogs.com/yfyyy/p/12335085.html