常用模块
模块,用一砣代码实现了某个功能的代码集合。
类似于函数式编程和面向过程编程,函数式编程则完成一个功能,其他代码用来调用即可,提供了代码的重用性和代码间的耦合。而对于一个复杂的功能来,可能需要多个函数才能完成(函数又可以在不同的.py文件中),n个 .py 文件组成的代码集合就称为模块。
python常用模块主要有:
1. time模块
2. random模块
3. hashlib模块
4. os模块
5. sys模块
6. logging模块
7. 序列化模块
8. configparser模块
9. re模块
10. shutul模块
11. subprocess模块
12. xml模块
13. paramiko模块
引入模块的方式
1 import module
2 import module.xxx as name
3 from module import xxx,xxx
4 from module import *
对于第二种的引入方式,将导入的模块或者模块方法重命名,个人觉得好处主要有以下两点:
1.对于模块名过于冗长的模块,可以方便使用;
2.对于某些功能可能涉及到修改模块的源码,这样的导入方式可以避免影响到原来的模块(类似于为每个项目建一个自己的虚拟环境)。
time模块
1.表示时间的三种方式:
(1)时间戳(timestamp) :通常来说,时间戳表示的是从1970年1月1日00:00:00开始按秒计算的偏移量。我们运行“type(time.time())”,返回的是float类型。
(2)格式化的时间字符串(Format String): ‘1988-03-16’
(3)元组(struct_time) :struct_time元组共有9个元素共九个元素:(年,月,日,时,分,秒,一年中第几周,一年中第几天等)
时间戳是计算机能够识别的时间;时间字符串是人能够看懂的时间;元组则是用来操作时间的
# <1> 时间戳

import time
time.time()      #--------------返回当前时间的时间戳:1493136727.099066


# <2> 时间字符串

time.strftime("%Y-%m-%d %X")    # -----------'2017-04-26 00:32:18'


# <3> 时间元组

time.localtime()
time.struct_time(tm_year=2017, tm_mon=4, tm_mday=26,
                 tm_hour=0, tm_min=32, tm_sec=42, tm_wday=2,
                 tm_yday=116, tm_isdst=0)
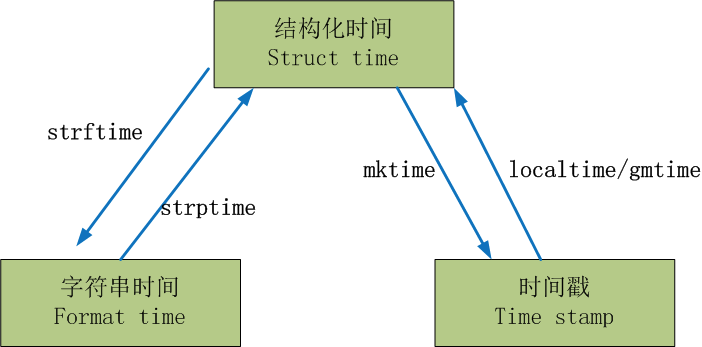
2.几种时间形式的转换

 1 #一 时间戳<---->结构化时间:  localtime/gmtime   mktime
 2
 3 time.localtime(3600*24)
 4 time.gmtime(3600*24)
 5
 6 time.mktime(time.localtime())
 7
 8
 9 #字符串时间<---->结构化时间: strftime/strptime
10
11 time.strftime("%Y-%m-%d %X", time.localtime())
12 time.strptime("2017-03-16","%Y-%m-%d")

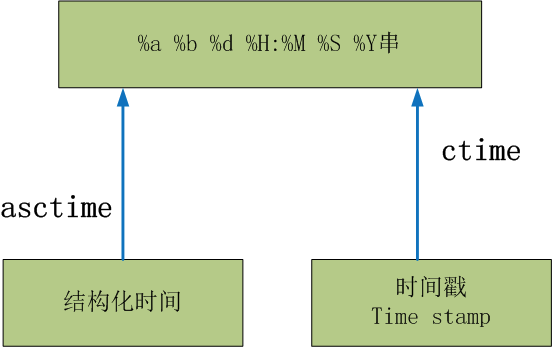
1 time.asctime(time.localtime(312343423))
2
3 time.ctime(312343423)
3.time & datetime常用操作

 1 #_*_coding:utf-8_*_
 2 __author__ = 'Alex Li'
 3
 4 import time
 5
 6
 7 # print(time.clock()) #返回处理器时间,3.3开始已废弃 , 改成了time.process_time()测量处理器运算时间,不包括sleep时间,不稳定,mac上测不出来
 8 # print(time.altzone)  #返回与utc时间的时间差,以秒计算\
 9 # print(time.asctime()) #返回时间格式"Fri Aug 19 11:14:16 2016",
10 # print(time.localtime()) #返回本地时间 的struct time对象格式
11 # print(time.gmtime(time.time()-800000)) #返回utc时间的struc时间对象格式
12
13 # print(time.asctime(time.localtime())) #返回时间格式"Fri Aug 19 11:14:16 2016",
14 #print(time.ctime()) #返回Fri Aug 19 12:38:29 2016 格式, 同上
15
16
17
18 # 日期字符串 转成  时间戳
19 # string_2_struct = time.strptime("2016/05/22","%Y/%m/%d") #将 日期字符串 转成 struct时间对象格式
20 # print(string_2_struct)
21 # #
22 # struct_2_stamp = time.mktime(string_2_struct) #将struct时间对象转成时间戳
23 # print(struct_2_stamp)
24
25
26
27 #将时间戳转为字符串格式
28 # print(time.gmtime(time.time()-86640)) #将utc时间戳转换成struct_time格式
29 # print(time.strftime("%Y-%m-%d %H:%M:%S",time.gmtime()) ) #将utc struct_time格式转成指定的字符串格式
30
31
32
33
34
35 #时间加减
36 import datetime
37
38 # print(datetime.datetime.now()) #返回 2016-08-19 12:47:03.941925
39 #print(datetime.date.fromtimestamp(time.time()) )  # 时间戳直接转成日期格式 2016-08-19
40 # print(datetime.datetime.now() )
41 # print(datetime.datetime.now() + datetime.timedelta(3)) #当前时间+3天
42 # print(datetime.datetime.now() + datetime.timedelta(-3)) #当前时间-3天
43 # print(datetime.datetime.now() + datetime.timedelta(hours=3)) #当前时间+3小时
44 # print(datetime.datetime.now() + datetime.timedelta(minutes=30)) #当前时间+30分
45
46
47 #
48 # c_time  = datetime.datetime.now()
49 # print(c_time.replace(minute=3,hour=2)) #时间替换
random模块

 1 import random
 2 random.random()      # 大于0且小于1之间的小数 0.7664338663654585
 3
 4 random.randint(1,5)  # 大于等于1且小于等于5之间的整数
 5
 6 random.randrange(1,3) # 大于等于1且小于3之间的整数
 7
 8 random.choice([1,'23',[4,5]])  # #1或者23或者[4,5]
 9
10 random.sample([1,'23',[4,5]],2) # #列表元素任意2个组合 [[4, 5], '23']
11
12 random.uniform(1,3) #大于1小于3的小数 1.6270147180533838
13
14 item=[1,3,5,7,9]
15 random.shuffle(item) # 打乱次序 item[5, 1, 3, 7, 9]
16 random.shuffle(item) # item [5, 9, 7, 1, 3]

 1 # 随机生成验证码
 2
 3 import random
 4
 5 def v_code():
 6
 7     code = ''
 8     for i in range(5):
 9
10         num=random.randint(0,9)
11         alf=chr(random.randint(65,90))
12         add=random.choice([num,alf])
13         code="".join([code,str(add)])
14
15     return code
16
17 print(v_code())
hashlib模块
哈希算法(散列算法):通过一个函数,把任意长度的数据转换为一个长度固定的数据串(通常用16进制的字符串表示),常常用于对密码进行加密。hashlib模块主要提供 SHA1, SHA224, SHA256, SHA384, SHA512 ,MD5 等加密算法。

 1 import hashlib
 2
 3 # ######## md5 ########
 4 hash = hashlib.md5()
 5 # help(hash.update)
 6 hash.update(bytes('admin', encoding='utf-8'))
 7 print(hash.hexdigest())  #16进制格式hash
 8 print(hash.digest())  #2进制格式hash
 9
10
11 ######## sha1 ########
12
13 hash = hashlib.sha1()
14 hash.update(bytes('admin', encoding='utf-8'))
15 print(hash.hexdigest())
16
17 # ######## sha256 ########
18
19 hash = hashlib.sha256()
20 hash.update(bytes('admin', encoding='utf-8'))
21 print(hash.hexdigest())
22
23
24 # ######## sha384 ########
25
26 hash = hashlib.sha384()
27 hash.update(bytes('admin', encoding='utf-8'))
28 print(hash.hexdigest())
29
30 # ######## sha512 ########
31
32 hash = hashlib.sha512()
33 hash.update(bytes('admin', encoding='utf-8'))
34 print(hash.hexdigest())
以上加密算法虽然依然非常厉害,但时候存在缺陷,即:通过撞库可以反解。所以,有必要对加密算法中添加自定义key再来做加密。
1 import hashlib
2
3 # ######## md5 ########
4
5 hash = hashlib.md5(bytes('898oaFs09f',encoding="utf-8"))
6 hash.update(bytes('admin',encoding="utf-8"))
7 print(hash.hexdigest())
python内置还有一个 hmac 模块,它内部对我们创建 key 和 内容 进行进一步的处理然后再加密
1 import hmac
2
3 h = hmac.new(bytes('898oaFs09f',encoding="utf-8"))
4 h.update(bytes('admin',encoding="utf-8"))
5 print(h.hexdigest())
To be continue....
来源:https://www.cnblogs.com/cdc1216/p/10317673.html
