算子 (Operator)
在图像处理中,边缘检测是不可分割的一个组成部分,而算子,可以看作是边缘检测的一个媒介。像我们这种学EE的,算子就好比是一个巴特沃夫滤波器,滤掉我们不想要的,留下我们所需要的;又像是我们小时候看到的筛米的米筛子,那时候家里吃的米掺杂着许多“奇怪的”东西,小石砾、麦穗等等,不像现在买来的大米都是机器为我们筛好的,基本是很少能在吃米饭时牙齿突然咔嚓一下,当时确是蛮痛苦的。
在本篇文章中用的是Sobel算子,是使用两个与原始图像卷积的3×3内核来计算导数的近似值-一个用于水平变化,一个用于垂直变化。
如果我们将A定义为源图像,并且和是两个图像,每个点分别包含垂直和水平导数近似值,则计算如下:
这里, 表示卷积运算,也就是两个矩阵对应位置相乘,即点乘。
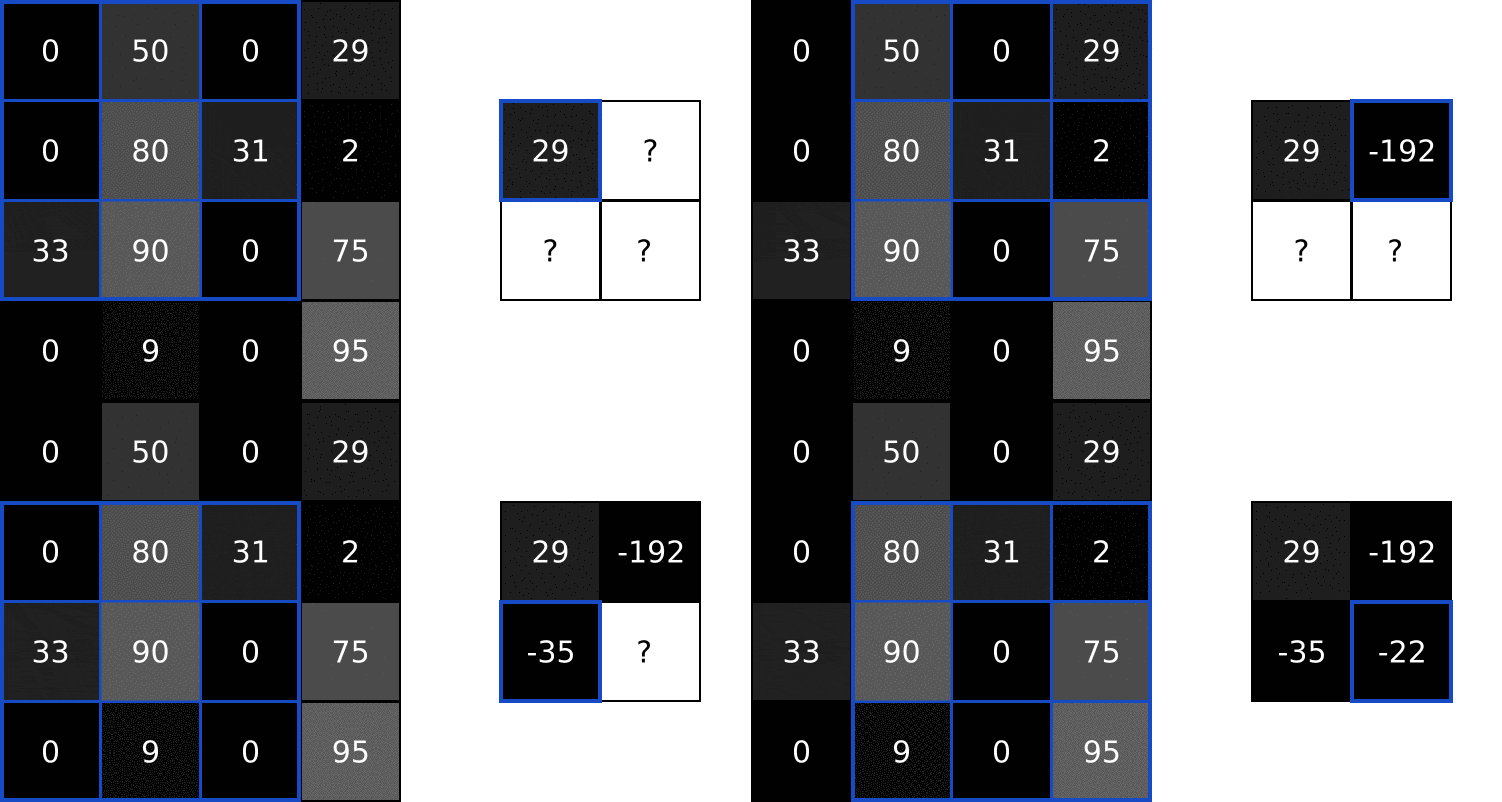
一张图片显然“pixel”不全是3×3的,甚至就没有图片是这么小的,那么上面的实施方法也很简单,就是从A的左上角开始,一行一行移动,到底后还下一行,直到右下角。

这里引用一个我很喜欢的博主(victorzhou)的图。
在大多数情况下,我们“筛选”后的图片大小要和原图片相等,一般有两种方法可以解决,这里我采用的是在处理后的图片外围一圈补零,即涂黑一圈。
算法实现
简单的介绍过后,下面给出我的代码,代码由几个部分组成,首先给出核心部分:
def sobel_v(img, threshold):
    '''
    edge detection with the vertical Sobel filter

    Parameters
    ----------
    img : TYPE
        the image input.
    threshold : TYPE
         varies for application [0 255].

    Returns
    -------
    mag : TYPE
        output after edge detection.

    '''
    G_x = np.array([[-1, 0, 1],[-2, 0, 2],[-1, 0, 1]])
    rows = np.size(img, 0)
    columns = np.size(img, 1)
    mag = np.zeros(img.shape)
    for i in range(0, rows - 2):
        for j in range(0, columns - 2):
            v = sum(sum(G_x * img[i:i+3, j:j+3]))  # vertical
            mag[i+1, j+1] = v

    for p in range(0, rows):
        for q in range(0, columns):
            if mag[p, q] < threshold:
                mag[p, q] = 0
    return mag
这是在垂直方向的检测,处理前后的图片对比如下:

那么水平方向的检测也就很简单了。
def sobel_h(img, threshold):
    '''
    edge detection with the horizon Sobel filter

    Parameters
    ----------
    img : TYPE
        the image input.
    threshold : TYPE
         varies for application [0 255].

    Returns
    -------
    mag : TYPE
        output after edge detection.

    '''
    G_y = np.array([[-1, -2, -1],[0, 0, 0],[1, 2, 1]])
    rows = np.size(img, 0)
    columns = np.size(img, 1)
    mag = np.zeros(img.shape)
    for i in range(0, rows - 2):
        for j in range(0, columns - 2):
            h = sum(sum(G_y * img[i:i+3, j:j+3]))  # horizon
            mag[i+1, j+1] = h

    for p in range(0, rows):
        for q in range(0, columns):
            if mag[p, q] < threshold:
                mag[p, q] = 0
    return mag

水平和垂直方向同时进行,也就是在计算每个pixel的时候,将水平和垂直的值作一次平方和的处理即可。
def sobel(img, threshold):
    '''
    edge detection based on sobel

    Parameters
    ----------
    img : TYPE
        the image input.
    threshold : TYPE
         varies for application [0 255].

    Returns
    -------
    mag : TYPE
        output after edge detection.

    '''
    G_x = np.array([[-1, 0, 1],[-2, 0, 2],[-1, 0, 1]])
    G_y = np.array([[-1, -2, -1],[0, 0, 0],[1, 2, 1]])
    rows = np.size(img, 0)
    columns = np.size(img, 1)
    mag = np.zeros(img.shape)
    for i in range(0, rows - 2):
        for j in range(0, columns - 2):
            v = sum(sum(G_x * img[i:i+3, j:j+3]))  # vertical
            h = sum(sum(G_y * img[i:i+3, j:j+3]))  # horizon
            mag[i+1, j+1] = np.sqrt((v ** 2) + (h ** 2))

    for p in range(0, rows):
        for q in range(0, columns):
            if mag[p, q] < threshold:
                mag[p, q] = 0
    return mag

很明显最后一张图片的效果是最好的。
题外话
附上两个小程序,是用作图片显示和处理的,我上面的对比图就是由这两个程序给出。
import numpy as np
import cv2

def img_show(img):
    cv2.namedWindow("Image")
    cv2.imshow("Image", img)
    cv2.waitKey(0)
    cv2.destroyAllWindows()

def sub_plot(img_1, img_2):
    l = np.size(img, 1)/4  # a quarter of the columns
    rows = np.size(img, 0)
    interval = np.ones((rows, int(l)))
    interval = interval * 255

    img_o = np.concatenate((img_1, interval, img_2), axis=1)
    return img_o
img = cv2.imread('CNN/pic1.jpg', 0)  # read an image
mag = sobel(img, 70)
mag_v = sobel_v(img, 70)
mag_h = sobel_h(img, 70)
# img_show(mag)

v = sub_plot(img, mag_v)
h = sub_plot(img, mag_h)
a = sub_plot(img, mag)
就是三张对比图啦。
(这只是CNN的一个铺垫)
该文章首发于 zyairelu.cn
欢迎来到我的网站进行评论及研讨
个人邮箱zyairelu@gmail.com
来源:CSDN
作者:zyairelu
链接:https://blog.csdn.net/weixin_42731543/article/details/103948583