背景:
相较于windows、unix等OS,Linux因为其开源、安全、稳定、性能优越等优点,已越来越受到互联网的青睐。而我们在学习和使用Linux也就会考虑到Linux机器和我们日常用的windows之间的通信,文件共享等问题。
问题定位:
1、如何实现Linux OS共享文件?
2、如何在日常使用的windows上get到Linux服务器上的文件?
3、如何做到Linux服务器之间的文件共享?
解决办法:
实现Linux的文件共享,也就是说在linux机器上共享文件,在windows机器上可以对Linux共享的文件进行下载。
实验前提:
1、关闭防火墙:service iptables stop
2、关闭selinux:setenforce 0 #临时有效,修改/etc/sysconfig/selinux
3、Windows IP:172.16.12.24
4、Linux IP:172.16.11.99
1、安装samba服务
[root@localhost ~]# rpm -qa | grep samba
[root@localhost ~]# yum install samba
2、创建smb登录用户名和密码
[root@localhost ~]# useradd smbuser #新创建用户
[root@localhost ~]# smbpasswd -a smbuser
回车后会提示输入密码 #设置远程主机(windows)登录时需要的密码
#删除smb用户:smbpasswd -x smbuser
3、创建共享目录
[root@localhost ~]# mkdir -m 777 /home/smbuser/share
#共享目录可以随意设置,不过要与配置文件相匹配
#共享的文件放于此处
#设置权限,共享目录的权限
4、修改samba服务的配置文件/etc/samba/smb.conf
[root@localhost ~]# vim /etc/samba/smb.conf
workgroup = WORKGROUP #windows工作组模式
#hosts allow = 172.16.12.24 #允许访问的windows的IP地址
视情况而定是否指定访问主机,无论是有没指定,前提条件是机器彼此间互通,也就是说能够ping通。
注意:默认配置文件里,是会共享[homes],注释掉,避免重复
在文件的结尾添加:
[share]   //(共享名,就是windows访问时会显示的名称)
comment = Public Stuff  //(注释)
path = /home/smbuser/share  //(创建的共享目录的共享名)
public = yes  //(公开)
writable = yes  //(可写)
printable = no
write list = +staff
其他的参数根据情况设置,比如会出现乱码,还要指定编码格式。
设置权限,这很重要,读写权限:读,就只能下载;写,可上传可下载
5、重启smb服务
[root@localhost ~]# service smb restart
6、windows下连接,启动运行,输入\\172.16.11.99,输入smb帐号密码


至此,即实现了Linux共享文件……
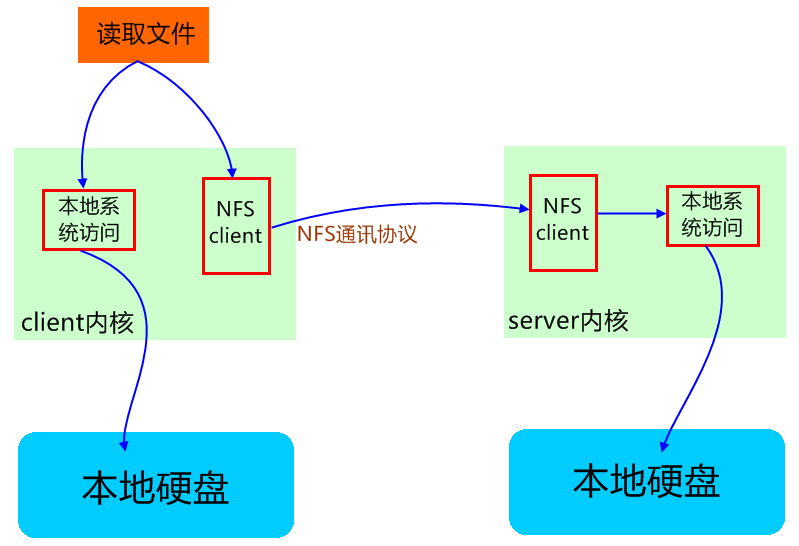
通过NFS来访问主机端共享文件。
NFS(Network File System):网络文件系统。
NFS允许一个系统在网络上与他人共享目录和文件。通过使用NFS,用户和程序可以像访问本地文件一样访问远端系统上的文件。(Linux、Unix之间的共享)

1、Server端
1、安装nfs
[root@server ~]# rpm -qa|grep "nfs"
……
如果没有安装
[root@server ~]# yum install nfs-utils
安装:centos 6.x之后的系统一个命令yum install nfs-utils 全部搞定
2、开启rpcbind服务
(取代之前的portmap---需要单独安装的服务)
[root@server ~]# service rpcbind status
rpcbind (pid 1885) is running...
3、配置NFS的配置文件etc/exports
[root@server ~]# vim /etc/exports
/home/share 172.16.0.0/16(rw,sync)
解析:
1、/home/share为共享目录(共享文件存放的目录,可以是随意的)
2、rw:具有读写权限
3、sync:文件同步写入到内存和硬盘
[root@server ~]# exportfs #生效配置文件
4、重启NFS服务
[root@server ~]# service nfs restart
[root@server ~]# service rpcbind restart
5、查看NFS的共享状态
[root@server home]# showmount -e
Export list for server.chinaitsoft.com:
/home/share 172.16.0.0/16
2、Client端
在nfs客户端需要安装nfs-utils软件包:yum install nfs-utils
1、查看可得到的NFS共享状态
#showmount -e NFS服务器IP
[root@client ~]# showmount -e 172.16.11.99
Export list for 172.16.11.99:
/home/share 172.16.0.0/16
2、挂载NFS服务器中的共享目录
#mount NFS服务器IP:共享目录 本地挂载点目录
[root@client ~]# mount 172.16.11.99:/home/share /mnt
[root@client ~]# mount | grep "nfs"
sunrpc on /var/lib/nfs/rpc_pipefs type rpc_pipefs (rw)
172.16.11.99:/home/share on /mnt type nfs (rw,vers=4,addr=172.16.11.99,clientaddr=172.16.3.16)
……挂载成功
3、如此,client和server建立文件共享机制
[root@server share]# pwd
/home/share
[root@server share]# touch file ; mkdir dir
[root@server share]# ll
total 4
drwxr-xr-x 2 root root 4096 Mar 9 12:49 dir
-rw-r--r-- 1 root root 0 Mar 9 12:49 file
[root@client mnt]# ls
dir file
[root@client mnt]# cd dir
[root@client dir]#
[root@client mnt]# mkdir dir_client
mkdir: cannot create directory `dir_client': Permission denied  //权限不够,原因共享目录本来就没有给其他用户打开写的权限

[root@server share]# ll -d
drwxr-xr-x 3 root root 4096 Mar 9 12:49 .
[root@server share]# chmod 777 -R /home/share
[root@server share]# ll -d
drwxrwxrwx 3 root root 4096 Mar 9 12:49 .
注意:
1、虽然通过权限设置可以让普通用户访问,但是挂载的时候默认情况下只有root可以去挂载,普通用户可以执行sudo。
2、NFS server 关机的时候一点要确保NFS服务关闭,没有客户端处于连接状态!通过showmount -a 可以查看,如果有的话用kill killall pkill 来结束(-9 强制结束)
4、相关命令
1、exportfs:启动了NFS之后又修改了/etc/exports,可以用exportfs 命令来使改动立刻生效
命令格式如下:
shell> exportfs [-aruv]
  -a  全部挂载或卸载 /etc/exports中的内容
  -r  重新读取/etc/exports 中的信息 ,并同步更新/etc/exports、/var/lib/nfs/xtab
  -u  卸载单一目录(和-a一起使用为卸载所有/etc/exports文件中的目录)
  -v  在export的时候,将详细的信息输出到屏幕上。

例:
  shell> exportfs -au  #卸载所有共享目录
  shell> exportfs -rv  #重新共享所有目录并输出详细信息
2、nfsstat 查看NFS的运行状态
3、rpcinfo 查看rpc执行信息
4、showmount
-a #显示已经于客户端连接上的目录信息
-e IP或者hostname #显示此IP地址分享出来的目录
5、netstat
Print network connections, routing tables, interface statistics, masquerade connections, and multicast memberships
#使用netstat命令,查看出nfs服务开启的端口,其中nfs 开启的是2049,portmap 开启的是111,其余则是rpc开启的。
来源:https://www.cnblogs.com/geaozhang/p/6941757.html