nginx添加模块
1.首先下载模块解压
2.添加模块
[root@jk]# cd /usr/src/nginx-1.16.1
[root@jk nginx-1.16.1]# ./configure --prefix=/usr/local/nginx --user=nginx --group=nginx --with-debug --with-http_ssl_module --with-http_realip_module --with-http_image_filter_module --with-http_gunzip_module --with-http_gzip_static_module --with-http_stub_status_module --http-log-path=/var/log/nginx/access.log --error-log-path=/var/log/nginx/error.log --add-module=../echo-nginx-module-master
3.编译(别安装)
[root@jk nginx-1.16.1]# make
4.将安装位置下的objs/下面nginx替换原来的nginx/sbin/nginx(先备份)
[root@jk sbin]# mv nginx nginx.backup
[root@jk sbin]# mv /usr/src/nginx-1.16.1/objs/nginx .
[root@jk sbin]# ls
nginx  nginx.backup
5.修改配置文件,验证模块效果
[root@jk html]# vim /usr/local/nginx/conf/nginx.conf
location /abc {
            root html;
            echo 'haha';
        }
[root@jk html]# curl http://192.168.174.111/abc
haha
访问控制
用于location段
allow:设定允许哪台或哪些主机访问,多个参数间用空格隔开
deny:设定禁止哪台或哪些主机访问,多个参数间用空格隔开
在配置文件中
示例:
location / {
            root   html/zabbix;
            index  index.php;
            allow 192.168.174.0/24;
            deny all;
        }
用户认证
- 添加配置文件
location / {
            root   html/zabbix;
            index  index.php;
            auth_basic "hello";                //“欢迎信息”
            auth_basic_user_file "/tmp/.pass";     //密码文件绝对路径
        }
- 生成密码
[root@jk tmp]# htpasswd -c -m .pass(密码文件) haha(用户)
New password:
Re-type new password:
Adding password for user haha
[root@jk tmp]# cat .pass
haha:$apr1$ZOE0IBKJ$vbk0QU3wbdRN9lfnLL6pc0
开启状态页面
开启statua:
location /status {
  stub_status {on | off};    //开启或g
  allow 172.16.0.0/16;
  deny all;
访问状态页面的方式:http://server_ip/status
[root@jk nginx]# curl http://192.168.174.111/status
Active connections: 5
server accepts handled requests
 22 22 290
Reading: 0 Writing: 1 Waiting: 4
状态页面信息详解:
| 状态码 | 表示的意义 |
|---|---|
| Active connections | 当前所有处于打开状态的连接数 |
| accepts | 总共处理了多少个连接 |
| handled | 成功创建多少握手 |
| requests | 总共处理了多少个请求 |
| Reading | nginx读取到客户端的Header信息数,表示正处于接收请求状态的连接数 |
| Writing | nginx返回给客户端的Header信息数,表示请求已经接收完成,且正处于处理请求或发送响应的过程中的连接数 |
| Waiting | 开启keep-alive的情况下,这个值等于active - (reading + writing),意思就是Nginx已处理完正在等候下一次请求指令的驻留连接 |
监控nginx访问连接
首先搭建zabbix服务并完成代理
开启nginx状态页面
1.开启zabbix脚本功能并完成相应配置
[root@jk ~]# vim /usr/local/etc/zabbix_agentd.conf
UnsafeUserParameters=1
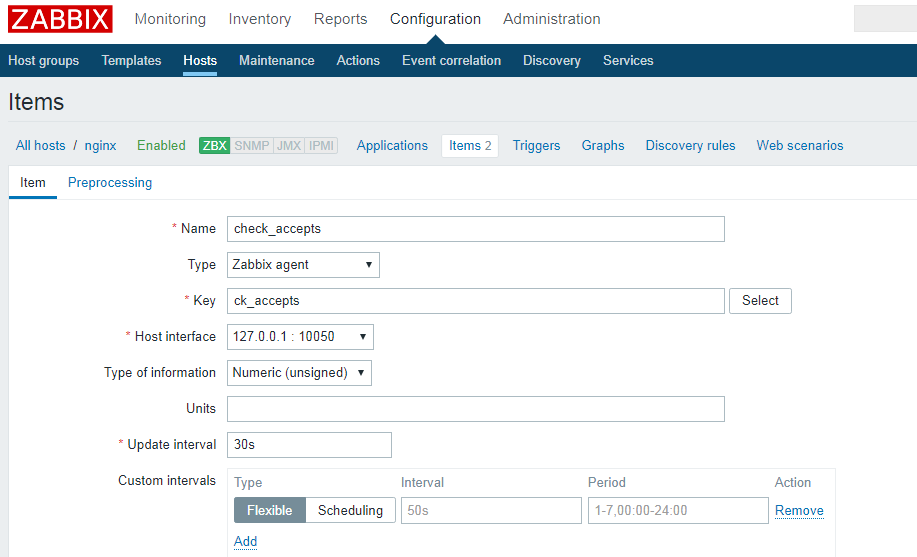
UserParameter=ck_accepts,/bin/bash /script/nginx.sh
UserParameter=ck_requests,/bin/bash /script/nginx1.sh
2.编写脚本并给执行权限
[root@jk ~]# cat /script/nginx.sh
#!/bin/bash
status=$(curl http://192.168.174.111/status 2>/dev/null | awk 'NR==3{print $1}')
echo "$status"
[root@jk ~]# cat /script/nginx1.sh
#!/bin/bash
status=$(curl http://192.168.174.111/status 2>/dev/null | awk 'NR==3{print $3}')
echo "$status"
[root@jk ~]# chmod +x /script/nginx.sh
[root@jk ~]# chmod +x /script/nginx1.sh
(重启服务)
3.配置zabbix网站
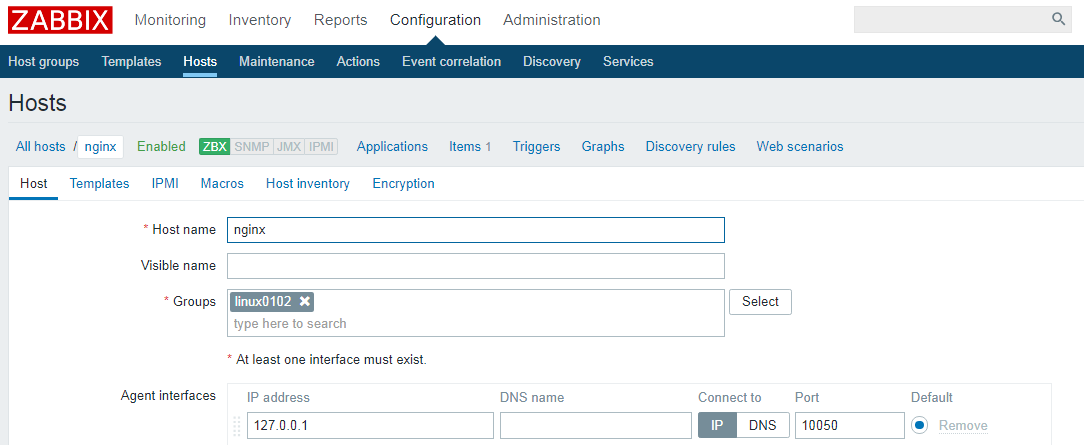
- 添加主机

- 添加监控项


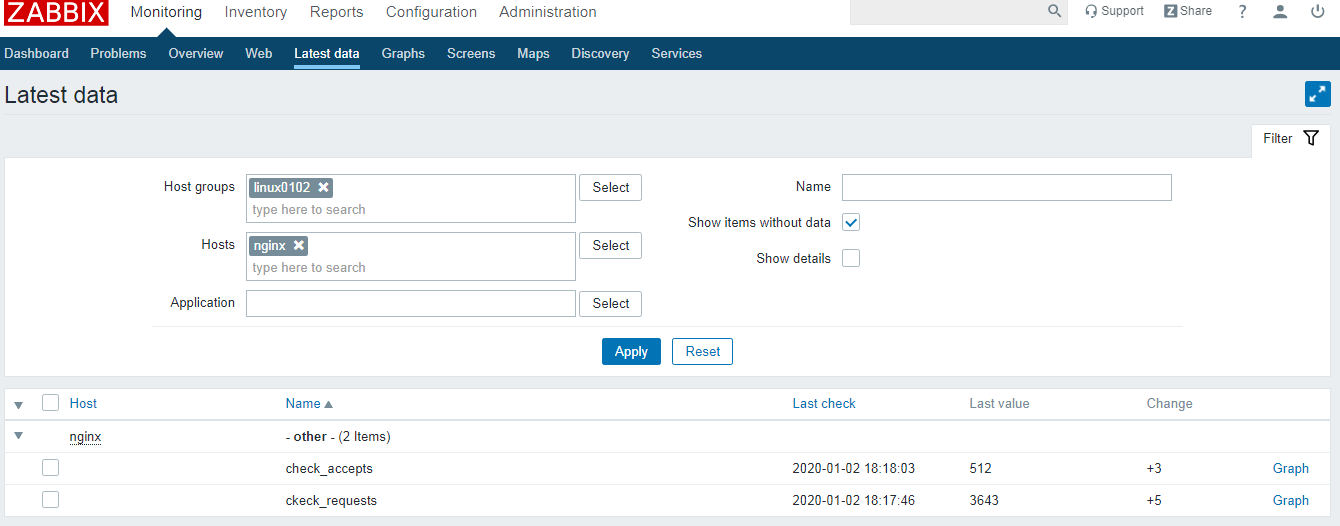
- 验证效果

rewrite
语法:rewrite regex replacement flag;,如:
rewrite ^/images/(.*\.jpg)$ /imgs/$1 break;
此处的$1用于引用(.*.jpg)匹配到的内容,又如:
rewrite ^/bbs/(.*)$ http://www.idfsoft.com/index.html redirect;
如上例所示,replacement可以是某个路径,也可以是某个URL
常见的flag
| flag | 作用 |
|---|---|
| last | 基本上都用这个flag,表示当前的匹配结束,继续下一个匹配,最多匹配10个到20个 一旦此rewrite规则重写完成后,就不再被后面其它的rewrite规则进行处理,而是由UserAgent重新对重写后的URL再一次发起请求,并从头开始执行类似的过程 |
| break | 中止Rewrite,不再继续匹配 一旦此rewrite规则重写完成后,由UserAgent对新的URL重新发起请求,且不再会被当前location内的任何rewrite规则所检查 |
| redirect | 以临时重定向的HTTP状态302返回新的URL |
| permanent | 以永久重定向的HTTP状态301返回新的URL |
rewrite模块的作用是用来执行URL重定向。这个机制有利于去掉恶意访问的url,也有利于搜索引擎优化(SEO)
nginx使用的语法源于Perl兼容正则表达式(PCRE)库,基本语法如下:
| 标识符 | 意义 |
|---|---|
| ^ | 必须以^后的实体开头 |
| $ | 必须以$前的实体结尾 |
| . | 匹配任意字符 |
| [] | 匹配指定字符集内的任意字符 |
| [^] | 匹配任何不包括在指定字符集内的任意字符串 |
| | | 匹配 | 之前或之后的实体 |
| () | 分组,组成一组用于匹配的实体,通常会有 | 来协助 |
捕获子表达式,可以捕获放在()之间的任何文本,比如:
^(hello|sir)$       //字符串为“hi sir”捕获的结果:$1=hi$2=sir

//这些被捕获的数据,在后面就可以当变量一样使用了
示例:
[root@jk ~]# vim /usr/local/nginx/conf/nginx.conf
location /abc {
            root html;
            echo 'haha';
        }
        location /haha {
        rewrite ^/haha/(.*)$ /abc break;
        }
验证:
来源:CSDN
作者:有点小忧郁
链接:https://blog.csdn.net/wjq1347654620/article/details/103800220


