HTML
一、语法
①文档后缀名.html或者.htm
②标签分为:
- 围堵标签:有开始结束标签,如
<html></html> - 自闭和标签:开始标签和结束标签在一起如
<br/>
③标签可以嵌套
④在开始标签中定义属性,属性是由键值对构成,值需要用引号引起来
⑤html的标签不分大小写,建议使用小写
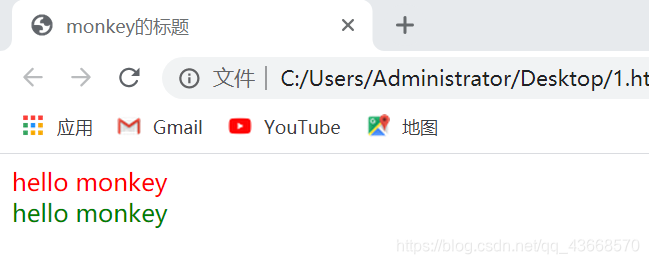
示例
<html>
   <head>
      <title>monkey的标题</title>
   </head>
   <body>
      <font color='red'>hello monkey1</font><br/>
	  <font color='green'>hello monkey2</font>
   </body>
</html>

二、标签
1、文件标签
<html></html>:html文档的根标签<head></head>:头标签,用于指定html文档的一些属性。引用外部的资源<title></title>:标题标签<body></body>:体标签<!DOCTYPE html>:html5中定义该文档是html文档
2、文本标签
<h1> to <h6>:标题标签,字体大小逐渐递减<p></p>:段落标签<br>:换行标签<hr></hr>:展示一条水平线,属性:color、size、align(对其方式center、left、right)、width<b></b>:字体加粗<i></i>:字体斜体<font></font>:字体标签,属性:color(#值1值2值3,值的范围:00~FF)、size、face(字体)、width(值,默认单位是 px (像素)、或者占比,占父元素相对) :空格
<!DOCTYPE html>
<html>
	<head>
		<meta charset="utf-8">
		<title>monkey的第一个网页</title>
	</head>
	<body>
    <h2>标题<h2>
    	<hr color=aquamarine>
     <p><font color="green">小开头</font>
     	段落1
     </p>

     <p>
     	段落2
     </p>

     <p>
     	段落3
     </p>

     <p>
     	段落4
     </p>
     <hr color="aquamarine">
     <center>
     	<font color="#CCCCCC" size="2">
     	       居中内容
        </font>
     </center>
	</body>
</html>

3、图片标签
<img src="" width="" height="" align="" alt="">:图片标签(自闭和标签),属性:align(top、right、left)、src(图片路径)、alt(图片加载失败)、width(宽度)、height(高度)- 路径:相对路径 以
.开头的路径./代表当前目录,../代表上一级目录
4、列表标签
<ol><li> </li></ol>:有序列表,属性:type(顺序是数字还是字母之类等等)<ul><li> </li></ul>:无序列表,属性:type(顺序前面的图案)
<ol type="1">
    		<li>
    		  hello
    		</li>
    		<li>
    		  monkey
    		</li>
    	</ol>
    	<ol type="A">
    		<li>
    		  hello
    		</li>
    		<li>
    		  monkey
    		</li>
    	</ol>
    	<ul type="square">
    		<li>
    		  hello
    		</li>
    		<li>
    		  monkey
    		</li>
    	</ul>

5、链接标签
<a href=" " target=" "> </a>:定义一个超链接,属性:href(指定访问资源的URL、本文件目录下的文件),target(指定打开资源的方式(_self-默认)、(_ blank-新页面))
6、div和span标签
<span></span>:文本信息在一行展示<div></div>:每一个div占满一整行
8、语义化标签
<header> </header><footer> </footer>- html5为提高程序可读性,提供的标签
9、表格标签
<table> </table>:定义表格,属性:border(边框)、cellpadding(定义内容和单元格的距离)、cellspacing(定义单元格之间的距离,指定为0,单元格的线会合为一条)、bgcolor(表格背景颜色)、align(对齐方式)<tr> </tr>:定义行,属性:bgcolor(行颜色)、align(对齐方式)<td> </td>:定义单元格<th> </th>:定义表格单元格<caption> </caption>:表格标题
 <table border="1" width="50%" cellpadding="0" cellspacing="0" align="center" bgcolor="aquamarine">
    	<caption><font color="cornflowerblue">动物信息表</caption>
    	<tr bgcolor="crimson">
    		<th>名字</th>
    		<th>编号</th>
    		<th>年龄</th>
    	</tr>
    	<tr>
    		<td>dog</td>
    		<td>1</td>
    		<td>20</td>
    	</tr>
    	<tr>
    		<td>cat</td>
    		<td>2</td>
            <td>18</td>
    	</tr>

    </table>

10、表单标签
概念:用于采集用户输入的数据,用于和服务器进行交互
- form用于定义表单,可定义一个范围,范围代表采集用户数据的范围
<form></form>:用于定义一个范围,范围代表采集用户数据的范围。属性:action(指定提交的URL、#为当前页面)、method(指定提交方式get、post)- 表单项中的数据想要被提交,必须指定其name属性
<input>:表单项标签,可以通过type属性值,改变元素展示的样式。属性:type<select>:下拉列表<textarea>:文本域
<form action="#" method="get">
			<label for="username">用户名</label>:<input type="text" name="username" placeholder="请输入用户名" id="username"><br>
			<label>密码</label>:<input type="password" name="password" placeholder="请输入密码"><br>
			性别:<input type="radio" name="gender" value="male">男
			     <input type="radio" name="gender" value="female">女
			     <br>
			爱好:<input type="checkbox" name="hobby" value="java">Java
			     <input type="checkbox" name="hobby" value="python">Python
			     <input type="checkbox" name="hobby" value="dart">Dart
			     <input type="checkbox" name="hobby" value="c++">C++
			     <br>
			图片:<input type="file" name="file"><br>
			隐藏域:<input type="hidden" name="id" value="aaa"><br>
			取色器:<input type="color" name="color"><br>
			生日:<input type="date" name="birthday"><br>
			生日:<input type="datetime-local" name="birthday"><br>
			邮箱:<input type="email" name="email"><br>
			年龄:<input type="number" name="age"><br>

			省份:<select name="province">
				    <option>--请选择--</option>
				    <option>北京</option>
				    <option>上海</option>
				    <option>成都</option>
			     </select>
			<br>
			自我描述:
			<textarea cols="20" rows="5" name="description"></textarea>
			<input type="submit" value="登录"><br>
			<input type="button" value="一个按钮"><br>
			<input type="image" src="img/3.jpg">
		</form>

属性method中的get和post方法
get:
- 请求参数会在地址栏中显示
- 请求参数大小是有限的
- 不太安全
post:
- 请求参数不会在地址栏中显示,会封装在请求体中
- 请求参数的大小没有限制
- 较为安全
<form action="#" method="post">
	                用户名:<input name="username"><br>
                        密码:<input name="password"><br>
            <input type="submit" value="登录">
		</form>

CSS—页面美化和控制
一、概念
1、Cascading Style Sheets: 层叠样式表,即多个样式可以作用在同一个html元素上同时生效。有点类似于换皮肤,但内容不变。
2、好处:功能强大、将内容展示和样式控制分离(降低耦合度,解耦、让分工协作更容易、提高开发效率)。相当于分工html和css,最后能整合到一起。
二、CSS与HTML结合方式
1、内联样式:在标签内使用style属性指定css代码
<div style="color: red;">hello,monkey</div>- 依旧耦合在一起,不推荐使用
2、内部样式:在head标签内定义style标签,style标签的标签体内容为css代码。只在当前页面生效。
<head>
		<meta charset="utf-8">
		<title>内部样式</title>
		<style>
			div{
				color: blue;
			}
		</style>
	</head>
	<body>
		<div>hello,monkey</div>
	</body>
3、外部样式
①定义css资源文件(在当前项目文件下创建一个文件目录,在里面写一个文件,后缀名.css)
②在head标签内,定义link标签,引入外部的资源文件

注意:1、2、3种方式css作用范围越来越大。1方式不常用,后期常用2,3。第3种格式还可以写为
<style>
  @import"css/1.css"
</style>
三、语法
格式
选择器{
    属性名1:属性值1;
    属性名2:属性值2;
    ....
}
注意:每一对属性需要使用分号隔开,最后一对属性可以不加分号
四、选择器以及常用属性
选择器:筛选具有相似特征的元素
1、选择器分类
①基础选择器
id选择器:选择id属性值的元素
- 语法:#id属性值()
元素选择器:选择具有相同标签名称的元素
- 语法:标签名称{ }
类选择器
- 语法:.class属性{ }
<head>
		<meta charset="utf-8">
		<title>基础选择器</title>
		<style>
			#div1{
				color:blue;
			}
			div{
				color: green;
			}
			.cls1{
				color: red;
			}

		</style>
	</head>
	<body>
		<div id="div1">hello,monkey</div>
		<div>hello,cat</div>
		<p class="cls1">hello,dog</p>
	</body>

注:id选择器优先级高于元素选择器、类选择器优先级高于元素选择器
②扩展选择器
选择所有元素:
- 语法:*{ }
并集选择器:
- 选择器1,选择器2{ }
子选择器:筛选选择器1元素下的选择器2元素
- 语法:选择器1 选择器2{ }
父选择器:筛选选择器2的父元素选择器1
- 语法:选择器1>选择器2{ }
属性选择器:
- 语法:元素名称[属性名=“属性值”]{ }
伪类选择器:选择一些元素具有的状态
- 语法:元素:状态{ }
- 如
<a> - 状态:
link:初始化的状态
visited:被访问过的状态
active:正在访问状态
hover:鼠标悬浮状态
<head>
		<meta charset="utf-8">
		<title>扩展选择器</title>

		<style >

			a:link{
		 	   color:green;
	        }

		    a:visited{
			   color:red;
		    }

		    a:active{
			   color: deeppink;
		    }
		    a:hover{
		       color: yellow;
		    }

		</style>
	</head>
	<body>
	    <a href="#">monkey</a>
	</body>
2、常用属性
①文本、字体
- font-size:字体大小
- color:文本颜色
- text-align:对其方式
- line-height:行高
②背景
- background:设置背景
③边框轮廓
- border:设置边框,符合属性
④尺寸
- width:宽度
- height:高度
<style>
			p{
				color: green;
				font-size: 30px;
				text-align: center;
				line-height: 100px;
				border: 2px solid deeppink;
			}
			div{
				height: 200px;
				width:200px;
				background: url(img/3.jpg) no-repeat center;
			}
		</style>

     <p>monkey</p>
	 <div></div>

⑤盒子模型:页面布局控制
- margin:外边距
- padding:内边距(默认情况下盒子会受内边距的影响、可设置盒子属性,让width和height就是最终盒子的大小
box-sizing:border-box) - float:浮动
<head>
		<meta charset="utf-8">
		<title>盒子模型</title>

		<style>
		div{
			border: 1px solid red;
			width: 80px;
		}
		.div1{
		    width: 100px;
		    height: 100px;
		    margin-left: 50px;
		}
		.div2{
			width: 200px;
			height: 200px;
			box-sizing: border-box;
		}
		.div3{
			float:left
		}
		.div4{
			float: left;
		}
		.div5{
			float:right;
		}
		</style>
	</head>
	<body>

	   <div class="div2">
	     	<div class="div1"></div>
	   </div>
	   <div class="div3">monkey</div>
	   <div class="div4">cat</div>
	   <div class="div5">dog</div>

	</body>

案例:结合HTML和CSS写一个注册页面
完整代码:
<!DOCTYPE html>
<html>
<head>
<meta charset="utf-8">
<title>注册界面</title>
<style>
/*
* '*'为通配符,指代所有元素
*/
*{
margin: 0px;
padding: 0px;
box-sizing: border-box;
}
body{
background: url(img/18.jpg) no-repeat center;
}
/*
* margin:auto(垂直居中)
*/
.rg_layout{
width: 1000px;
height: 500px;
border: 8px solid darkgrey;
margin: auto;
padding: 15px;
margin-top: 20px;
}
.rg_left{
float:left;
margin: 15px;
}
.rg_left p:first-child{
color: darkblue;
font-size: 20px;
font-family:futura;
}
.rg_left p:last-child{
color: grey;
font-size: 30px;
}
.rg_center{
float: left;
width: 450px;
}
.rg_right{
float: right;
margin: 15px;
}
.rg_right p a{
color: palevioletred;
}
.td_left{
width: 100px;
text-align: right;
height: 40px;
}
.td_right{
padding-left: 50px;
}
#username,#password,#tel,#name,#email,#checkcode,#birthday{
width: 240px;
height: 32px;
border: 1px solid grey;
/*设置边框圆角*/
border-radius: 5px;
padding-left: 10px;
}
#checkcode{
width: 110px;
}
/*
* vertical-align: middle(设置元素垂直排列)
*/
#img_check{
height: 32px;
vertical-align: middle;
}
#btn_sub{
width: 150px;
height: 40px;
background: cornflowerblue;
border: darkgray 2px solid;
}
</style>
</head>
<body>
<div class="rg_layout">
<div class="rg_left">
<p class="p1">新用户注册</p>
<p class="p2">USER REGISTER</p>
</div>
<div class="rg_center">
<div class="rg_form">
<form action="#" method="post">
<table align="center" width="500px" height="400px">
<tr>
<td class="td_left"><label for="username">用户名</label></td>
<td class="td_right"><input type="text" name="username" id="username" autocomplete="off" placeholder="请输入用户名"></td>
</tr>
<tr>
<td class="td_left"><label for="password">密码</label></td>
<td class="td_right"><input type="password" name="password" id="password" autocomplete="off" placeholder="请输入密码"></td>
</tr>
<tr>
<td class="td_left"><label for="email">Email</label></td>
<td class="td_right"><input type="email" name="email" id="email" autocomplete="off" placeholder="请输入Email"></td>
</tr>
<tr>
<td class="td_left"><label for="name">姓名</label></td>
<td class="td_right"><input type="text" name="name" id="name" autocomplete="off" placeholder="请输入姓名"></td>
</tr>
<tr>
<td class="td_left"><label for="tel">手机号</label></td>
<td class="td_right"><input type="text" name="tel" id="tel" autocomplete="off" placeholder="请输入手机号"></td>
</tr>
<tr>
<td class="td_left"><label>性别</label></td>
<td class="td_right">
<input type="radio" name="gender" autocomplete="off">男
<input type="radio" name="gender" autocomplete="off">女
</td>
</tr>
<tr>
<td class="td_left"><label for="birthday">出生日期</label></td>
<td class="td_right"><input type="date" name="birthday" id="birthday" autocomplete="off"></td>
</tr>
<tr>
<td class="td_left"><label for="checkcode">验证码</label></td>
<td class="td_right"><input type="text" name="checkcode" id="checkcode" autocomplete="off" placeholder="请输入验证码">
<img id="img_check" src="img/3.jpg" / width="60px" height="30px">
</td>
</tr>
<tr>
<td colspan="2" align="center">
<input id="btn_sub" type="submit" value="注册" />
</td>
</tr>
</table>
</form>
</div>
</div>
<div class="rg_right">
<p>已有账号?<a href="#">立即登录</a></p>
</div>
</div>
</body>
</html>
来源:CSDN
作者:monkey-zz
链接:https://blog.csdn.net/qq_43668570/article/details/103901179