本人所有博客均是记录自己的学习和爬坑的过程,顺便分享一些好用的东西给同学,没有任何商用行为,若有侵权,请及时联系本人1521976977@qq.com。如果对你有帮助的话不妨点赞呗~谢谢
卡片CardView
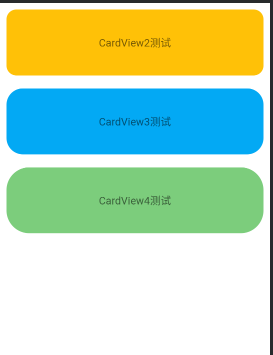
这个好东西是Android5.0推出的,Android 5.0版本中新增了CardView,CardView继承自FrameLayout类,并且可以设置圆角和阴影,使得 控件具有立体性,也可以包含其他的布局容器和控件。——可以很好的实现项目中的这类的需求
步骤一
配置build.gradle
一:support版
comple 'com.android.support:appcompat-v7:28.0.0'[一般都有了]
comple 'com.android.support:cardview-v7:28.0.0'
二:Androidx版
implementation 'androidx.cardview:cardview'
根据自己的项目选择导入正确的依赖
——Sync Now
如果出现

一般这样是因为网络原因,依赖没有下载成功
换个mave仓库试试吧
project.gradle
repositories {
        maven{ url 'https://maven.aliyun.com/repository/central'}
        maven{ url 'https://maven.aliyun.com/repository/jcenter'}
        maven{ url 'https://maven.aliyun.com/repository/google'}
        maven {
            url "https://maven.google.com"
        }
        google()
        jcenter()

    }
步骤二
依赖导入成功当然就是上手操作了啊!先上手在布局里面试试有没有这个布局,且布局有没有效果!
如果布局没有效果ctrl+点击cardView看看导入的包对不对吧,如果你是supoort项目引入的是androidx下的cardview肯定不行
support包下:
 <android.support.v7.widget.CardView
        android:id="@+id/card_view_three"
        android:layout_width="match_parent"
        android:layout_height="100dp"
        android:layout_gravity="center"
        android:layout_marginLeft="10dp"
        android:layout_marginTop="10dp"
        android:layout_marginRight="10dp"
        app:cardBackgroundColor="#CAE1FF"
        app:cardCornerRadius="15dp"
        app:layout_constraintTop_toTopOf="parent"
        >

        <TextView
            android:id="@+id/info_text_three"
            android:layout_width="match_parent"
            android:layout_height="match_parent"
            android:gravity="center"
            android:text="CardView3测试"
            android:textSize="16sp" />
    </android.support.v7.widget.CardView>
Androidx:包下:
    <androidx.cardview.widget.CardView
        android:id="@+id/card_view_one"
        android:layout_width="match_parent"
        android:layout_height="100dp"
        android:layout_gravity="center"
        android:layout_marginLeft="10dp"
        android:layout_marginTop="10dp"
        android:layout_marginRight="10dp"
        app:cardCornerRadius="5dp">

        <TextView
            android:id="@+id/info_text_one"
            android:layout_width="match_parent"
            android:layout_height="match_parent"
            android:gravity="center"
            android:text="CardView1测试"
            android:textSize="16sp" />
    </androidx.cardview.widget.CardView>

介绍下里面的一些常用属性:
1、 点击事件需申明:
------android:clickable=“true”
------- android:focusable=“true”
2、设置圆角:app:cardCornerRadius="@dimen/dp_7"
3、设置阴影大小:app:cardElevation="@dimen/dp_10"
app:cardElevation这是设置z轴的阴影
app:cardMaxElevation这是设置z轴的最大高度值
4、点击产生波纹效果:android:foreground="?android:attr/selectableItemBackground"
[selectableItemBackgroundBorderless这个属性的效果是超过边界的效果,长按会一直延伸,直至到cardview充满为止。]
5、设置内边距:app:contentPadding="@dimen/dp_7"
6、设置背景色:app:cardBackgroundColor="@color/transparent"
还有如果都按上面的操作了 cardview还是没效果且也没报错,那么阔能是在Mainfest中硬件加速被禁止了
修改为:
android:hardwareAccelerated="true"
学习就到这里了 ,希望能帮助到你,可以的话给个赞吧!比心
来源:CSDN
作者:我唱着黑色毛衣
链接:https://blog.csdn.net/Lemon_wzq/article/details/103513024