【推荐】2019 Java 开发者跳槽指南.pdf(吐血整理) >>> 
在spring容器中,BeanDefinition是最为重要的元素。那么从我们配置的xml到最终成为被容器管理的bean最起码要经过以下几个过程
第一、资源定位。spring能够定位到我们配置的文件。通常,我们把配置信息放置到xml文件中去,spring要根据自己的规则找到配置文件。
第一、文件解析,将我们配置到xml或者其他文件中的类元素转化成为可以被spring容器认识的元素-beanDefinition
第二、beanDefinition的载入。有了beanDefinition还要将其转化成Spring内幕标示的数据结构。这个结构IOC容器通过HashMap去维护。

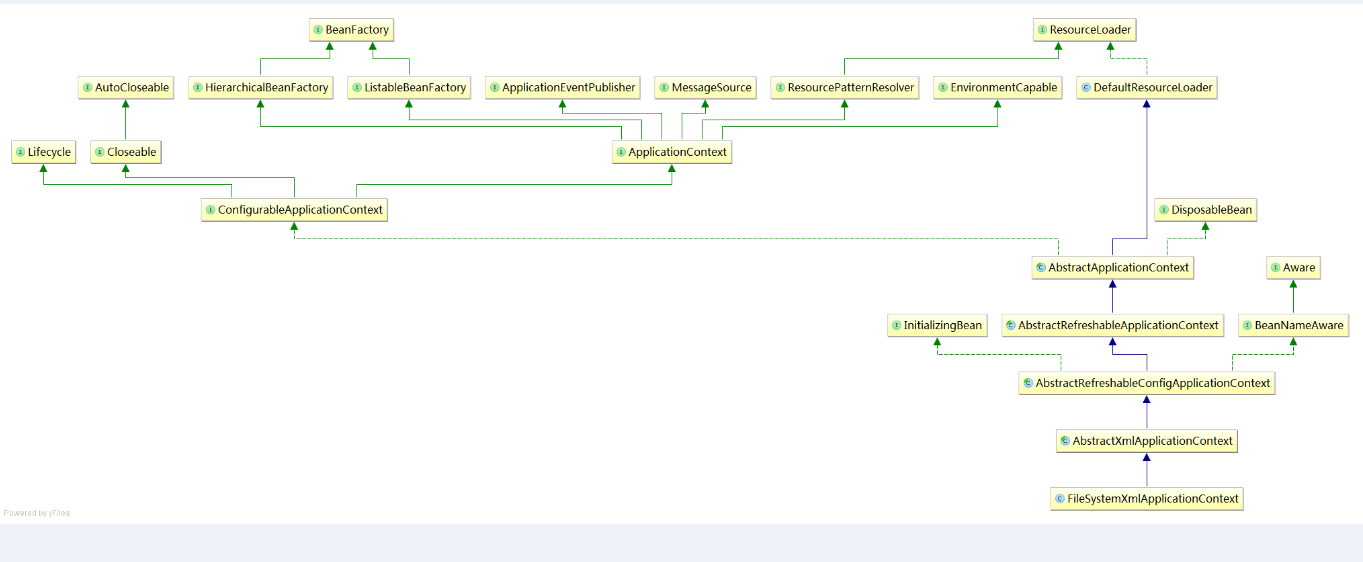
FileSystemXmlApplicationContext是bean载入的成熟上下文。他的整个过程包括了bean从配置文件元素,到能够被spring容器管理的所有过程。
FileSystemXmlApplicationContext
public FileSystemXmlApplicationContext(String[] configLocations, boolean refresh, ApplicationContext parent)
throws BeansException {
super(parent);
setConfigLocations(configLocations);
if (refresh) {
refresh();
}
}
AbstractApplicationContext
public void refresh() throws BeansException, IllegalStateException {
synchronized (this.startupShutdownMonitor) {
// Prepare this context for refreshing.
prepareRefresh();
// Tell the subclass to refresh the internal bean factory.
ConfigurableListableBeanFactory beanFactory = obtainFreshBeanFactory();
// Prepare the bean factory for use in this context.
prepareBeanFactory(beanFactory);
try {
// Allows post-processing of the bean factory in context subclasses.
postProcessBeanFactory(beanFactory);
// Invoke factory processors registered as beans in the context.
invokeBeanFactoryPostProcessors(beanFactory);
// Register bean processors that intercept bean creation.
registerBeanPostProcessors(beanFactory);
// Initialize message source for this context.
initMessageSource();
// Initialize event multicaster for this context.
initApplicationEventMulticaster();
// Initialize other special beans in specific context subclasses.
onRefresh();
// Check for listener beans and register them.
registerListeners();
// Instantiate all remaining (non-lazy-init) singletons.
finishBeanFactoryInitialization(beanFactory);
// Last step: publish corresponding event.
finishRefresh();
}
catch (BeansException ex) {
// Destroy already created singletons to avoid dangling resources.
destroyBeans();
// Reset 'active' flag.
cancelRefresh(ex);
// Propagate exception to caller.
throw ex;
}
}
}
refresh方法里面又包含了12个方法。这12个方法包括了IOC容器启动所有的内容。接下来让我们一个一个看看每个方法都做了什么
1、 // Prepare this context for refreshing.
prepareRefresh();第一个方法的注释写着为重新启动上下文做准备。也就是说这个方法 主要做了准备工作。准备工作都包括了什么呢?
protected void prepareRefresh() {
// Initialize any placeholder property sources in the context environment//初始化所有在上下文环境中的占位符属性元
initPropertySources();
// Validate that all properties marked as required are resolvable
// see ConfigurablePropertyResolver#setRequiredProperties//验证所有标示为required的属性被正确的设置。
getEnvironment().validateRequiredProperties();
}
prepareRefresh方法首先将项目的上下文环境都放置进来了。包括war包位置、临时文件位置、占位符、server等等信息。然后通过调用validateRequiredProperties()方法判断requiredProperties里面的属性是否正确的设置进来了。在我的项目中,requiredProperties是空。没有做任何操作。
2、告诉子类刷新内部的bean factory类
// Tell the subclass to refresh the internal bean factory.
ConfigurableListableBeanFactory beanFactory = obtainFreshBeanFactory();
refreshBeanFactory();
ConfigurableListableBeanFactory beanFactory = getBeanFactory();
if (logger.isDebugEnabled()) {
logger.debug("Bean factory for " + getDisplayName() + ": " + beanFactory);
}
return beanFactory;
}
该方法首先调用refreshBeanFactory()做了以下几个动作:
1、判断beanFactory是否非空,非空则清空bean容器、清空缓存、清空beanFactory。
2、创建DefaultListableBeanFactory实例。这个过程设置了父子容器的关系。
3、设置上文实例化的DefaultListableBeanFactory的内部属性。包括设置candidate resolver ,该属性决定该bean Definition是否被认为能够autowiring。
4、为指定的bean工厂加载了bean。实际加载bean的是XmlBeanDefinitionReader 实例。接下来初始化reader和加载bean过程由相应的子类实现。
// Create a new XmlBeanDefinitionReader for the given BeanFactory.
XmlBeanDefinitionReader beanDefinitionReader = new XmlBeanDefinitionReader(beanFactory);
// Configure the bean definition reader with this context's
// resource loading environment.
beanDefinitionReader.setEnvironment(this.getEnvironment());
beanDefinitionReader.setResourceLoader(this);
beanDefinitionReader.setEntityResolver(new ResourceEntityResolver(this));
// Allow a subclass to provide custom initialization of the reader,
// then proceed with actually loading the bean definitions.//设置reader的属性validating。设置是否使用xml验证,缺省是true initBeanDefinitionReader(beanDefinitionReader);
//加载beanDefinition
loadBeanDefinitions(beanDefinitionReader);
}protected void loadBeanDefinitions(XmlBeanDefinitionReader reader) throws BeansException, IOException {
Resource[] configResources = getConfigResources();
if (configResources != null) {
reader.loadBeanDefinitions(configResources);
}
String[] configLocations = getConfigLocations();
if (configLocations != null) {
reader.loadBeanDefinitions(configLocations);
}
}
我们系统中配置的xml信息最终都已Resouces类的形式被spring读取。

reader.loadBeanDefinitions(configLocations);方法将我们配置的spring xml文件信息解析出来。。
解析进来要包括我们配置的方方面面。包括像autowired属性,各个bean的property属性。这些都是使用reader"笔"来载入的。
//将元素封装成为BeanDefinitionHolder 实例。
BeanDefinitionHolder bdHolder = delegate.parseBeanDefinitionElement(ele);
if (bdHolder != null) {//将autowire、autowire-candidate、class、destroy-method、id,lazy-init、property属性//放置到bdHolder
bdHolder = delegate.decorateBeanDefinitionIfRequired(ele, bdHolder);
try {
// Register the final decorated instance.
BeanDefinitionReaderUtils.registerBeanDefinition(bdHolder, getReaderContext().getRegistry());
}
catch (BeanDefinitionStoreException ex) {
getReaderContext().error("Failed to register bean definition with name '" +
bdHolder.getBeanName() + "'", ele, ex);
}
// Send registration event.
getReaderContext().fireComponentRegistered(new BeanComponentDefinition(bdHolder));
}
}
最终,将beanDefinitions放置到了beanDefinitionMap中。
3、工厂类有了,接下来就是如何让这个工厂类配置信息,让他有容器工厂的样子。配置工厂的标准上下文特性,比如上下文的类加载器和后置处理器等等。 prepareBeanFactory(beanFactory);
除了设置一些关于容器的类信息之外。最重要的就注册进来新的类到容器中。这三个类包含了jdk、servlet容器的信息都在这一步设置进了容器中。

4、 这个过程主要包括后置处理器设置、作用域设置。包括web.xml里面设置的xml文件位置解析postProcessBeanFactory(beanFactory);
protected void postProcessBeanFactory(ConfigurableListableBeanFactory beanFactory) {//设置后置处理器
beanFactory.addBeanPostProcessor(new ServletContextAwareProcessor(this.servletContext, this.servletConfig));
beanFactory.ignoreDependencyInterface(ServletContextAware.class);
beanFactory.ignoreDependencyInterface(ServletConfigAware.class);
//注册作用域设置。
WebApplicationContextUtils.registerWebApplicationScopes(beanFactory, this.servletContext);
WebApplicationContextUtils.registerEnvironmentBeans(beanFactory, this.servletContext, this.servletConfig);
}
.
五、触发后置处理器。
步骤4已经将后置处理器注册到了工厂类中,接下来就是出发这些工厂类的时候了。

1、从工厂类中获取到后置处理器
2、后置处理器有优先级。我们要对处理器的前后顺序排序
3、如果没有在工厂类中获取后置处理器,那从工厂加载的bean中寻找后置处理器。触发这些后置处理器。
invokeBeanFactoryPostProcessors(beanFactory);
六、注册拦截bean创建的 bean处理器 registerBeanPostProcessors(beanFactory);
1、获取到后置处理器(包括三个类型)
2、将后置处理器增加到了factory中(包括一个监听器后置处理器ApplicationListenerDetector)
七、 初始化上下文的消息资源
initMessageSource();
在factory中注册了一个名称为MESSAGE_SOURCE_BEAN_NAME的类。
如果配置了,则从容器中获取到bean。
如果没有配置,则采用默认的方式创建,将其将其添加到singletonObjects中。
八、初始化上下文的事件广播。 initApplicationEventMulticaster();
在factory中注册一个名为APPLICATION_EVENT_MULTICASTER_BEAN_NAME的类。如果factory中已经有名称为APPLICATION_EVENT_MULTICASTER_BEAN_NAME的类,则从容器中获取到bean。
如果没有配置,则采用默认的方式创建,将其添加到 singletonObjects中。
// Initialize other special beans in specific context subclasses.
九、初始化铁定上下文子类中其他特殊的bean。
子类中都通过它增加了主题功能的支持。 onRefresh();
protected void onRefresh() {
this.themeSource = UiApplicationContextUtils.initThemeSource(this);
} // Check for listener beans and register them.
十、查找监听bean,并注册他们。 registerListeners();
//获取到上下文中的监听,将其添加到SimpleApplicationEventMulticaster类的监听器列表中
for (ApplicationListener<?> listener : getApplicationListeners()) {
      getApplicationEventMulticaster().addApplicationListener(listener);
   }
//获取到注册进来的bean中类型为ApplicationListener的监听器,将其添加到SimpleApplicationEventMulticaster类的监听器列表中。   String[] listenerBeanNames = getBeanNamesForType(ApplicationListener.class, true, false);
   for (String lisName : listenerBeanNames) {
      getApplicationEventMulticaster().addApplicationListenerBean(lisName);
   }
}
十一、实例化所有剩余类型为单利的bean finishBeanFactoryInitialization(beanFactory);
包括以下几个步骤:
1、判断类型为CONVERSION_SERVICE_BEAN_NAME类是否存在,存在则将其设置进工厂类中。
2、判断类型为LoadTimeWeaverAware的类是否存在,依赖注入之。
3、取消掉临时类加载器。
4、设置缓存frozenBeanDefinitionNames
5、初始化剩余的非懒加载的单例类。
十二、发布事件。
finishRefresh();
1、初始化一个类:org.springframework.context.support.DefaultLifecycleProcessor
首先判断factory中是否包含名称为lifecycleProcessor的类,如果有则将其赋值给上下文的lifecycleProcessor中。如果没有则将实例化一个默认值DefaultLifecycleProcessor defaultProcessor = new DefaultLifecycleProcessor();并将其复制给上下文的lifecycleProcessor中
2
2.1、获取容器中加载进来的类中哪个类是Lifecycle.class类型的。
2.2、将Lifecycle.class类型的类放置到容器中返回。
2.3、启动监听容器。
3、
3.1、获取线程池线程
3.2、调用监听方法listener.onApplicationEvent(event),执行监听事件。上文中说@Scheduled方法的时间就是在这个时候出发执行的。
4、没用过,不懂。官方的注解是在LiveBeansView MBean环境中使用。
来源:oschina
链接:https://my.oschina.net/u/166980/blog/534991