Sentinel 是什么?
随着微服务的流行,服务和服务之间的稳定性变得越来越重要。Sentinel 以流量为切入点,从流量控制、熔断降级、系统负载保护等多个维度保护服务的稳定性。
Sentinel 具有以下特征:
- 丰富的应用场景:Sentinel 承接了阿里巴巴近 10 年的双十一大促流量的核心场景,例如秒杀(即突发流量控制在系统容量可以承受的范围)、消息削峰填谷、集群流量控制、实时熔断下游不可用应用等。
- 完备的实时监控:Sentinel 同时提供实时的监控功能。您可以在控制台中看到接入应用的单台机器秒级数据,甚至 500 台以下规模的集群的汇总运行情况。
- 广泛的开源生态:Sentinel 提供开箱即用的与其它开源框架/库的整合模块,例如与 Spring Cloud、Dubbo、gRPC 的整合。您只需要引入相应的依赖并进行简单的配置即可快速地接入 Sentinel。
- 完善的 SPI 扩展点:Sentinel 提供简单易用、完善的 SPI 扩展接口。您可以通过实现扩展接口来快速地定制逻辑。例如定制规则管理、适配动态数据源等。
以上是官网对sentinel的一个介绍,本篇文章不讲原理,只讲搭建和使用。官网:https://github.com/alibaba/Sentinel/
正式开始之前我们先来看一下sentinel提供的dashboard界面:
通过https://github.com/alibaba/Sentinel/tree/master/sentinel-dashboard 下载源码进行构建,由于是SpringBoot项目,打包后可以使用java -jar xxx.jar来启动,我这里已经构建好了,直接来看启动后的界面:

默认的用户名和密码都是 sentinel,

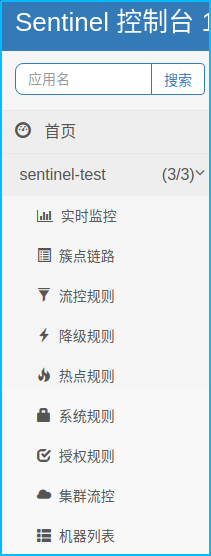
可以看到有sentinel-test的,这个是我们刚刚刚定义的。


可以看到,我刚刚对c1和c2的服务进行了访问,在这里可以查看接口的qps等。

由于我使用的集群总体,阀值为20,所以qps平均在21左右,集群内有2个机器,分别是c1和c2, Java的测试代码如下:

可以看到Blocked By Sentinel (flow limiting) 说明被拒绝了,有一个注意点就是在添加规则的时候要选择集群:

在添加流控规则的时候如果不勾选默认是单机的,不会走token-server

可以看到我当前的机器节点。 下面来说项目的搭建。

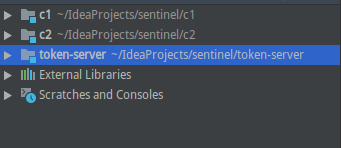
项目结构如上,c1和c2模仿了2个应用,token-server为集群提供token。
下面我们来看c1和c2的工程目录:

c2和c1的工程目录一样,为了方便截图,只展开C1工程。
c1、c2工程的pom配置如下:
<?xml version="1.0" encoding="UTF-8"?>
<project xmlns="http://maven.apache.org/POM/4.0.0" xmlns:xsi="http://www.w3.org/2001/XMLSchema-instance"
         xsi:schemaLocation="http://maven.apache.org/POM/4.0.0 https://maven.apache.org/xsd/maven-4.0.0.xsd">
    <modelVersion>4.0.0</modelVersion>
    <parent>
        <groupId>org.springframework.boot</groupId>
        <artifactId>spring-boot-starter-parent</artifactId>
        <version>2.2.2.RELEASE</version>
        <relativePath/> <!-- lookup parent from repository -->
    </parent>
    <groupId>com.sentinel</groupId>
    <artifactId>c1</artifactId>
    <version>0.0.1-SNAPSHOT</version>
    <name>c1</name>
    <description>Demo project for Spring Boot</description>

    <properties>
        <java.version>1.8</java.version>
    </properties>

    <dependencies>
        <dependency>
            <groupId>org.springframework.boot</groupId>
            <artifactId>spring-boot-starter-web</artifactId>
        </dependency>

        <dependency>
            <groupId>org.springframework.boot</groupId>
            <artifactId>spring-boot-starter-test</artifactId>
            <scope>test</scope>
            <exclusions>
                <exclusion>
                    <groupId>org.junit.vintage</groupId>
                    <artifactId>junit-vintage-engine</artifactId>
                </exclusion>
            </exclusions>
        </dependency>


        <dependency>
            <groupId>org.springframework.cloud</groupId>
            <artifactId>spring-cloud-starter-alibaba-sentinel</artifactId>
        </dependency>

        <dependency>
            <groupId>com.alibaba.csp</groupId>
            <artifactId>sentinel-transport-simple-http</artifactId>
            <version>1.7.0</version>
        </dependency>

        <dependency>
            <groupId>com.alibaba.csp</groupId>
            <artifactId>sentinel-core</artifactId>
            <version>1.7.0</version>
        </dependency>

        <dependency>
            <groupId>com.alibaba.csp</groupId>
            <artifactId>sentinel-datasource-extension</artifactId>
            <version>1.7.0</version>
        </dependency>

        <dependency>
            <groupId>com.alibaba.csp</groupId>
            <artifactId>sentinel-cluster-client-default</artifactId>
            <version>1.7.0</version>
        </dependency>


    </dependencies>

    <dependencyManagement>
        <dependencies>
            <dependency>
                <groupId>org.springframework.cloud</groupId>
                <artifactId>spring-cloud-dependencies</artifactId>
                <version>${spring-cloud.version}</version>
                <type>pom</type>
                <scope>import</scope>
            </dependency>

            <dependency>
                <groupId>org.springframework.cloud</groupId>
                <artifactId>spring-cloud-alibaba-dependencies</artifactId>
                <version>0.2.2.RELEASE</version>
                <type>pom</type>
                <scope>import</scope>
            </dependency>
        </dependencies>
    </dependencyManagement>


    <build>
        <plugins>
            <plugin>
                <groupId>org.springframework.boot</groupId>
                <artifactId>spring-boot-maven-plugin</artifactId>
            </plugin>
        </plugins>
    </build>

</project>
application.properties配置如下
server.port=8700
spring.application.name=sentinel-test

spring.cloud.sentinel.eager=true
spring.cloud.sentinel.transport.dashboard=http://192.168.0.122:8080
C1Application.java、C2Application.java
package com.sentinel.c1;

import org.springframework.boot.SpringApplication;
import org.springframework.boot.autoconfigure.SpringBootApplication;
import org.springframework.web.bind.annotation.RequestMapping;
import org.springframework.web.bind.annotation.RestController;

@SpringBootApplication
@RestController
public class C1Application {

    public static void main(String[] args) {
        System.setProperty("csp.sentinel.log.use.pid", "true");
        SpringApplication.run(C1Application.class, args);
    }


    @RequestMapping(value = "hello")
    public String hello(){
        return "c1";
    }

}
以上主要为C1和C2工程目录的主要配置文件和代码,接下来我们看看token-server的配置。

token-server的pom.xml配置
<?xml version="1.0" encoding="UTF-8"?>
<project xmlns="http://maven.apache.org/POM/4.0.0" xmlns:xsi="http://www.w3.org/2001/XMLSchema-instance"
         xsi:schemaLocation="http://maven.apache.org/POM/4.0.0 https://maven.apache.org/xsd/maven-4.0.0.xsd">
    <modelVersion>4.0.0</modelVersion>
    <parent>
        <groupId>org.springframework.boot</groupId>
        <artifactId>spring-boot-starter-parent</artifactId>
        <version>2.2.2.RELEASE</version>
        <relativePath/> <!-- lookup parent from repository -->
    </parent>
    <groupId>com.sentinel</groupId>
    <artifactId>token-server</artifactId>
    <version>0.0.1-SNAPSHOT</version>
    <name>token-server</name>
    <description>Demo project for Spring Boot</description>

    <properties>
        <java.version>1.8</java.version>
    </properties>

    <dependencies>
        <dependency>
            <groupId>org.springframework.boot</groupId>
            <artifactId>spring-boot-starter-web</artifactId>
        </dependency>

        <dependency>
            <groupId>org.springframework.boot</groupId>
            <artifactId>spring-boot-starter-test</artifactId>
            <scope>test</scope>
            <exclusions>
                <exclusion>
                    <groupId>org.junit.vintage</groupId>
                    <artifactId>junit-vintage-engine</artifactId>
                </exclusion>
            </exclusions>
        </dependency>

        <dependency>
            <groupId>com.alibaba.csp</groupId>
            <artifactId>sentinel-core</artifactId>
            <version>1.7.0</version>
        </dependency>

        <dependency>
            <groupId>com.alibaba.csp</groupId>
            <artifactId>sentinel-transport-simple-http</artifactId>
            <version>1.7.0</version>
        </dependency>

        <dependency>
            <groupId>com.alibaba.csp</groupId>
            <artifactId>sentinel-cluster-server-default</artifactId>
            <version>1.7.0</version>
        </dependency>

        <dependency>
            <groupId>org.apache.logging.log4j</groupId>
            <artifactId>log4j-slf4j-impl</artifactId>
            <version>2.9.1</version>
        </dependency>


    </dependencies>

    <build>
        <plugins>
            <plugin>
                <groupId>org.springframework.boot</groupId>
                <artifactId>spring-boot-maven-plugin</artifactId>
            </plugin>
        </plugins>
    </build>

</project>
TokenServerApplication.java
package com.sentinel.tokenserver;

import com.alibaba.csp.sentinel.cluster.server.ClusterTokenServer;
import com.alibaba.csp.sentinel.cluster.server.SentinelDefaultTokenServer;
import com.alibaba.csp.sentinel.cluster.server.config.ClusterServerConfigManager;
import com.alibaba.csp.sentinel.cluster.server.config.ServerTransportConfig;
import org.springframework.boot.autoconfigure.SpringBootApplication;

import java.util.Collections;

@SpringBootApplication
public class TokenServerApplication {

    public static void main(String[] args) throws Exception {
//        SpringApplication.run(TokenServerApplication.class, args);


        System.setProperty("project.name", "sentinel-test");
        System.setProperty("csp.sentinel.dashboard.server", "http://192.168.0.122:8080");
        System.setProperty("csp.sentinel.log.use.pid", "true");

        ClusterServerConfigManager.loadServerNamespaceSet(Collections.singleton("default"));
        ClusterServerConfigManager.loadGlobalTransportConfig(new ServerTransportConfig().setPort(11111).setIdleSeconds(600));

        // Not embedded mode by default (alone mode).
        ClusterTokenServer tokenServer = new SentinelDefaultTokenServer();

        // A sample for manually load config for cluster server.
        // It's recommended to use dynamic data source to cluster manage config and rules.
        // See the sample in DemoClusterServerInitFunc for detail.
        ClusterServerConfigManager.loadGlobalTransportConfig(new ServerTransportConfig()
                .setIdleSeconds(600)
                .setPort(11111));
        ClusterServerConfigManager.loadServerNamespaceSet(Collections.singleton("study-process-server-dev"));

        // Start the server.
        tokenServer.start();


    }
}
tokenServer是在main方法中启动的,并不是通过SpringBoot启动的。为了方便测试,创建了三个SpringBoot项目。
先启动token-server,在启动c1 和 c2,然后在dashboard里边就可以看到了。
有问题可以在评论区评论,技术问题可以私聊我。
来源:CSDN
作者:坐看云起时_雨宣
链接:https://blog.csdn.net/qq_24434671/article/details/103682781