目录
4.补充:以后主要使用c3p0连接池 其实都一样,配法不同而已
5.jbdc模板类具体方法使用学习(学过hibernate就都很简单了 )(了解)
今日资料下载: 直接下载spring02.zip 网盘备份下载
一、spring JDBC模板的使用
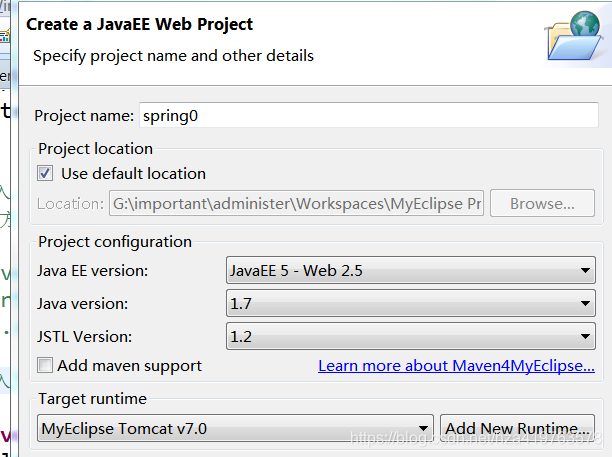
1.搭建环境
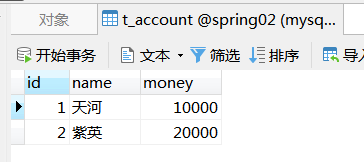
建表:
use spring02;
create table t_account(
	id int primary key auto_increment,
	name varchar(20),
	money double
);
新建后台工程


2.写applicationContext.xml配置文件
注入两个类 连接池类:DriverManagerDataSource 和模板类:jdbcTemplate
两个正常的类,不是自己写的罢了
配置好了DriverManagerDataSource,spring一启动就帮我们建立好了连接池,接着创建模板类,并且注入了连接池(即连接上了数据库)
<?xml version="1.0" encoding="UTF-8"?>
<beans xmlns="http://www.springframework.org/schema/beans"
	xmlns:xsi="http://www.w3.org/2001/XMLSchema-instance"
	xmlns:context="http://www.springframework.org/schema/context"
	xmlns:aop="http://www.springframework.org/schema/aop"
	xmlns:tx="http://www.springframework.org/schema/tx"
	xsi:schemaLocation="http://www.springframework.org/schema/beans
	http://www.springframework.org/schema/beans/spring-beans.xsd
	http://www.springframework.org/schema/context
	http://www.springframework.org/schema/context/spring-context.xsd
	http://www.springframework.org/schema/aop
	http://www.springframework.org/schema/aop/spring-aop.xsd
	http://www.springframework.org/schema/tx
	http://www.springframework.org/schema/tx/spring-tx.xsd">

	<!-- 先配置连接池
		也是让spring 帮忙管理一个类 只不过这个类不是自己写的罢了
	 -->
	<bean id="dataSource" class="org.springframework.jdbc.datasource.DriverManagerDataSource">
		<property name="driverClassName" value="com.mysql.jdbc.Driver"/>
		<property name="url" value="jdbc:mysql:///spring02"/>
		<property name="username" value="root"/>
		<property name="password" value="root"/>
	</bean>

	<!--
		再配置jdbc模板类,需要用到的类都丢给spring
		也是一个类,不是自己写的罢了
	 -->
	 <bean id="jdbcTemplate" class="org.springframework.jdbc.core.JdbcTemplate">
	 	<!-- 直接注入dataSource 一定是jdbcTemplate类的一个属性 -->
	 	<property name="dataSource" ref="dataSource"/>
	 </bean>

</beans>
3.测试模板类的使用
JDBCDemo1.java
package cn.ahpu.demo;

import javax.annotation.Resource;

import org.junit.Test;
import org.junit.runner.RunWith;
import org.springframework.jdbc.core.JdbcTemplate;
import org.springframework.jdbc.datasource.DriverManagerDataSource;
import org.springframework.test.context.ContextConfiguration;
import org.springframework.test.context.junit4.SpringJUnit4ClassRunner;

/**
 * 演示jdbc的模板类
 * @author 软件163韩竹安
 * 2019年12月25日-下午2:45:34
 */
//第一行是spring测试的注解   第二行是让spring自动加载的注解
@RunWith(SpringJUnit4ClassRunner.class)
@ContextConfiguration("classpath:applicationContext.xml")
public class JDBCDemo1 {

	/*//演示模板类1  原始new的方式 不需要配置文件
	@Test
	public void run1(){
		//很麻烦,需要自己获取连接池(DataSource就是连接池)
		DriverManagerDataSource dataSource=new DriverManagerDataSource();//spring内置连接池
		dataSource.setDriverClassName("com.mysql.jdbc.Driver");
		dataSource.setUrl("jdbc:mysql:///spring02");
		dataSource.setUsername("root");
		dataSource.setPassword("root");

		//创建jdbc模板
		JdbcTemplate template=new JdbcTemplate(dataSource);
		//调用api完成操作
		template.update("insert into t_account values(null,?,?)","天河",10000);
	}*///可以打开直接运行

	//IOC方式 spring创建 我们直接拿来用
	//name写applicationContext.xml里配置的id 自动帮你注入测试类里了
	@Resource(name="jdbcTemplate")
	private JdbcTemplate jdbcTemplate;
	@Test
	public void run2(){
		jdbcTemplate.update("insert into t_account values(null,?,?)","紫英",20000);
	}

}

4.补充:以后主要使用c3p0连接池 其实都一样,配法不同而已
<bean id="dataSource" class="com.mchange.v2.c3p0.ComboPooledDataSource">
		<property name="driverClass" value="com.mysql.jdbc.Driver"/>
		<property name="jdbcUrl" value="jdbc:mysql:///spring02"/>
		<property name="user" value="root"/>
		<property name="password" value="root"/>
</bean>
5.jbdc模板类具体方法使用学习(学过hibernate就都很简单了 )(了解)
package cn.ahpu.demo;

import javax.annotation.Resource;

import org.junit.Test;
import org.junit.runner.RunWith;
import org.springframework.jdbc.core.JdbcTemplate;
import org.springframework.test.context.ContextConfiguration;
import org.springframework.test.context.junit4.SpringJUnit4ClassRunner;

/**
 * 演示jdbc的模板类
 * @author 软件163韩竹安
 * 2019年12月25日-下午2:45:34
 */
//第一行是spring测试的注解   第二行是让spring自动加载的注解
@RunWith(SpringJUnit4ClassRunner.class)
@ContextConfiguration("classpath:applicationContext.xml")
public class JDBCDemoMethod {

	//IOC方式 spring创建 我们直接拿来用
	//name写applicationContext.xml里配置的id 自动帮你注入测试类里了
	@Resource(name="jdbcTemplate")
	private JdbcTemplate jdbcTemplate;


	/**
	 * update(String sql,Object ...params)   可以完成增删改 类似dbUtils
	 */
	@Test
	public void run1(){
		//增
		//jdbcTemplate.update("insert into t_account values(null,?,?)","紫英2",20000);

		//删
		//jdbcTemplate.update("delete from t_account where id=?",3);

		//改
		jdbcTemplate.update("update t_account set money=? where id=?",8888,2);

	}
	//查询啥的就不测了 反正用不到
}
二、Spring框架的事务管理
转账案例
1.搭建基本环境


2.引入xml 注意学会配置
applicationContext.xml
<?xml version="1.0" encoding="UTF-8"?>
<beans xmlns="http://www.springframework.org/schema/beans"
	xmlns:xsi="http://www.w3.org/2001/XMLSchema-instance" xmlns:context="http://www.springframework.org/schema/context"
	xmlns:aop="http://www.springframework.org/schema/aop" xmlns:tx="http://www.springframework.org/schema/tx"
	xsi:schemaLocation="http://www.springframework.org/schema/beans
	http://www.springframework.org/schema/beans/spring-beans.xsd
	http://www.springframework.org/schema/context
	http://www.springframework.org/schema/context/spring-context.xsd
	http://www.springframework.org/schema/aop
	http://www.springframework.org/schema/aop/spring-aop.xsd
	http://www.springframework.org/schema/tx
	http://www.springframework.org/schema/tx/spring-tx.xsd">

	<!-- 配置连接池类 -->
	<bean id="dataSource" class="com.mchange.v2.c3p0.ComboPooledDataSource">
		<property name="driverClass" value="com.mysql.jdbc.Driver" />
		<property name="jdbcUrl" value="jdbc:mysql:///spring02" />
		<property name="user" value="root" />
		<property name="password" value="root" />
	</bean>

	<!-- spring管理事务必须的配置
		 配资平台事务管理器
	 -->
	<bean id="transactionManager" class="org.springframework.jdbc.datasource.DataSourceTransactionManager">
		<!-- 配资平台事务管理器也需要连接池 -->
		<property name="dataSource" ref="dataSource"/>
	</bean>
	<!-- 并开启事务注解 -->
	<tx:annotation-driven transaction-manager="transactionManager"/>


	<!-- 配置业务层和持久层 -->
	<bean id="accountService" class="cn.ahpu.demo1.AccountServiceImpl">
		<property name="accountDao" ref="accountDao"/>
	</bean>
	<bean id="accountDao" class="cn.ahpu.demo1.AccountDaoImpl">
		<!-- 直接在dao里配个连接池  模板类不用配置了 -->
		<property name="dataSource" ref="dataSource"/>
	</bean>

</beans>
AccountDao.java
package cn.ahpu.demo1;

public interface AccountDao {
	public void outMoney(String out,double money);//扣钱
	public void inMoney(String in,double money);//加钱
}
AccountDaoImpl.java
package cn.ahpu.demo1;

import org.springframework.jdbc.core.JdbcTemplate;
import org.springframework.jdbc.core.support.JdbcDaoSupport;

public class AccountDaoImpl extends JdbcDaoSupport implements AccountDao {

	//配置文件里有jdbcTemplate  写个属性提供set 然后注入不就完了
	/*private JdbcTemplate jdbcTemplate;
	public void setJdbcTemplate(JdbcTemplate jdbcTemplate) {
		this.jdbcTemplate = jdbcTemplate;
	}*/ //更简单 继承父类  父类已经有这个属性了


	@Override
	public void outMoney(String out, double money) {
		this.getJdbcTemplate().update("update t_account set money=money-? where name=?",money,out);
	}

	@Override
	public void inMoney(String in, double money) {
		this.getJdbcTemplate().update("update t_account set money=money+? where name=?",money,in);
	}

}
AccountService.java
package cn.ahpu.demo1;

public interface AccountService {
	public void pay(String out,String in,double money);
}
AccountServiceImpl.java
package cn.ahpu.demo1;

import org.springframework.transaction.annotation.Transactional;

@Transactional
public class AccountServiceImpl implements AccountService{

	private AccountDao accountDao;
	public void setAccountDao(AccountDao accountDao) {
		this.accountDao = accountDao;
	}

	@Override
	public void pay(String out, String in, double money) {
		//先扣钱
		accountDao.outMoney(out, money);
		int i=1/0;
		//再加钱
		accountDao.inMoney(in, money);
	}

}
测试类:TestAction.java
package cn.ahpu.demo1;

import javax.annotation.Resource;

import org.junit.Test;
import org.junit.runner.RunWith;
import org.springframework.test.context.ContextConfiguration;
import org.springframework.test.context.junit4.SpringJUnit4ClassRunner;


@RunWith(SpringJUnit4ClassRunner.class)
@ContextConfiguration("classpath*:applicationContext.xml")
public class TestAction {
	@Resource(name="accountService")
	private AccountService accountService;

	@Test
	public void run1(){
		//调用支付方法 天河给紫英转1000
		accountService.pay("天河", "紫英", 1000);
	}
}
2个配置:
<!-- spring管理事务必须的配置
配资平台事务管理器
-->
<bean id="transactionManager" class="org.springframework.jdbc.datasource.DataSourceTransactionManager">
<!-- 配资平台事务管理器也需要连接池 -->
<property name="dataSource" ref="dataSource"/>
</bean>
<!-- 并开启事务注解 -->
<tx:annotation-driven transaction-manager="transactionManager"/>一个注解:
service类上面加"@Transactional" 整个ServiceImpl类的所有方法都添加事务
service类某个具体方法加s"@Transactional" 则仅加了的方法有事务
来源:CSDN
作者:树叶子_
链接:https://blog.csdn.net/hza419763578/article/details/103698870