一、float属性
1、基本属性
先来了解一下block元素和inline元素在文档流中的排列方式。
block元素通常被现实为独立的一块,独占一行,多个block元素会各自新起一行,默认block元素宽度自动填满其父元素宽度。block元素可以设置width、height、margin、padding属性;
inline元素不会独占一行,多个相邻的行内元素会排列在同一行里,直到一行排列不下,才会新换一行,其宽度随元素的内容而变化。inline元素设置width、height属性无效
- 常见的块级元素有 div、form、table、p、pre、h1~h5、dl、ol、ul 等。
- 常见的内联元素有span、a、strong、em、label、input、select、textarea、img、br等。
所谓的文档流,指的是元素排版布局过程中,元素会自动从左往右,从上往下的流式排列。
脱离文档流,也就是将元素从普通的布局排版中拿走,其他盒子在定位的时候,会当做脱离文档流的元素不存在而进行定位。
假如某个div元素A是浮动的,如果A元素上一个元素也是浮动的,那么A元素会跟随在上一个元素的后边(如果一行放不下这两个元素,那么A元素会被挤到下一行);如果A元素上一个元素是标准流中的元素,那么A的相对垂直位置不会改变,也就是说A的顶部总是和上一个元素的底部对齐。此外,浮动的框之后的block元素元素会认为这个框不存在,但其中的文本依然会为这个元素让出位置。 浮动的框之后的inline元素,会为这个框空出位置,然后按顺序排列。
示例代码:

<!DOCTYPE html>
<html lang="en">
<head>
    <meta charset="UTF-8">
    <title>Title</title>
    <style>
        *{
            margin: 0;
        }

        .r1{
            width: 300px;
            height: 100px;
            background-color: #7A77C8;
            float: left;
        }
        .r2{
            width: 200px;
            height: 200px;
            background-color: wheat;
            /*float: left;*/

        }
        .r3{
            width: 100px;
            height: 200px;
            background-color: darkgreen;
            float: left;
        }
    </style>
</head>
<body>

<div class="r1"></div>
<div class="r2"></div>
<div class="r3"></div>

</body>
</html>
2、非完全脱离文档流
左右结构div盒子重叠现象,一般是由于相邻两个DIV一个使用浮动一个没有使用浮动。一个使用浮动一个没有导致DIV不是在同个“平面”上,但内容不会造成覆盖现象,只有DIV形成覆盖现象。
注意:处于文档流的文本不会被悬浮的DIV覆盖,会被挤出来显示。


<!DOCTYPE html>
<html lang="en">
<head>
    <meta charset="UTF-8">
    <title>Title</title>
    <style>
        *{
            margin: 0;
        }

        .r1{
            width: 100px;
            height: 100px;
            background-color: #7A77C8;
            float: left;
        }
        .r2{
            width: 200px;
            height: 200px;
            background-color: wheat;

        }
    </style>
</head>
<body>

<div class="r1"></div>
<div class="r2">region2</div>


</body>
</html>
>>>>解决不覆盖的方法:要么都不使用浮动;要么都使用float浮动;要么对没有使用float浮动的DIV设置margin样式。
3、父级塌陷现象

<!DOCTYPE html>
<html lang="en">
<head>
    <meta charset="UTF-8">
    <title>Title</title>
<style type="text/css">
         * {
             margin:0;padding:0;
         }
        .container{
            border:1px solid red;width:300px;
        }
        #box1{
            background-color:green;float:left;width:100px;height:100px;
        }
        #box2{
            background-color:deeppink; float:right;width:100px;height:100px;
        }
         #box3{
             background-color:pink;height:40px;
         }
</style>
</head>
<body>

        <div class="container">
                <div id="box1">box1 向左浮动</div>
                <div id="box2">box2 向右浮动</div>
        </div>
        <div id="box3">box3</div>
</body>
</body>
</html>

例子如上:.container和box3的布局是上下结构,上图发现box3跑到了上面,与.container产生了重叠,但文本内容没有发生覆盖,只有div发生覆盖现象。这个原因是因为第一个大盒子里的子元素使用了浮动,脱离了文档流,导致.container没有被撑开。box3认为.container没有高度(未被撑开),因此跑上去了。
>>>>解决方法:
1.固定高度
给.container设置固定高度,一般情况下文字内容不确定多少就不能设置固定高度,所以一般不能设置“.container”高度(当然能确定内容多高,这种情况下“.container是可以设置一个高度即可解决覆盖问题。
或者给.container加一个固定高度的子div:
<div class="container">
                <div id="box1">box1 向左浮动</div>
                <div id="box2">box2 向右浮动</div>
                <div id="empty" style="height: 100px"></div>
</div>
<div id="box3">box3</div>
但是这样限定固定高度会使页面操作不灵活,不推荐!
2.清除浮动(推荐)
clear语法:
clear : none | left | right | both
取值:
none : 默认值。允许两边都可以有浮动对象
left : 不允许左边有浮动对象
right : 不允许右边有浮动对象
both : 不允许有浮动对象
但是需要注意的是:clear属性只会对自身起作用,而不会影响其他元素。

<!DOCTYPE html>
<html lang="en">
<head>
    <meta charset="UTF-8">
    <title>Title</title>
    <style>
        *{
            margin: 0;
        }

        .r1{
            width: 300px;
            height: 100px;
            background-color: #7A77C8;
            float: left;
        }
        .r2{
            width: 200px;
            height: 200px;
            background-color: wheat;
            float: left;
            clear: left;

        }
        .r3{
            width: 100px;
            height: 200px;
            background-color: darkgreen;
            float: left;
        }
    </style>
</head>
<body>

<div class="r1"></div>
<div class="r2"></div>
<div class="r3"></div>


</body>
</html>
把握住两点:
1、元素是从上到下、从左到右依次加载的。
2、clear: left;对自身起作用,一旦左边有浮动元素,即切换到下一行来保证左边元素不是浮动的,依据这一点解决父级塌陷问题。
解决父级塌陷:
'''

    .clearfix:after {             <----在类名为“clearfix”的元素内最后面加入内容;
    content: ".";                 <----内容为“.”就是一个英文的句号而已。也可以不写。
    display: block;               <----加入的这个元素转换为块级元素。
    clear: both;                  <----清除左右两边浮动。
    visibility: hidden;           <----可见度设为隐藏。注意它和display:none;是有区别的。
                                       visibility:hidden;仍然占据空间,只是看不到而已;
    line-height: 0;               <----行高为0;
    height: 0;                    <----高度为0;
    font-size:0;                  <----字体大小为0;
    }

    .clearfix { *zoom:1;}         <----这是针对于IE6的,因为IE6不支持:after伪类,这个神
                                       奇的zoom:1让IE6的元素可以清除浮动来包裹内部元素。


整段代码就相当于在浮动元素后面跟了个宽高为0的空div,然后设定它clear:both来达到清除浮动的效果。
之所以用它,是因为,你不必在html文件中写入大量无意义的空标签,又能清除浮动。
<div class="head clearfix"></div>

'''


<!DOCTYPE html>
<html lang="en">
<head>
    <meta charset="UTF-8">
    <title>Title</title>
<style type="text/css">
         * {
             margin:0;padding:0;
         }
         .clearfix:after{
             content: "";
             display: block;
             clear: both;
             visibility: hidden;
         }
         .container{
            border:1px solid red;width:300px;
         }
         #box1{
            background-color:green;float:left;width:100px;height:100px;
         }
         #box2{
            background-color:deeppink; float:right;width:100px;height:100px;
         }
         #box3{
             background-color:pink;height:40px;
         }
</style>
</head>
<body>

        <div class="container clearfix">
                <div id="box1">box1 向左浮动</div>
                <div id="box2">box2 向右浮动</div>
        </div>
        <div id="box3">box3</div>
</body>
</html>
3.overflow:hidden
overflow:hidden的含义是超出的部分要裁切隐藏,float的元素虽然不在普通流中,但是他是浮动在普通流之上的,可以把普通流元素+浮动元素想象成一个立方体。如果没有明确设定包含容器高度的情况下,它要计算内容的全部高度才能确定在什么位置hidden,这样浮动元素的高度就要被计算进去。这样包含容器就会被撑开,清除浮动。
二、position(定位)
1、static
static 默认值,无定位,不能当作绝对定位的参照物。设置标签对象的left、top等值是不起作用的的。
2 、position: relative / absolute
relative: 相对定位。
相对定位是相对于该元素在文档流中的原始位置,即以自己原始位置为参照物。有趣的是,即使设定了元素的相对定位以及偏移值,元素还占有着原来的位置,即占据文档流空间。对象遵循正常文档流,但将依据top,right,bottom,left等属性在正常文档流中偏移位置。而其层叠通过z-index属性定义。
注意:position:relative的一个主要用法:方便绝对定位元素找到参照物。
absolute: 绝对定位。
定义:设置为绝对定位的元素框从文档流完全删除,并相对于最近的已定位祖先元素定位,如果元素没有已定位的祖先元素,那么它的位置相对于最初的包含块(即body元素)。元素原先在正常文档流中所占的空间会关闭,就好像该元素原来不存在一样。元素定位后生成一个块级框,而不论原来它在正常流中生成何种类型的框。
重点:如果父级设置了position属性,例如position:relative;,那么子元素就会以父级的左上角为原始点进行定位。这样能很好的解决自适应网站的标签偏离问题,即父级为自适应的,那我子元素就设置position:absolute;父元素设置position:relative;,然后Top、Right、Bottom、Left用百分比宽度表示。
另外,对象脱离正常文档流,使用top,right,bottom,left等属性进行绝对定位。而其层叠通过z-index属性定义。
示例代码:

<!DOCTYPE html>
<html lang="en">
<head>
    <meta charset="UTF-8">
    <title>Title</title>
    <style>
        *{
            margin: 0;
        }
        .outet{
            /*position: relative;*/

        }
        .item{
            width: 200px;
            height:200px ;
        }
        .r1{
            background-color: #7A77C8;
        }
        .r2{
            background-color: wheat;
            /*position: relative;*/
            position: absolute;
            top: 200px;
            left: 200px;
        }
        .r3{
            background-color: darkgreen;
        }
    </style>
</head>
<body>

<div class="item r1"></div>
<div class="outet">

    <div class="item r2"></div>
    <div class="item r3"></div>
</div>


</body>
</html>
总结:参照物用相对定位,子元素用绝对定位,并且保证相对定位参照物不会偏移即可。
3、position:fixed
fixed:对象脱离正常文档流,使用top,right,bottom,left等属性以窗口为参考点进行定位,当出现滚动条时,对象不会随着滚动。而其层叠通过z-index属性 定义。 注意点: 一个元素若设置了 position:absolute | fixed; 则该元素就不能设置float。这 是一个常识性的知识点,因为这是两个不同的流,一个是浮动流,另一个是“定位流”。但是 relative 却可以。因为它原本所占的空间仍然占据文档流。
在理论上,被设置为fixed的元素会被定位于浏览器窗口的一个指定坐标,不论窗口是否滚动,它都会固定在这个位置。
示例代码:

<!DOCTYPE html>
<html lang="en">
<head>
    <meta charset="UTF-8">
    <title>Title</title>
    <style>
        *{
            margin: 0;
        }
        .back{
            background-color: wheat;
            width: 100%;
            height: 1200px;
        }
        span{
            display: inline-block;
            width: 80px;
            height: 50px;
            position: fixed;
            bottom: 20px;
            right: 20px;
            background-color: rebeccapurple;
            color: white;
            text-align: center;
            line-height: 50px;

        }
    </style>
</head>
<body>


<div class="back">
    <span>返回顶部</span>
</div>
</body>
</html>
三、课后作业
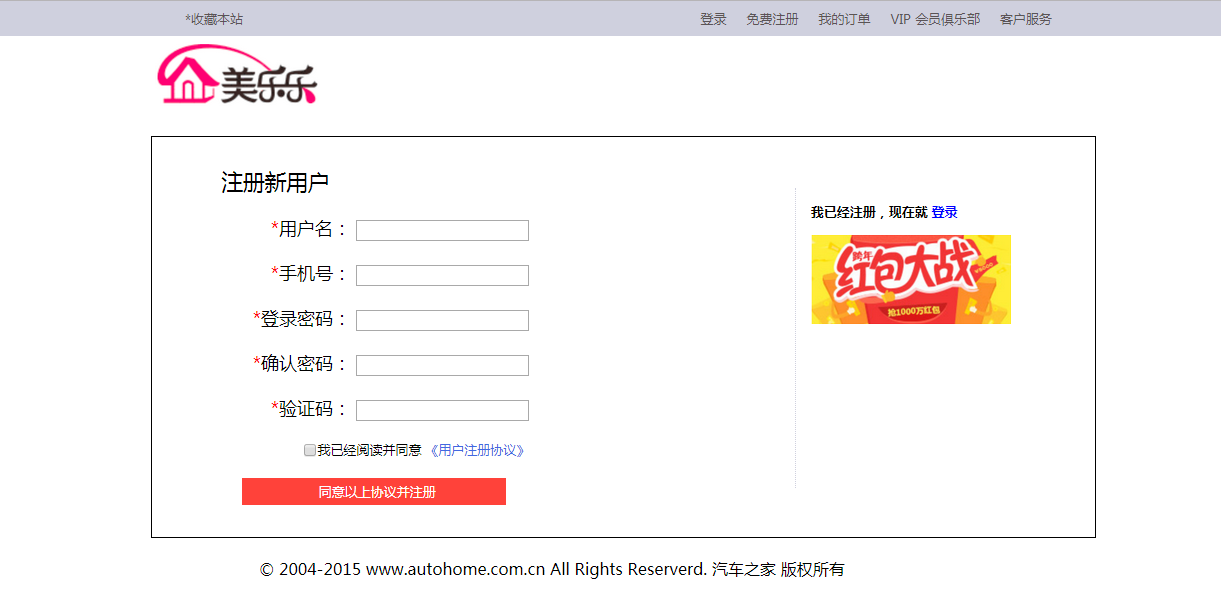
1、


<!DOCTYPE html>
<html lang="en">
<head>
<meta charset="UTF-8">
<meta http-equiv="x-ua-compatible" content="IE=edge">
<meta name="viewport" content="width=device-width, initial-scale=1">
<title>注册</title>
<style>
* {
margin: 0;
}
.head {
margin: 0 auto;
height: 35px;
background: #CFD0DE;
position: relative;
}
.head-content {
margin: 0 auto;
width: 65%;
height: 35px;
font-size: small;
}
.left {
float: left;
line-height: 35px;
}
.right {
float: right;
line-height: 35px;
margin: 0 10px;
}
a {
text-decoration: none;
color: #5a5456;
}
.body {
width: 70%;
/*height: 100px;*/
margin: 0 auto;
}
.zc {
height: 400px;
border: 1px solid;
position: relative;
}
.red {
color: red;
}
.xinxi {
width: 40%;
text-align: right;
font-size: large;
margin: 30px 20px;
}
.xinxi p {
margin: 20px;
}
.h1 {
font-size: small;
}
.h1 a {
color: royalblue;
}
.h1 input {
vertical-align: -2px;
}
.tijiao {
background: #ff423a;
width: 70%;
text-align: center;
position: relative;
right: -50px;
}
.tijiao a {
width: 260px;
display: inline-block;
font-size: small;
color: white;
margin: 5px;
}
#q {
position: relative;
left: -220px;
font-size: larger;
}
.deng {
width: 250px;
height: 300px;
float: right;
border-left: 1px dotted #CFD0DE;
position: relative;
bottom: 350px;
right: 50px;
}
.deng p {
margin: 15px;
font-size: small;
font-weight: 600;
}
.deng a {
color: blue;
}
.bottom {
text-align: right;
margin: 20px auto;
}
</style>
</head>
<body>
<div class="head">
<div class="head-content">
<div class="left"><a href="">*收藏本站</a></div>
<div class="right"><a href="">客户服务</a></div>
<div class="right"><a href="">VIP 会员俱乐部</a></div>
<div class="right"><a href="">我的订单</a></div>
<div class="right"><a href="">免费注册</a></div>
<div class="right"><a href="">登录</a></div>
</div>
</div>
<div class="body">
<img src="tubiao.png" alt="meile">
<div class="zc">
<form action="">
<div class="xinxi">
<span id="q">注册新用户</span>
<p>
<label for="user"><span class="red">*</span>用户名:</label>
<input type="text" id="user">
</p>
<p>
<label for="phone"><span class="red">*</span>手机号:</label>
<input type="text" id="phone">
</p>
<p>
<label for="password"><span class="red">*</span>登录密码:</label>
<input type="text" id="password">
</p>
<p>
<label for="repasswoed"><span class="red">*</span>确认密码:</label>
<input type="text" id="repasswoed">
</p>
<p>
<label for="yan"><span class="red">*</span>验证码:</label>
<input type="text" id="yan">
</p>
<p class="h1">
<input type="checkbox">我已经阅读并同意 <a href=""> 《用户注册协议》</a>
</p>
<p class="tijiao">
<a href="">同意以上协议并注册</a>
</p>
</div>
</form>
</div>
<div class="deng">
<p>我已经注册,现在就 <a href="">登录</a></p>
<p><img src="huobao.png"></p>
</div>
</div>
<p class="bottom">© 2004-2015 www.autohome.com.cn All Rights Reserverd. 汽车之家 版权所有</p>
</body>
</html>
2、


<!DOCTYPE html>
<html lang="en">
<head>
    <meta charset="UTF-8">
    <meta http-equiv="x-ua-compatible" content="IE=edge">
    <meta name="viewport" content="width=device-width, initial-scale=1">
    <title>登录页面</title>
    <style>
        *{
            margin: 8px;
            padding: 0;
        }
        .top{
            margin: 20px;
        }
        .outer{
            margin: 0 100px;
            padding: 50px;
            border: 2px beige solid;
            position: relative;
        }
        .right div{
            list-style: none;
            text-align: right;
            font-size: large;
            margin: 20px;
            line-height: 100%;
        }
        .right{
            float: right;
            position: absolute;
            top: 100px;
            right: 115px;
        }
        input{
            height: 29px;
            margin: 0 19px;
        }
        a{
            text-decoration: none;
            color: royalblue;

        }
        span{
            color: red;
        }
        #user1,#pass1{
            width: 19px;
            height: 19px;
            float: right;
            margin: 5px;

        }
        #user1{
            background: url("allPuzzle.png") 0 -30px no-repeat;
            position: absolute;
            right: 212px;
            top:21px;
        }
        #pass1{
            background: url("allPuzzle.png") -21px -30px no-repeat;
            position: absolute;
            right: 212px;
            top:72px;
        }
        #zi {
            float: right;
            position: absolute;
            top: 174px;
            right: 181px;
        }

    </style>
</head>
<body>
<div class="top"><img src="tubiao.png" alt="meilele"></div>
<div class="outer">
    <div><img src="tupian.png" alt="jinrongjie"></div>
    <div class="right">

                <div><span>* </span>
                    用户名:
                    <label for="user" id="user1"></label>
                    <input type="text" id="user">
                </div>
                <div><span>* </span>
                    <label for="pass" id="pass1"></label>
                    密码:<input type="password" id="pass"></div>
                <div><span>* </span>验证码:<input type="text"></div>
                <div id="zi1"><input type="checkbox" id="zi">自动登录  <a href="">忘记密码?</a></div>

    </div>
</div>
<div></div>
</body>
</html>
3、


<!DOCTYPE html>
<html lang="en">
<head>
    <meta charset="UTF-8">
    <meta http-equiv="x-ua-compatible" content="IE=edge">
    <meta name="viewport" content="width=device-width, initial-scale=1">
    <title>Title</title>
    <style>
        * {
            margin: 0;
            padding: 0;
        }

        .outer {
            width: 790px;
            height: 390px;
            margin: 30px auto;
            position: relative;
        }

        .outer a {
            position: absolute;
            top: 0;
            left: 0;
        }

        .bottom {
            position: absolute;
            bottom: 65px;
            left: 37%;
        }

        .bottom p {
            display: inline-block;
            background-color: grey;
            text-align: center;
            opacity: 0.7;
            border-radius: 100%;
            margin: 2px;
            padding: 0 5px;
        }

        .bottom p:hover {
            opacity: 1;
            color: white;

        }
        .jia p{
            width: 20px;
            height: 40px;
            color: white;
            text-align: center;
            line-height: 40px;
            position: absolute;
            background-color: #CFD0DE;
            top:50%;
            margin-top:-40px;
            opacity: 0.3;
        }
        .right{
            right: 0;
        }

        .jia p:hover{
            color: #5a5456;
            opacity: 1;

        }
    </style>
</head>
<body>

<div class="outer">
    <div><a href=""><img src="jpg/1.jpg" alt=""></a></div>
    <div><a href=""><img src="jpg/2.jpg" alt=""></a></div>
    <div><a href=""><img src="jpg/3.jpg" alt=""></a></div>
    <div><a href=""><img src="jpg/4.jpg" alt=""></a></div>
    <div><a href=""><img src="jpg/5.jpg" alt=""></a></div>
    <div><a href=""><img src="jpg/6.jpg" alt=""></a></div>
    <div><a href=""><img src="jpg/7.jpg" alt=""></a></div>
    <div><a href=""><img src="jpg/8.jpg" alt=""></a></div>
    <div class="bottom">
        <p>1</p>
        <p>2</p>
        <p>3</p>
        <p>4</p>
        <p>5</p>
        <p>6</p>
        <p>7</p>
        <p>8</p>
    </div>
    <div class="jia">
        <p class="left">< </p>
        <p class="right">> </p>
    </div>
</div>


</body>
</html>
来源:https://www.cnblogs.com/maple-shaw/p/7280299.html
