第一步: 录音
录音这个很简单,给大家分享一个比较全面的demo,
https://github.com/liuchunlao/RecordAndPlayVoice;
录音和播放的功能基本够用了,
/** 录音工具的单例 */
+ (instancetype)sharedRecordTool;
/** 开始录音 */
- (void)startRecording;
/** 停止录音 */
- (void)stopRecording;
/** 播放录音文件 */
- (void)playRecordingFile;
/** 停止播放录音文件 */
- (void)stopPlaying;
/** 销毁录音文件 */
- (void)destructionRecordingFile;
/** 录音对象 */
@property (nonatomic, strong) AVAudioRecorder *recorder;
/** 播放器对象 */
@property (nonatomic, strong) AVAudioPlayer *player;
/** 更新图片的代理 */
@property (nonatomic, assign) id<LVRecordToolDelegate> delegate;
详细的实现代码大家可以看下载的demo.
需要提醒大家注意一点:
如果你要转码成MP3,这部分的设置不能随便写<代码一>
- (AVAudioRecorder *)recorder {
if (!_recorder) {
// 1.获取沙盒地址
NSString *path = [NSSearchPathForDirectoriesInDomains(NSDocumentDirectory, NSUserDomainMask, YES) lastObject];
// 2.录音文件的路径 @"lvRecord.caf"
NSString *filePath = [path stringByAppendingPathComponent:LVRecordFielName];
self.recordFileUrl = [NSURL fileURLWithPath:filePath];
NSLog(@"%@", filePath);
NSDictionary *setting = [NSDictionary dictionaryWithObjectsAndKeys:
[NSNumber numberWithInt:AVAudioQualityMin],
AVEncoderAudioQualityKey,
[NSNumber numberWithInt:16],
AVEncoderBitRateKey,
[NSNumber numberWithInt:2],
AVNumberOfChannelsKey,
[NSNumber numberWithFloat:44100.0],
AVSampleRateKey,
nil];
_recorder = [[AVAudioRecorder alloc] initWithURL:self.recordFileUrl settings:setting error:NULL];
_recorder.delegate = self;
_recorder.meteringEnabled = YES;
//崩溃的地方
[_recorder prepareToRecord];
}
return _recorder;
}
setting里的参数设置,这些值是我尝试出来的转码成MP3后还可以正常播放的值,如果有某一个值不合适,你就听不到自己录的音了哦;至于为什么要设置成这些参数,本人目前还未深究,如果有这方面的大牛,可以分享下;还有一点,大家注意看,我注释的那行
//崩溃的地方
[_recorder prepareToRecord];
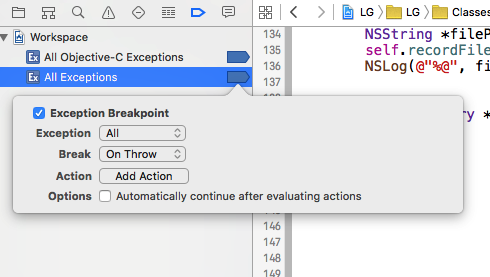
如果你用了这个demo,可能会发现,模拟器上跑会崩在这一行,但是跑真机上可以正常录音和播放,我当时被这个bug卡了很久,一度都想要放弃了,后来同事帮忙查到,这是xcode的bug,真心有点想吐血的感觉!!!
解决办法很简单,如图,打个全局断点,右击,第一个选项Exception 选择All,就OK了

这个问题可以就这样圆满解决了!!
第二步:转MP3
首先,你需要去网上下载一个lame的第三方库,网上很多的但要提醒大家,你下载的lame.a必须是支持 64 位编译器的,否则导入会报错.下载完后,只需要把这两个东西添加到你的项目中就可以啦
 如图
如图
然后还需要一段代码<代码2为借鉴结果>
- (void)audio_CAFtoMP3
{
NSString *path = [NSSearchPathForDirectoriesInDomains(NSDocumentDirectory, NSUserDomainMask, YES) lastObject];
NSString *filePath = [path stringByAppendingPathComponent:@"lvRecord.caf"];
NSString *mp3FilePath = [path stringByAppendingPathComponent:@"temp.mp3"];
@try {
int read, write;
FILE *pcm = fopen([filePath cStringUsingEncoding:1], "rb"); //source 被转换的音频文件位置
fseek(pcm, 4*1024, SEEK_CUR); //skip file header
FILE *mp3 = fopen([mp3FilePath cStringUsingEncoding:1], "wb"); //output 输出生成的Mp3文件位置
const int PCM_SIZE = 8192;
const int MP3_SIZE = 8192;
short int pcm_buffer[PCM_SIZE*2];
unsigned char mp3_buffer[MP3_SIZE];
lame_t lame = lame_init();
lame_set_num_channels(lame,1);//设置1为单通道,默认为2双通道
lame_set_in_samplerate(lame, 44100.0);
lame_set_VBR(lame, vbr_default);
lame_set_brate(lame,8);
lame_set_mode(lame,3);
lame_set_quality(lame,2);
lame_init_params(lame);
do {
read = fread(pcm_buffer, 2*sizeof(short int), PCM_SIZE, pcm);
if (read == 0)
write = lame_encode_flush(lame, mp3_buffer, MP3_SIZE);
else
write = lame_encode_buffer_interleaved(lame, pcm_buffer, read, mp3_buffer, MP3_SIZE);
fwrite(mp3_buffer, write, 1, mp3);
} while (read != 0);
lame_close(lame);
fclose(mp3);
fclose(pcm);
}
@catch (NSException *exception) {
NSLog(@"%@",[exception description]);
}
@finally {
// self.audioFileSavePath = mp3FilePath;
// NSLog(@"MP3生成成功: %@",self.audioFileSavePath);
}
}
这样就成功的把.caf 或者 .wav转换成了mp3格式.如果你想问为什么要转MP3或者不转MP3能不能上传,不好意思,我只能告诉你,苹果的录音格式安卓获取到了无法播放,不转能不能上传 这个需要你自己去尝试一下.
第三步:上传
我们首先要拿到录音文件的路径,然后用NSFileManager以二进制的格式读取出来,再用自己封装的AFN上传就可以啦.我们项目里是有图片和音频一起上传的,在这里把代码拿出来和大家分享下
+(void)photoImagePost:(NSDictionary *)paramDict andImageDatas:(NSMutableArray*)imageArray andVoiceData:(NSString *)filePath success:(mSuccessBlock)successBlock errorBlock:(mErrorBlock)errorBlock
{
[AppSettings httpSetCookies];
AFHTTPRequestOperationManager *manager = [AFHTTPRequestOperationManager manager];
manager.requestSerializer =[AFHTTPRequestSerializer serializer];
manager.responseSerializer =[AFJSONResponseSerializer serializer];
//[manager.requestSerializer setValue:@"application/json" forHTTPHeaderField:@"Accept"];
manager.responseSerializer.acceptableContentTypes=[manager.responseSerializer.acceptableContentTypes setByAddingObject: @"text/html"];
//设置多个文件的分隔符
unsigned int random = arc4random();
NSString * boundary = [NSString stringWithFormat:@"%d",random];
NSString *contentType = [NSString stringWithFormat:@"boundary=%@",boundary];
[manager.requestSerializer setValue:contentType forHTTPHeaderField:@"Content-Type"];
[manager.requestSerializer willChangeValueForKey:@"timeoutInterval"];
manager.requestSerializer.timeoutInterval = 30.f;
[manager.requestSerializer didChangeValueForKey:@"timeoutInterval"];
NSString *uslStr =[postURL stringByAddingPercentEscapesUsingEncoding:NSUTF8StringEncoding];
// NSMutableDictionary *dict=[NSMutableDictionary dictionaryWithCapacity:0];
// [dict setValue:serviceCode forKey:@"A"];
// [dict setValue:[paramDict JSONString] forKey:@"P"];
[manager POST:uslStr parameters:paramDict constructingBodyWithBlock:^(id<AFMultipartFormData> formData)
{
// 图片处理
for(int i=0;i<imageArray.count;i++)
{
NSData *data=UIImageJPEGRepresentation(imageArray[i], 0.2);
[formData appendPartWithFileData:data name:[NSString stringWithFormat:@"Pictures[]"] fileName:[NSString stringWithFormat:@"pic%d.jpg",i+1] mimeType:@"image/*"];
}
// 语音处理
//方法1
NSFileManager* fm=[NSFileManager defaultManager];
NSData *data = nil;
//路径是传进来的
if([fm fileExistsAtPath:filePath]){
//读取某个文件
data = [NSData dataWithContentsOfFile:filePath];
// NSLog(@"%@",data);
}
[formData appendPartWithFileData:data name:@"voice[]" fileName:@"temp.mp3" mimeType:@"amr/mp3/wmr"];
//
} success:^(AFHTTPRequestOperation *operation,id responseObject) {
successBlock(operation,responseObject);
} failure:^(AFHTTPRequestOperation *operation,NSError *error) {
errorBlock(operation, error);
NSLog(@"%@",error);
}];
}
这样,就可以上传成功啦!
第四步: 从服务器获取录音文件并播放
其实,录音成功了,播放很简单,导入头文件:
#import <AVFoundation/AVFoundation.h>
//播放
NSString * urlStr = [NSString stringWithFormat:@"http://120.25.221.42:8010%@",model.Voice.lastObject];
NSURL *url = [NSURL URLWithString:urlStr];
//把音频文件保存到本地
NSData *audioData = [NSData dataWithContentsOfURL:url];
NSString *docDirPath = [NSSearchPathForDirectoriesInDomains(NSDocumentDirectory, NSUserDomainMask, YES) objectAtIndex:0];
NSString *filePath = [NSString stringWithFormat:@"%@/%@.mp3", docDirPath ,
@"temp2"];
// DDLogWarn(@" 从网络拿到的音频数据写入的本地路径 %@",filePath);
[audioData writeToFile:filePath atomically:YES];
NSURL *fileURL = [NSURL fileURLWithPath:filePath];
self.player = [[AVAudioPlayer alloc] initWithContentsOfURL:fileURL error: &error];
self.player.volume=1;
if (error) {
NSLog(@"error:%@",[error description]);
return;
}
//准备播放
[self.player prepareToPlay];
[self.player play];
//显示时长 (暂时是点击了播放之后才知道时长)
float duration = (float)self.player.duration;
NSString *format = [self decimalwithFormat:@"0" floatV:duration ];
self.voice.timeLable.text = [NSString stringWithFormat:@"%@S",format];
这里需要注意:我们的 self.player播放不了 非本地的URL的音频文件,必须先以二进制的形式读出来,保存到沙盒,再拿到沙盒路径播放.
至此整个录音,转码,上传,下载,播放,都已圆满的完成啦.
本人系iOS菜鸟一枚,博文中如有错误之处欢迎大家批评指正,也欢迎大家提问和分享,本文系原创,转载请注明出处,谢谢!
来源:oschina
链接:https://my.oschina.net/u/2853109/blog/714442