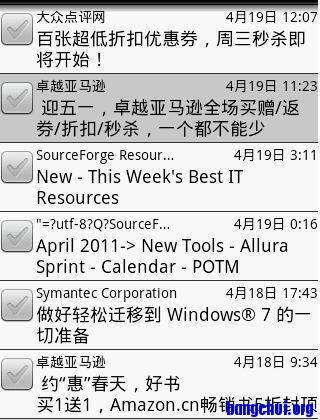
Android中的ListView是用得非常频繁的一种组件,同时ListView也是一种很强大的组件,你可以为每一行自定义布局,也可以修改各行的 背景色。自定义布局比较容易,自己实现一个layout的布局文件,然后在adapter的getView里读入就可以了。需要注意的是,在 getView中不需要每次都加载layout文件,因为ListView会重复利用已生成的Item。所以每次拖动上下滚动条的时候其实每行的Item 变化的只是显示的内容,就窗体本身而言是不变的,Android SDK里自带的例子是最好的说明。
Android的界面开发模式决定了实现某一种风格的组件存在很多种方法,而如果没有对它的界面框架有个比较全面的理解的话往往实现起来要走很多弯路,譬如给各item设置背景色。因为在邮件列表中要显示两种颜色,已经阅读过的和未读的邮件以不同的背景色标识。
在item的layout文件里只能设置一中固定的颜色,这当然不是我想要的。
最直接的思路就是在Adapter的getView中根据position的不同来设置不同的背景色,但是设置了不同颜色后发现在屏幕上选中一行时背景色没有变化,选中跟没选中的颜色是一样的。于是又重新设置selector,但仍然不起作用。
看 来getView中返回的View就是ListView中各行最终显示界面,所以又想着先在ListView的 OnItemClickListener中记录当前选中的Item,然后在getView中判断是不是该行,如果是,就设置为选中的背景色。但是这种方法 存在很大的问题,第一个问题就是onItemClickListener是在用户点击之后调用的,所以背景色的改变也是用户点完了之后才发生,而正确的应 该是press的一瞬间改变背景色。第二个问题是,再返回到该ListView时需要在代码里重新清楚选中行的记录,否则该行的背景色不会刷新。
最终的解决方法是这样的:
实现两个selector文件(正常显示下有几种背景色就需要几个这样的selector文件)
mail_read_bg.xml
在getView中根据邮件不同的状态设置不同的颜色方案

本文转自 http://hi.baidu.com/hbzha/blog/item/4c734f6f7b5853c280cb4a38.html
|
1
2
3
4
5
6
7
8
9
10
11
12
13
14
15
16
17
18
19
20
21
22
23
24
25
26
27
28
29
30
31
32
33
34
35
36
|
/**
* Make a view to hold each row.
*
*
@see android.widget.ListAdapter#getView(int, android.view.View,
* android.view.ViewGroup)
*/
publicView getView(intposition, View convertView, ViewGroup parent) {
// A ViewHolder keeps references to children views to avoid unneccessary calls
// to findViewById() on each row.
ViewHolder holder;
// When convertView is not null, we can reuse it directly, there is no need
// to reinflate it. We only inflate a new View when the convertView supplied
// by ListView is null.
if(convertView ==null) {
convertView = mInflater.inflate(R.layout.list_item_icon_text,null);
// Creates a ViewHolder and store references to the two children views
// we want to bind data to.
holder =newViewHolder();
holder.text = (TextView) convertView.findViewById(R.id.text);
holder.icon = (ImageView) convertView.findViewById(R.id.icon);
convertView.setTag(holder);
}else{
// Get the ViewHolder back to get fast access to the TextView
// and the ImageView.
holder = (ViewHolder) convertView.getTag();
}
// Bind the data efficiently with the holder.
holder.text.setText(DATA[position]);
holder.icon.setImageBitmap((position &1) ==1? mIcon1 : mIcon2);
returnconvertView;
}
staticclassViewHolder {
TextView text;
ImageView icon;
}
}
|
Android的界面开发模式决定了实现某一种风格的组件存在很多种方法,而如果没有对它的界面框架有个比较全面的理解的话往往实现起来要走很多弯路,譬如给各item设置背景色。因为在邮件列表中要显示两种颜色,已经阅读过的和未读的邮件以不同的背景色标识。
在item的layout文件里只能设置一中固定的颜色,这当然不是我想要的。
最直接的思路就是在Adapter的getView中根据position的不同来设置不同的背景色,但是设置了不同颜色后发现在屏幕上选中一行时背景色没有变化,选中跟没选中的颜色是一样的。于是又重新设置selector,但仍然不起作用。
看 来getView中返回的View就是ListView中各行最终显示界面,所以又想着先在ListView的 OnItemClickListener中记录当前选中的Item,然后在getView中判断是不是该行,如果是,就设置为选中的背景色。但是这种方法 存在很大的问题,第一个问题就是onItemClickListener是在用户点击之后调用的,所以背景色的改变也是用户点完了之后才发生,而正确的应 该是press的一瞬间改变背景色。第二个问题是,再返回到该ListView时需要在代码里重新清楚选中行的记录,否则该行的背景色不会刷新。
最终的解决方法是这样的:
实现两个selector文件(正常显示下有几种背景色就需要几个这样的selector文件)
mail_read_bg.xml
|
1
2
3
4
5
6
7
8
9
10
11
12
13
14
15
16
17
18
19
20
21
22
23
24
25
|
<?xml version="1.0"encoding="utf-8"?>
<selector xmlns:android="[url=
http://schemas.android.com/apk/res/android]
http://schemas.android.com/apk/res/android[/url]">
<item
android:state_selected="false"
android:state_pressed="false"
android:drawable="@color/ltgray"/>
<item android:state_pressed="true"
android:drawable="@color/red"/>
<item android:state_selected="true"
android:state_pressed="false"
android:drawable="@color/red"/>
</selector>
mail_unread_bg.xml
<?xml version="1.0"encoding="utf-8"?>
<selector xmlns:android="[url=
http://schemas.android.com/apk/res/android]
http://schemas.android.com/apk/res/android[/url]">
<item
android:state_selected="false"
android:state_pressed="false"
android:drawable="@color/white"/>
<item android:state_pressed="true"
android:drawable="@color/red"/>
<item android:state_selected="true"
android:state_pressed="false"
android:drawable="@color/red"/>
</selector>
|
在getView中根据邮件不同的状态设置不同的颜色方案
|
1
2
3
4
|
ifunread
convertView.setBackgroundResource(R.drawable.mail_unread_bg);
else
convertView.setBackgroundResource(R.drawable.mail_read_bg);
|

本文转自 http://hi.baidu.com/hbzha/blog/item/4c734f6f7b5853c280cb4a38.html
来源:oschina
链接:https://my.oschina.net/u/593773/blog/118243