由于mini2440在WIN7上下载,USB驱动无法兼容,总是出现蓝屏重启的现象,导致不得不想其他方式来下载,首先就考虑了使用U-Boot来下载,因为它支持多种下载方式:
1. 使用串口下载,它支持kermit/xmodem/ymodem等模式,但是下载速度比较慢。
2. 使用U盘/SD卡加载程序,需要先将程序拷贝到U盘/SD卡中,然后再通过相应的命令读取到内存中。
3. 使用TFTP/NFS网络服务加载程序,配置好终端和服务器,使用起来比较方便,而且速度很快。
在这里我讲一下TFTP方式的配置过程,以及使用方式。首先需要将U-boot下载到Nand Flash中,但是由于友善之臂提供的USB驱动在WIN7及其不稳定,所以我费了九牛二虎之力才将其使用DNW下载进去。使用的是由Tekkaman Ninja移植的U-boot,可以通过git来下载源代码,下载方式是:git clone https://github.com/tekkamanninja/u-boot-2010.03-tekkaman.git。关于GIT的用法,参考http://www.arm9home.net/read.php?tid-5266.html。下载完成之后需要重新编译,编译步骤如下:
$cd u-boot-2010.03-tekkaman
$export PATH=$PATH:/opt/FriendlyARM/toolschain/4.4.3/bin/
$make ARCH=arm CROSS_COMPILE=/opt/FriendlyARM/toolschain/4.4.3/bin/arm-linux- mini2440_config
$make ARCH=arm CROSS_COMPILE=/opt/FriendlyARM/toolschain/4.4.3/bin/arm-linux- all
如果你在编译的过程中碰到了invalid option的问题,那是因为git下载的文件编码格式不正确,应该使用utf-8的格式下载文件,或者使用在linux中通过git下载源代码编译,保证文件格式是正确的。最终生成的u-boot.bin可以通过supervivi菜单项里的"[a] Absolute User Application"选项 + DNW工具下载到NAND Flash中。
将mini2440设置成nand flash启动模式,链接串口和网线,网线分为交叉网线和直连网线,mini2440赠送的是直连网线,不过网卡可以自动识别。启动串口之后就可以看到以下内容:
U-Boot 2010.03 (Dec 27 2012 - 06:32:26)
modified by tekkamanninja (tekkamanninja@163.com)
Love Linux forever!!I2C: ready
DRAM: 64 MB
Flash: 2 MB
NAND: 256 MiB
Video: 240x320x16 20kHz 62Hz
In: serial
Out: serial
Err: serial
USB slave is enable!
Net: dm9000
U-Boot 2010.03 (Dec 27 2012 - 06:32:26)
modified by tekkamanninja
(tekkamanninja@163.com)
Love Linux forever!!
Hit any key to stop autoboot: 0
[u-boot@MINI2440]#
显示出机器的一些基本信息,我们可以使用printenv命令显示当前的环境变量:
[u-boot@MINI2440]# printenv
bootargs=noinitrd root=/dev/nfs rw nfsroot=192.168.0.1:/home/tekkaman/working/nfs/rootfs ip=192.168.0.2:192.168.0.1::255.255.255.0 console=ttySAC0,115200 init=/linuxrc mem=64M
baudrate=115200
ethaddr=08:08:11:18:12:27
netmask=255.255.255.0
tekkaman=bmp d 70000
stdin=serial
stdout=serial
stderr=serial
ethact=dm9000
ipaddr=192.168.3.8
gatewayip=192.168.3.1
serverip=192.168.3.5
bootcmd=tftp zImage_T35.img;bootm
bootdelay=3Environment size: 425/131068 bytes
这个时候首先需要配置IP,将PC本地连接的IP和mini2440的IP配置在同一网段,ipaddr是mini2440的IP,gatewayip是网关,serverip是PC的IP,需要在PC段设置静态IP,设置完成之后一定要saveenv将设置写入flash之中,否则下载启动有得重新设置:
[u-boot@MINI2440]# setenv ipaddr 192.168.3.8
[u-boot@MINI2440]# setenv gatewayip 198.168.3.1
[u-boot@MINI2440]# setenv serverip 192.168.3.5
[u-boot@MINI2440]# saveenv
Saving Environment to NAND...
Erasing Nand...
Erasing at 0x6000000000002 -- 0% complete.
Writing to Nand... done
虽然mini2440与PC通过网线连接起来的,但是PC机上的本地连接仍旧是断开的,这是因为我们使用的是直连网线,只有等到ping的时候才可以正常连接,并且只能通过mini2440 ping PC,无法通过PC来ping mini2440。
接下来需要下载TFTP服务软件,下载地址:http://tftpd32.jounin.net/tftpd32_download.html。请选择合适的版本下载,安装之后打开软件配置,主要是配置Current Directory,这个路径下主要是存放你需要下载的文件的。同时需要关闭防火墙和杀毒软件,如果不想关闭它们可以通过设置允许TFTP通过windows防火墙通信来避免通信被阻挡。
比如我的mini2440 IP为192.168.3.8,PC机的本地连接IP为192.168.3.5。可以在uboot上通过ping 192.168.3.5来测试网络是否连接好了。如果可以ping通,那么会出现:
[u-boot@MINI2440]# ping 192.168.3.5
dm9000 i/o: 0x20000300, id: 0x90000a46
DM9000: running in 16 bit mode
MAC: 08:08:11:18:12:27
operating at 100M full duplex mode
Using dm9000 device
host 192.168.3.5 is alive
然后我们把需要下载的文件发到刚刚设置的tftpboot目录下,就可以使用下面的方法来下载了,比如我们要下载linux内核zImage_T35.img:
[u-boot@MINI2440]# tftp zImage_T35.img
dm9000 i/o: 0x20000300, id: 0x90000a46
DM9000: running in 16 bit mode
MAC: 08:08:11:18:12:27
operating at 100M full duplex mode
Using dm9000 device
TFTP from server 192.168.3.5; our IP address is 192.168.3.8
Filename 'zImage_T35.img'.
Load address: 0x30008000
Loading: T #################################################################
#################################################################
#########################
done
Bytes transferred = 2266708 (229654 hex)
这样就将linux内核镜像加载到了起始地址为0x30008000的内存中,然后通过bootm命令就可以启动linux,不过前提是你得安装文件系统,否则会panic。但是如果bootm之后显示kernel参数错误,那么就是Image格式不对,需要使用下面的命令来转化:
mkimage -n 'linux-2.6.14' -A arm -O linux -T kernel -C none -a 0x30008000 -e 0x30008000 -d zImage_T35 zImage_T35.img
如果你需要将Image写入到nand flash中需要如下的操作:
[u-boot@MINI2440]# nand erase 0x100000 300000
NAND erase: device 0 offs et 0x100000, size 0x300000
Erasing at 0x3e000001800000 -- 0% complete.
OK
[u-boot@MINI2440]# nand write 0x30008000 0x100000 300000
NAND write: device 0 offset 0x100000, size 0x300000
Writing at 0x3e000000020000 -- 100% is complete. 3145728 bytes written: OK
[u-boot@MINI2440]# nand device 0
Device 0: NAND 128MiB 3,3V 8-bit... is now current device
[u-boot@MINI2440]# nboot 30008000 0 0x100000
Loading from NAND 128MiB 3,3V 8-bit, offset 0x100000
Image Name: tekkaman
Created: 2010-03-29 12:59:51 UTC
Image Type: ARM Linux Kernel Image (uncompressed)
Data Size: 2277476 Bytes = 2.2 MB
Load Address: 30008000
Entry Point: 30008040
[u-boot@MINI2440]# bootm 30008000
## Booting kernel from Legacy Image at 30008000 ...
Image Name: tekkaman
Created: 2010-03-29 12:59:51 UTC
Image Type: ARM Linux Kernel Image (uncompressed)
Data Size: 2277476 Bytes = 2.2 MB
Load Address: 30008000
Entry Point: 30008040
Verifying Checksum ... OK
XIP Kernel Image ... OK
OK
Starting kernel ...
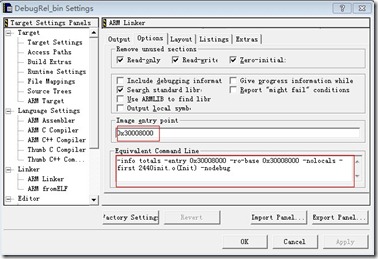
如果我们需要调试的是一般程序,那么通过tftp下载之后,可以使用go 30008000来运行,注意由于友善之臂提供的代码入口地址都是0x30000000,所以不能运行,我们自己编写的程序入口地址应该设置为0x30008000.
下面介绍一个简单的调试方法,因为我们每次调试代码都需要不断的下载新的编译程序。
1. 首先设置tftp 的Current Directory为工程生成bin文件的目录。
2. 设置环境变量bootcmd和bootdelay:
[u-boot@MINI2440]# setenv bootdelay 1
[u-boot@MINI2440]# setenv bootcmd "tftp 2440test.bin;go 0x30008000"
[u-boot@MINI2440]# saveenv
Saving Environment to NAND...
Erasing Nand...
Erasing at 0x6000000000002 -- 0% complete.
Writing to Nand... done
注意2440test.bin为项目最终生成的bin文件名字,你的项目生成的是什么名字,这里就填写什么名字。
以后每次你打开mini2440,它就会自动下载最新的bin文件,并且执行它,你就可以立即看到结果,根本不需要你动手去下载,是不是很方便。
U-Boot 2010.03 (Dec 27 2012 - 06:32:26)
modified by tekkamanninja (tekkamanninja@163.com)
Love Linux forever!!I2C: ready
DRAM: 64 MB
Flash: 2 MB
NAND: 256 MiB
Video: 240x320x16 20kHz 62Hz
In: serial
Out: serial
Err: serial
USB slave is enable!
Net: dm9000
U-Boot 2010.03 (Dec 27 2012 - 06:32:26)
modified by tekkamanninja
(tekkamanninja@163.com)
Love Linux forever!!
Hit any key to stop autoboot: 0
dm9000 i/o: 0x20000300, id: 0x90000a46
DM9000: running in 16 bit mode
MAC: 08:08:11:18:12:27
operating at 100M full duplex mode
Using dm9000 device
TFTP from server 192.168.3.5; our IP address is 192.168.3.8
Filename '2440test.bin'.
Load address: 0x30008000
Loading: T ##########################################
done
Bytes transferred = 613092 (95ae4 hex)
## Starting application at 0x30008000 ...<***********************************************>
SBC2440 Test Program VER1.0
www.arm9.net
Build time is: Jan 08 2013 23:05:30
Image$$RO$$Base = 0x30008000
Image$$RO$$Limit = 0x3003c4fc
Image$$RW$$Base = 0x3003c4fc
Image$$RW$$Limit = 0x300ea2b4
Image$$ZI$$Base = 0x3009dae4
Image$$ZI$$Limit = 0x300ea2b4
<***********************************************>Please select function :
0 : Please input 1-16 to select test
1 : Test PWM
2 : RTC time display
3 : Test ADC
4 : Test interrupt and key scan
5 : Test Touchpanel
6 : Test TFT-LCD or VGA1024x768 module
7 : Test IIC EEPROM, if use QQ2440, please remove the LCD
8 : UDA1341 play music
9 : Test SD Card
10 : Test CMOS Camera
下面提供一些参考链接,希望对你有帮助:
Tekkaman Ninja的博客:http://blog.chinaunix.net/space.php?uid=20543672&do=blog&id=94376
Tekkaman Ninja的Github:https://github.com/tekkamanninja/u-boot-2010.03-tekkaman
ARM9 之家论坛:http://www.arm9home.net/simple/index.php?t3539.html
U-boot官方网站:http://www.denx.de/wiki/U-Boot
来源:oschina
链接:https://my.oschina.net/u/579952/blog/101743

![ZD_J}37H`RH{%O12$_(][[A ZD_J}37H`RH{%O12$_(][[A](http://static.oschina.net/uploads/img/201301/12140642_yJ31.jpg)
