前言:
在前面的“5天学会jaxws-webservice教程”,我们讲了基本的jax-ws的使用。
Jax-ws是业界公认的标准的webservice,它已经成为了一个行业界标准,包括cxf,其实cxf也是调用的jax-ws为标准的基于spring的webservice框架。
同时,大家都知道世界上除了j2ee体系外,还存在.net体系,同时有过相关经验的同事们也知道用ws-security无非就是涉及到“加密”,“解密”,而JAVA的x509所涉及到的证书,公钥,私钥与.net体系之间是无法通用的。
但是webservice是因该属于无所谓语言的一个标准,因此为了让j2ee的webservice与.net的webservice能够互相调用(当然包括ws-security里的加密解密),SUN与微软联合推出了一个:WCF。
WCF是Windows Communication Foundation的缩写,原来代号为Indigo,它是MS为SOA(Service Oriented Architecture 面向服务架构)而设计的一套完整的技术框架。利用它能够开发出分布式(Distributed)应用程序,而且开发难度相比以前 的.NETRemoting和ASP.NETXML Web Service等都有了大幅度的降低。
那么搞J2EE的人如何去支持这个WCF呢?我们不可能去用.net的语言在J2EE工程中写符合WCF的Webservice?
因此,SUN在jax-ws上推出了一套框架叫:metro,用于支持WCF的webservice.
在下面的介绍中,我们会先以一个jax-ws结合SSH框架的例子来作为一个承上启下的开头,现在开始我们的ws-security之旅吧。
该教程为基础篇,不涉及到QoS与wcf相关,只有阅读完了本教程,才能过渡到真正的jax-ws的ws-security。真正的可扩展的符合wcf标准的WebserviceQoS会在另一篇教程中(METRO)详细介绍。
jax-ws集成SSH框架
1. 引入两个额外的jar包
jaxws-spring-1.8.jar与xbean-spring-2.8.jar。
2. 修改applicationContext.xml文件
<beans xmlns="http://www.springframework.org/schema/beans" xmlns:p="http://www.springframework.org/schema/p" xmlns:xsi="http://www.w3.org/2001/XMLSchema-instance" xmlns:aop="http://www.springframework.org/schema/aop" xmlns:tx="http://www.springframework.org/schema/tx" xmlns:context="http://www.springframework.org/schema/context" xmlns:ws="http://jax-ws.dev.java.net/spring/core" xmlns:wss="http://jax-ws.dev.java.net/spring/servlet" xsi:schemaLocation=" http://www.springframework.org/schema/beans http://www.springframework.org/schema/beans/spring-beans-3.0.xsd http://www.springframework.org/schema/tx http://www.springframework.org/schema/tx/spring-tx-3.0.xsd http://www.springframework.org/schema/aop http://www.springframework.org/schema/aop/spring-aop-3.0.xsd http://www.springframework.org/schema/context http://www.springframework.org/schema/context/spring-context-3.0.xsd http://jax-ws.dev.java.net/spring/core http://jax-ws.dev.java.net/spring/core.xsd http://jax-ws.dev.java.net/spring/servlet http://jax-ws.dev.java.net/spring/servlet.xsd"> |
请注意红色加粗部分。
<bean id="roleQuery" class="com.cts.pip.ws.RoleQuery" /> <wss:binding url="/roleQueryService"> <wss:service> <ws:service bean="#roleQuery" /> </wss:service> </wss:binding> |
ü 上面的描述,使得我们的Spring容器根据JAVA类: com.cts.pip.ws.RoleQuery生成相应的wsdl。
ü 这边的: wss:binding url映射的是我们的web.xml中映射的相应的servleturl。
来看我们的web.xml中如何去映射我们的servleturl的:
<servlet> <servlet-name>jaxws-servlet</servlet-name> <servlet-class>com.sun.xml.ws.transport.http.servlet.WSSpringServlet</servlet-class> </servlet> <servlet-mapping> <servlet-name>jaxws-servlet</servlet-name> <url-pattern>/roleQueryService</url-pattern> </servlet-mapping> |
3. 们的webservice
package com.cts.pip.ws; import javax.annotation.Resource; import javax.jws.WebMethod; import javax.jws.WebService; import org.apache.log4j.Logger; import com.cts.pip.dto.*; import java.util.*; import com.cts.pip.service.*; public class RoleQuery { protected Logger log = Logger.getLogger(this.getClass()); RoleService roleService;
@WebMethod public List<RoleDTO> getRoles(){ List<RoleDTO> roleList=new ArrayList<RoleDTO>(); try{ roleList=roleService.queryRole(); log.info("roleList Size====="+roleList.size()); return roleList; }catch(Exception e){ log.error(e); return null; } } } |
可以看到,我们的这个类,可以直接annotation进一个由spring容器管理的service层,层我们的webservice可以集成spring,调用springcontext中管理的任何资源,相信这个实用阶值会比较大吧,对吧?呵呵。
4. 们的webservice成wsdl与生成相关的服务类
(如何编译参考5天学会jaxws-webservice教程第一天)。

把这个web应用发布到tomcat中去,启动tomcat。
输入:http://localhost:8080/backendmanagement/roleQueryService?wsdl
我们可以得到wsdl的输出。
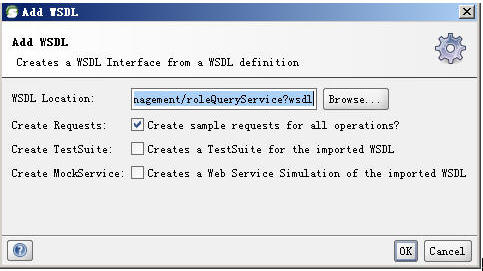
打开soapui,生成一个soap测试客户端:

测试一下我们的soap测试客户端:

可以看到右边我们得到了3条输出,这就是webservice通过spring的service,spring的service通过hibernate的dao获得到数据的soap包。代表我们的webservice服备端已经发布成功。
5. 开发客户端
这边如何编译,如何引用wsdl生成客户端所需要的stub一并滤过,详细请参见:5天学会jaxws-webservice教程第一天中相关的内容,下面只给出实现的客户端,在这边我们使用的polling方式的webservice客户端。
package com.cts.pip.ws; import javax.xml.ws.*; import java.util.*; import com.cts.pip.ws.*; import ctsjavacoe.ws.fromjava.CollectionWS; import ctsjavacoe.ws.fromjava.RtnMethodResponse;
public class JAXWSSPRINGPollingClient { public static void main(String[] args) throws Exception { RoleQueryService service = new RoleQueryService(); RoleQuery port = service.getRoleQueryPort(); Response<GetRolesResponse> getRoleAsync = port.getRolesAsync(); while (!getRoleAsync.isDone()) { System.out.println("is not done"); } List<RoleDTO> rtnList = new ArrayList<RoleDTO>(); try { GetRolesResponse getRolesResponse = getRoleAsync.get(); rtnList = getRolesResponse.getReturn(); System.out.println("return size======" + rtnList.size()); for (RoleDTO r : rtnList) { System.out.println(r.getRoleId() + " " + r.getRoleName()); } } catch (Exception ex) { ex.printStackTrace(); } } } |
来源:oschina
链接:https://my.oschina.net/u/187822/blog/291783