题记——
难过了,悄悄走一走;
伤心了,默默睡一觉;
优雅不是训练出来的,而是一种阅历;
淡然不是伪装出来的,而是一种沉淀;
时间飞逝,老去的只是我们的容颜;
时间仿佛一颗灵魂,越来越动人;
其他站点:
1、回享每一时刻 http://jingyan.baidu.com/article/25648fc193fcbe9190fd004f.html
2、回眸每一点钟 http://blog.csdn.net/zl18603543572/article/details/52012122
1、简述:
在多线程的世界中,是那么的神奇 与 高效以及合理;
2、创建线程池实例
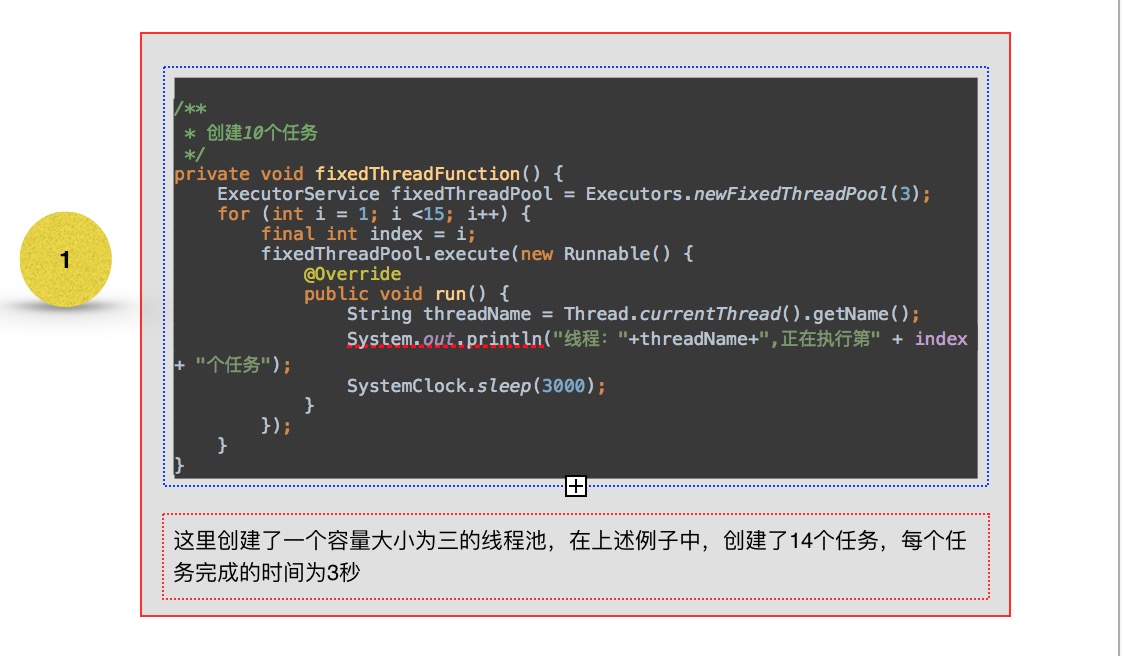
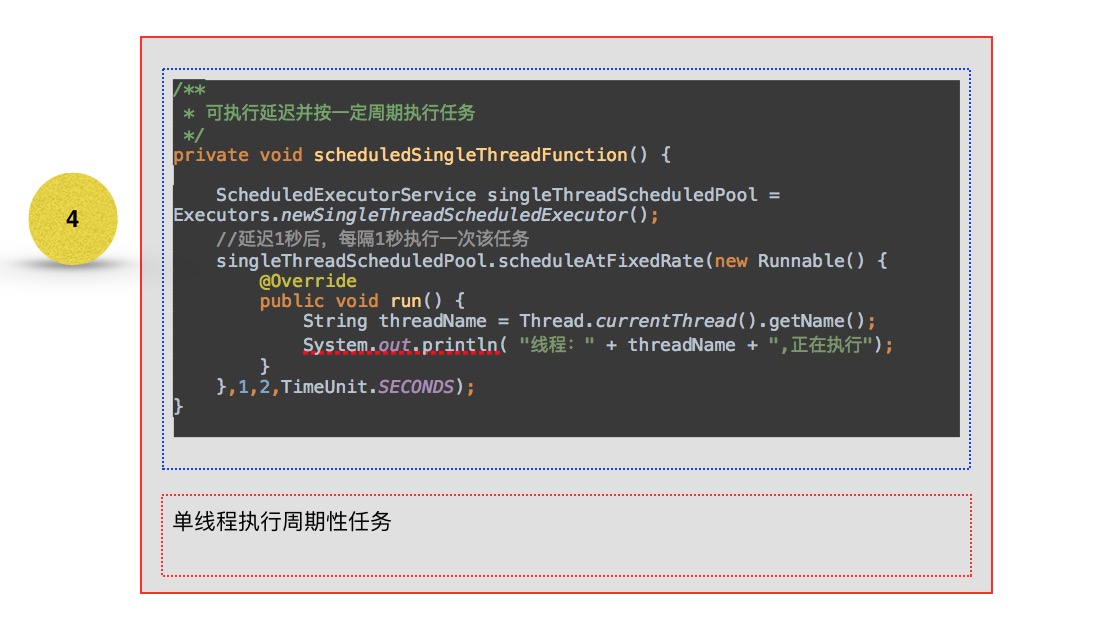
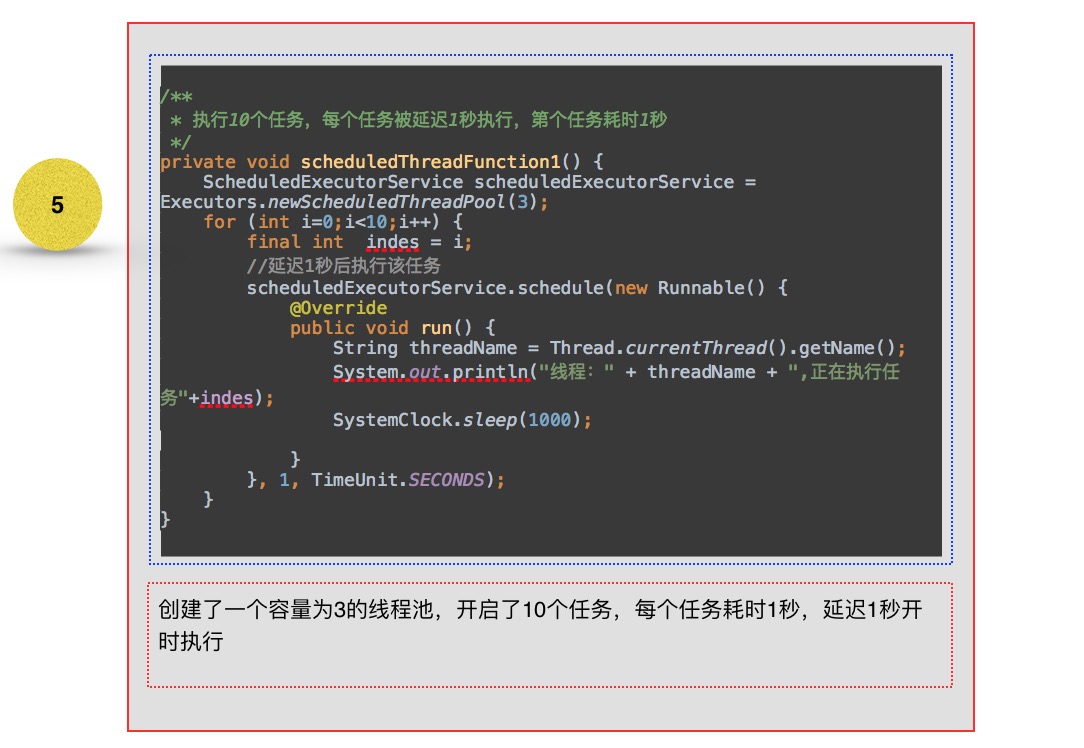
官方推荐使用Executors类工厂方法来创建线程池管理,Executors类是官方提供的一个工厂类,里面封装了好多功能不一样的线程池,从而使得我们创建线程池非常的简单:

3、使用线程池来管理任务


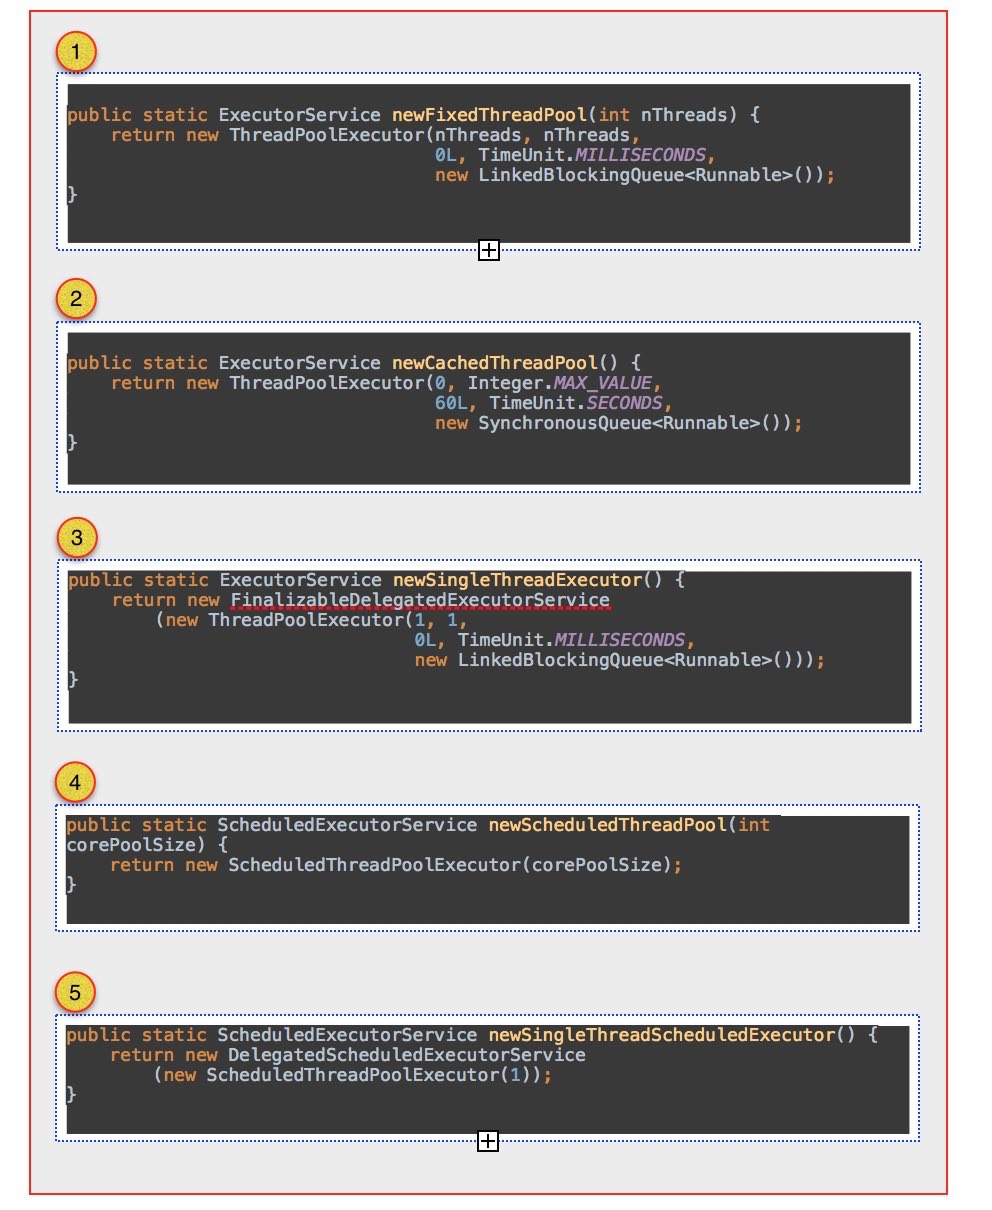
4、Executors核心创建说明

可以看到1 - 3 创建线程池的方法中,全部是创建了ThreadPoolExecutor这个对象实例,不同的只是构造中的参数不一至,而在4 与5 ,从其继承的角度来看
public class ScheduledThreadPoolExecutor
        extends ThreadPoolExecutor
        implements ScheduledExecutorService {
可以看到其实质也是继承于ThreadPoolExecutor这个对象实例。
也就是说上述一种类型的线程池其都是 ThreadPoolExecutor子类,其实直接创建ThreadPoolExecutor实例对象,只需要传入相对应的配制参数,就可以创建出来与上述五种效果相一至的线程池管理,只不过是在书写的时候太过于繁锁。
 /**
     * Creates a new {@code ThreadPoolExecutor} with the given initial
     * parameters and default thread factory and rejected execution handler.
     * It may be more convenient to use one of the {@link Executors} factory
     * methods instead of this general purpose constructor.
     *
     * @param corePoolSize the number of threads to keep in the pool, even
     *        if they are idle, unless {@code allowCoreThreadTimeOut} is set
     * @param maximumPoolSize the maximum number of threads to allow in the
     *        pool
     * @param keepAliveTime when the number of threads is greater than
     *        the core, this is the maximum time that excess idle threads
     *        will wait for new tasks before terminating.
     * @param unit the time unit for the {@code keepAliveTime} argument
     * @param workQueue the queue to use for holding tasks before they are
     *        executed.  This queue will hold only the {@code Runnable}
     *        tasks submitted by the {@code execute} method.
     * @throws IllegalArgumentException if one of the following holds:<br>
     *         {@code corePoolSize < 0}<br>
     *         {@code keepAliveTime < 0}<br>
     *         {@code maximumPoolSize <= 0}<br>
     *         {@code maximumPoolSize < corePoolSize}
     * @throws NullPointerException if {@code workQueue} is null
     */
    public ThreadPoolExecutor(int corePoolSize,
                              int maximumPoolSize,
                              long keepAliveTime,
                              TimeUnit unit,
                              BlockingQueue<Runnable> workQueue) {
        this(corePoolSize, maximumPoolSize, keepAliveTime, unit, workQueue,
             Executors.defaultThreadFactory(), defaultHandler);
    }
5、ThreadPoolExecutor简述
从上述创建ThreadPoolEecutor实例的构造来说,

6、自定义线程池
    /**
     * 创建线程池也是需要资源的,所以线程池内线程数量的大小也会影响系统的性能,
     * 大了反而浪费资源,小了反而影响系统的吞吐量,
     * 所以我们创建线程池需要把握一个度才能合理的发挥它的优点,
     * 通常来说我们要考虑的因素有CPU的数量、内存的大小、并发请求的数量等因素,按需调整。
     *通常核心线程数可以设为CPU数量+1,而最大线程数可以设为CPU的数量*2+1。
     */
    private void customThreadFunction() {
        /**
         * 获取CPU数量
         */
        int processors = Runtime.getRuntime().availableProcessors();

        /**
         * 核心线程数量
         */
        int corePoolSize =processors + 1;
        /**
         * 最大线程数量
         */
        int maximumPoolSize =  processors * 2 + 1;
        /**
         * 空闲有效时间
         */
        long keepAliveTime = 60;
        /**
         * 创建自定义线程池
         */

        ThreadPoolExecutor threadPoolExecutor = new ThreadPoolExecutor(corePoolSize, maximumPoolSize, keepAliveTime, TimeUnit.SECONDS, new PriorityBlockingQueue());

        /**
         * 添加执行任务
         */
        for (int i=1;i<=20;i++){
            final int prites = i;
            threadPoolExecutor.execute(new CustomRunnable(prites){

                @Override
                public void doRun() {

                    String name = Thread.currentThread().getName();
                    System.out.println("curentThread name is "+name +"and prites is "+prites);
                    SystemClock.sleep(1000);

                }
            });
        }
    }
 public abstract class CustomRunnable implements Runnable,Comparable<CustomRunnable> {
        private int priority;

        public CustomRunnable(int priority) {
            if (priority<0)
            throw new IllegalArgumentException();
            this.priority = priority;
        }

        @Override
        public int compareTo(CustomRunnable another) {
            int my = this.getPriority();
            int other = another.getPriority();
            if (my>other){
                return  -1;
            }else{
                return 0;
            }

        }


        @Override
        public void run() {
            doRun();
        }

        public abstract void doRun();

        public int getPriority() {
            return priority;
        }
    }
7、自定义扩展线程池
public class CustomExpanThreadPool extends ThreadPoolExecutor {

    private CustomExpanThreadPool(int corePoolSize, int maximumPoolSize, long keepAliveTime, TimeUnit unit, BlockingQueue<Runnable> workQueue) {
        super(corePoolSize, maximumPoolSize, keepAliveTime, unit, workQueue);
    }

    public static CustomExpanThreadPool getInstance() {
        /**
         * 获取CPU数量
         */
        int processors = Runtime.getRuntime().availableProcessors();

        /**
         * 核心线程数量
         */
        int corePoolSize = processors + 1;
        /**
         * 最大线程数量
         */
        int maximumPoolSize = processors * 2 + 1;
        /**
         * 空闲有效时间
         */
        long keepAliveTime = 60;
        /**
         * 创建自定义线程池
         */

        return new CustomExpanThreadPool(corePoolSize, maximumPoolSize, keepAliveTime, TimeUnit.SECONDS, new PriorityBlockingQueue());

    }

    /**
     * 用于控制线程开始与停止执行的方法
     */
    private boolean isPaused;
    private ReentrantLock pauseLock = new ReentrantLock();
    private Condition unpaused = pauseLock.newCondition();


    /**
     * 任务执行前要执行的方法
     *
     * @param t
     * @param r
     */
    @Override
    protected void beforeExecute(Thread t, Runnable r) {
        super.beforeExecute(t, r);
        System.out.println(Thread.currentThread().getName() + "  任务执行开始 ");
        pauseLock.lock();
        try {
            while (isPaused) unpaused.await();
        } catch (InterruptedException ie) {
            t.interrupt();
        } finally {
        }
    }

    /**
     * 任务执行后要执行的方法
     *
     * @param r
     * @param t
     */
    @Override
    protected void afterExecute(Runnable r, Throwable t) {
        super.afterExecute(r, t);
        System.out.println(Thread.currentThread().getName() + "  任务执行over ");
    }

    /**
     * 线程池关闭后要执行的方法
     */
    @Override
    protected void terminated() {
        super.terminated();
    }

    /**
     * 暂停执行任务的方法
     */
    public void pause() {
        pauseLock.lock();
        try {
            isPaused = true;
        } finally {
            pauseLock.unlock();
        }
    }

    /**
     * 恢复执行任务的方法
     */
    public void resume() {
        pauseLock.lock();
        try {
            isPaused = false;
            unpaused.signalAll();
        } finally {
            pauseLock.unlock();
        }
    }
}
使用:
 private void customThreadFunction2() {

        CustomExpanThreadPool threadPoolExecutor = CustomExpanThreadPool.getInstance();

        /**
         * 添加执行任务
         */
        for (int i=1;i<=20;i++){
            final int prites = i;
            threadPoolExecutor.execute(new CustomRunnable(prites){

                @Override
                public void doRun() {

                    String name = Thread.currentThread().getName();
                    System.out.println("curentThread name is "+name +"and prites is "+prites);
                    SystemClock.sleep(1000);

                }
            });
        }
    }
8、自定义线程池与可控制取消的任务
首先创建自定义的线程池(与标签7)
    /**
     * CPU数量
     */
    private int process = Runtime.getRuntime().availableProcessors();
    /**
     * 核心线程数量
     */
    private int corePoolSize = process + 1;
    /**
     * 最大线程数量
     */
    private int maxPoolSize = process * 2 + 1;
    /**
     * 空闲有效时间
     */
    private long keepAliveTime = 60;
    /**
     * 自定义线程池
     */
    private ThreadPoolExecutor mThreadPoolExecutor;

    /**
     * 用于保存任务的集合
     */
    private Map<String, Future<Integer>> mThreadFutureTaskMap;

    private ThreadPoolManager(){
        if (mThreadPoolExecutor == null) {
            synchronized (ThreadPoolManager.class){
                if (mThreadPoolExecutor == null) {
                    init();
                }
            }
        }
    }
    public void init() {

        /**
         * 初始化创建线程池
         */
        mThreadPoolExecutor = new ThreadPoolExecutor(corePoolSize,
                                                        maxPoolSize,
                                                        keepAliveTime,
                                                        TimeUnit.SECONDS,
                                                        new LinkedBlockingQueue<Runnable>()) {

            private boolean isPaused;
            private ReentrantLock pauseLock = new ReentrantLock();
            private Condition unpaused = pauseLock.newCondition();

            @Override
            protected void beforeExecute(Thread t, Runnable r) {
                pauseLock.lock();
                try {
                    while (isPaused) unpaused.await();
                } catch (InterruptedException ie) {
                    t.interrupt();
                } finally {
                    pauseLock.unlock();
                }
            }

            /**
             * 暂停
             */
            public void pauseThreadPool() {
                pauseLock.lock();
                try {
                    isPaused = true;
                } finally {
                    pauseLock.unlock();
                }
            }

            /**
             * 恢复任务
             */
            public void resumeThreadPool() {
                pauseLock.lock();
                try {
                    isPaused = false;
                    unpaused.signalAll();
                } finally {
                    pauseLock.unlock();
                }
            }

        };
        /**
         * 初始化保存任务的集合
         */
        mThreadFutureTaskMap = new HashMap<>();
    }
然后就是创建用于控制任务的回调
public abstract class ThreadPoolCallable implements Callable<Integer> {
    @Override
    public Integer call() throws Exception {
        runCall();
        return 1;
    }
    public abstract void  runCall();
}
关于ThreadPoolCallable
可以看到这里是继承于Callable,call方法中的回调返回的信息可以通过些任务对象回调得到,当然异步方法也是在call方法中执行
然后就是向线程池内添加任务
    /**
     * 添加单个任务
     *@param keyTag 任务的标签
     * @param task 任务
     * @return  任务对象
     */
    public Future addTask(ProrityPoolCallable task, String keyTag) {
        //添加并提交任务
        RunnableFuture futureTask = (RunnableFuture) mThreadPoolExecutor.submit(task);
        //将任务添加到集合中
        Future put = mThreadFutureTaskMap.put(keyTag, futureTask);
        return futureTask;
    }
将每个任务提交给线程池管理,然后会返回一个Future对象,看其源码会发现其最终继承Runable对象,然后呢我们将这个Future对象以key,value形式存储到Map集合中去,目的是当我们要取消一个任务的时候,当这个任务已经被提交到线程池中,未执行或者是正在执行,我们都可以通过传的KEY,然后再从集合中取出Key对应的Futureccf对象,然后执行cancel方法,就可以取消这个任务了
取消任务
    /**
     * 移除单个任务
     * @param key   任务标签
     * @return  true 为成功
     */
    public boolean removeTask(String key) {
        //任务移除标识
        boolean cancel = false;
        //根据KEY来获取对应的Future对象
        Set<String> keySet = mThreadFutureTaskMap.keySet();
        if (keySet.contains(key)) {
            Future<Integer> future = mThreadFutureTaskMap.get(key);
            //当前的任务已经被执行完毕,不进行操作
            if (!future.isCancelled()) {
                cancel = future.cancel(true);
                if (cancel) {
                    //当取消成功后,从本地Key集合中移除标识
                    mThreadFutureTaskMap.remove(key);
                }
            }else{
                mThreadFutureTaskMap.remove(key);
            }
        }
        return cancel;
    }
来源:oschina
链接:https://my.oschina.net/u/2447911/blog/716828