springmvc搭建注解开发的小例子
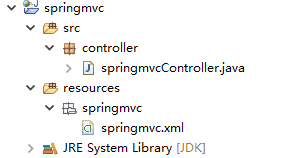
项目搭建展示

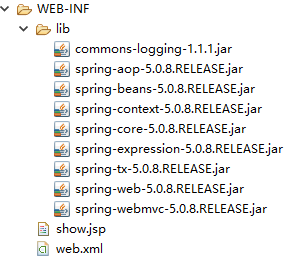
导入jar包

1、创建视图和springmvcController.java类
@Controller  //需要进行注解标识
@RequestMapping("/textspringmvc")
public class springmvcController {

    @RequestMapping(value="/getways")
    public String getWays() {

        System.out.println("成功进入");

        return "show";
    }
}视图:创建名称为show.jsp。里面随便书写一句文字,用来测试
2、创建配置文件springmvc.xml
<?xml version="1.0" encoding="UTF-8"?>
<beans xmlns="http://www.springframework.org/schema/beans"
        xmlns:mvc="http://www.springframework.org/schema/mvc"
        xmlns:context="http://www.springframework.org/schema/context"
        xmlns:xsi="http://www.w3.org/2001/XMLSchema-instance"
        xsi:schemaLocation="
        http://www.springframework.org/schema/beans
        http://www.springframework.org/schema/beans/spring-beans.xsd
        http://www.springframework.org/schema/context
        http://www.springframework.org/schema/context/spring-context.xsd
        http://www.springframework.org/schema/mvc
        http://www.springframework.org/schema/mvc/spring-mvc.xsd">

    <!--包扫描的方式,找到controller-->
    <context:component-scan base-package="controller"></context:component-scan>

    <mvc:annotation-driven></mvc:annotation-driven>

     <bean class="org.springframework.web.servlet.view.InternalResourceViewResolver">
        <property name="prefix" value="/WEB-INF/"/>
        <property name="suffix" value=".jsp"/>
    </bean>
</beans>
3、搭建web.xml
//classpath: 找到配置文件springmvc.xml的路径,并且配置访问的方式<servlet>
     <servlet-name>springmvc</servlet-name>
     <servlet-class>org.springframework.web.servlet.DispatcherServlet</servlet-class>
     <init-param>
         <param-name>contextConfigLocation</param-name>
         <param-value>classpath:springmvc/springmvc.xml</param-value>
     </init-param>
</servlet>
<servlet-mapping>
     <servlet-name>springmvc</servlet-name>
     <url-pattern>/</url-pattern>
</servlet-mapping>
搭建好后,把项目放在Tomcat上运行,浏览器端输入
http://localhost:8080/springmvc/textspringmvc/getways
完成测试。