1、Swagger2介绍
编写和维护接口文档是每个程序员的职责,前面我们已经写好的接口现在需要提供一份文档,这样才能方便调用者使用。考虑到编写接口文档是一个非常枯燥的工作,我们采用Swagger2这套自动化文档工具来生成文档,它可以轻松的整合到Spring Boot中,并与Spring MVC程序配合组织出强大RESTful API文档。
2、SpringBoot开启Swagger2支持
第一步:pom文件中导入对应依赖
<dependency>
            <groupId>io.springfox</groupId>
            <artifactId>springfox-swagger2</artifactId>
            <version>2.7.0</version>
</dependency>
<dependency>
            <groupId>io.springfox</groupId>
            <artifactId>springfox-swagger-ui</artifactId>
            <version>2.7.0</version>
</dependency>
第二步:创建配置类
@Configuration
@EnableSwagger2
public class Swagger2 {
    private ApiInfo apiInfo(){
        return new ApiInfoBuilder()
                .title("spring Boot中使用Swagger2构建Restful APIS") //大标题
                .description("就业")   //描述
                .termsOfServiceUrl("http://www.baidu.com/")
                .contact("Sunny")
                .version("1.0")
                .build();
    }
    @Bean
    public Docket createRestApi(){
        return  new Docket(DocumentationType.SWAGGER_2)
                .apiInfo(apiInfo())
                .select()
                .apis(RequestHandlerSelectors.basePackage("com.ghh.staticdemo.controller"))
                .paths(PathSelectors.any())
                .build();
    }
}
通过@Configuration注解,表明它是一个配置类,
@EnableSwagger2 注解开启swagger2。apiInfo() 方法配置一些基本的信息。
createRestApi() 方法指定扫描的包会生成文档,默认是显示所有接口,可以用@ApiIgnore注解标识该接口不显示。
运行步骤:
通过@Configuration注解,让Spring来加载该类配置。再通过@EnableSwagger2注解来启用Swagger2。
再通过createRestApi方法创建Docket的Bean之后,
apiInfo()用来创建该Api的基本信息(这些基本信息会展现在文档页面中)。
select()函数返回一个ApiSelectorBuilder实例用来控制哪些接口暴露给Swagger来展现,本例采用指定扫描的包路径来定义,Swagger会扫描该包下所有Controller定义的API,并产生文档内容(除了被@ApiIgnore指定的请求)。
apis()用于指定spring容器会扫描当前项目中哪些包中的接口
第三步:在controller层的接口上添加以下注解
@GetMapping("Hello")
    @ApiOperation(value = "返回123",notes = "返回123字符串")
    public String hello(){
        return "123";
    }
@GetMapping("findUser/{id}")
    @ApiOperation(value = "查找指定id姓名",notes = "返回user对象")
    @ApiImplicitParams({
            @ApiImplicitParam(name = "id",value = "用户id",required = true,dataType = "Long"),
            @ApiImplicitParam(name = "uname",value = "用户姓名",required = true,dataType = "String")
    })
    public User findUser(@PathVariable("id")Integer id,@RequestParam("name")String uname){
        User user = new User();
        user.setUid(id);
        user.setUname(uname);
        return user;
    }
通过@ApiOperation注解来给API增加说明()、通过@ApiImplicitParams(接口中需要的多个参数参数)、@ApiImplicitParam(单个参数)注解来给参数增加说明。name:参数名,value:参数的描述,dateType代表返回值类型,required代表参数是否必须要传,
3、查看Swagger2文档
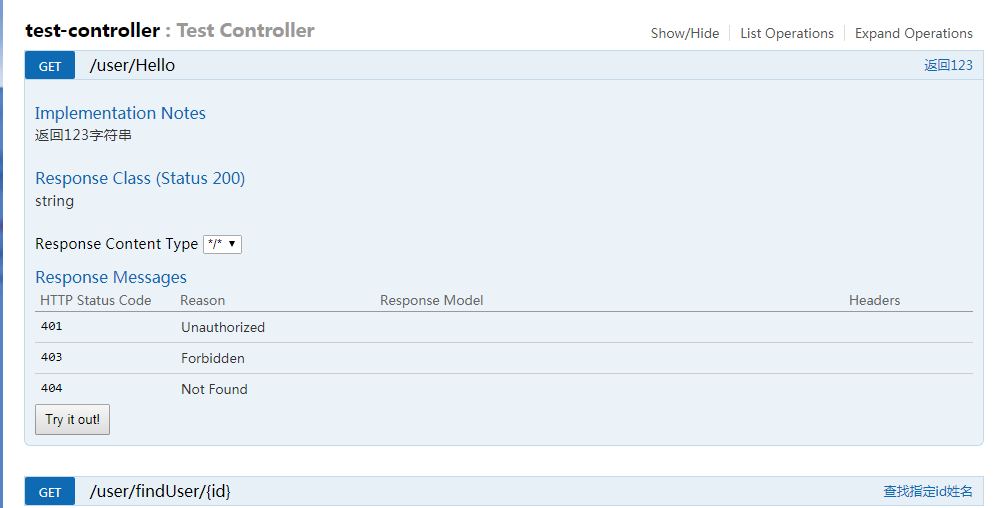
重启应用:访问地址 http://localhost:8080/swagger-ui.html
效果如下

比较简洁,希望能帮到你们