1 先创建一个空项目(自己起名字)
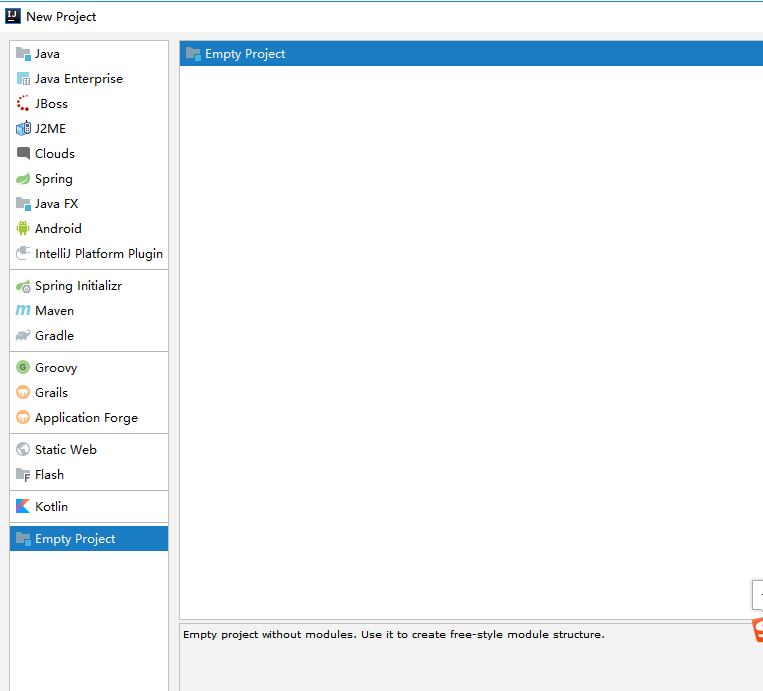
2 在1步骤中创建的空项目中创建两个模块,创建方式如下图所示

1)创建启动器模块用maven项目我的启动器名称为 mao-spring-boot-starter
 pom.xml如下所示

 <?xml version="1.0" encoding="UTF-8"?>
<project xmlns="http://maven.apache.org/POM/4.0.0"
     xmlns:xsi="http://www.w3.org/2001/XMLSchema-instance"

     xsi:schemaLocation="http://maven.apache.org/POM/4.0.0 http://maven.apache.org/xsd/maven-4.0.0.xsd">

<modelVersion>4.0.0</modelVersion>

<groupId>com.mao.starter</groupId>

<artifactId>mao-spring-boot-starter</artifactId>

<version>1.0-SNAPSHOT</version>

<!-- 启动器-->

<properties>
    <project.build.sourceEncoding>UTF-8</project.build.sourceEncoding>

    <project.reporting.outputEncoding>UTF-8</project.reporting.outputEncoding>

    <java.version>1.8</java.version>

</properties>

<dependencies>

     <!-- 引入自动配置模块-->

    <dependency>

        <groupId>com.mao-starter</groupId>

    <artifactId>mao-spring-boot-starter-autoconfigurer</artifactId>

    <version>0.0.1-SNAPSHOT</version>

    </dependency>

	</dependencies>
</project>
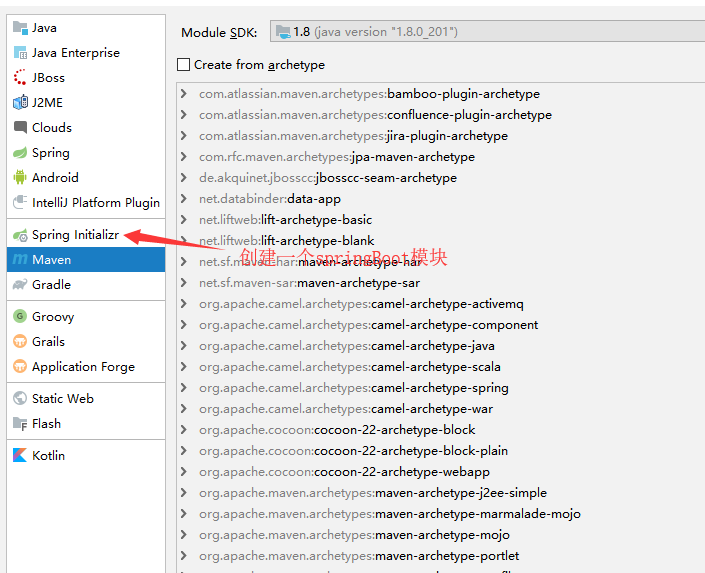
2) 创建自动配置模块,我创建的名字为:mao-spring-boot-starter-autoconfigurer如下图所示
pom.xml如下所示
<?xml version="1.0" encoding="UTF-8"?>
<project xmlns="http://maven.apache.org/POM/4.0.0" xmlns:xsi="http://www.w3.org/2001/XMLSchema-instance"
     xsi:schemaLocation="http://maven.apache.org/POM/4.0.0 http://maven.apache.org/xsd/maven-4.0.0.xsd">

<modelVersion>4.0.0</modelVersion>

<parent>

    <groupId>org.springframework.boot</groupId>

    <artifactId>spring-boot-starter-parent</artifactId>

    <version>1.5.21.RELEASE</version>

    <relativePath/> <!-- lookup parent from repository -->

</parent>

<groupId>com.mao-starter</groupId>

<artifactId>mao-spring-boot-starter-autoconfigurer</artifactId>

<version>0.0.1-SNAPSHOT</version>

<name>mao-spring-boot-starter-autoconfigurer</name>

<description>Demo project for Spring Boot</description>

<properties>

    <project.build.sourceEncoding>UTF-8</project.build.sourceEncoding>

    <project.reporting.outputEncoding>UTF-8</project.reporting.outputEncoding>

    <java.version>1.8</java.version>

</properties>
<!-- 所有要引入的基本配置-->
<dependencies>

    <dependency>

        <groupId>org.springframework.boot</groupId>

        <artifactId>spring-boot-starter</artifactId>

    </dependency>

</dependencies>
</project>
3 创建如下图的3个类

helloProperties.java //属性类
package com.maostarter.mao;
import org.springframework.boot.context.properties.ConfigurationProperties;
@ConfigurationProperties(prefix = "map.hello")
public class helloProperties {
public String prefix;

public String getPrefix() {

    return prefix;
}
public void setPrefix(String prefix) {

    this.prefix = prefix;
}

public String getSuffix() {

    return suffix;
}
public void setSuffix(String suffix) {

    this.suffix = suffix;

}

private String suffix;
}
HelloService.java //向外提供服务的类
public class HelloService {
helloProperties helloPropertie;

public helloProperties getHelloPropertie() {

    return helloPropertie;
}

public void setHelloPropertie(helloProperties helloPropertie) {

    this.helloPropertie = helloPropertie;
}

public String sayHelloMao(String name){

    return helloPropertie.getPrefix()+'*'+name+helloPropertie.getSuffix();
}
}
helloServiceAutoConfiguration.java //服务自动注入类
@Configuration
@ConditionalOnWebApplication //web应用才生效
@EnableConfigurationProperties(helloProperties.class)
public class helloServiceAutoConfiguration {
@Autowired

helloProperties helloPropertie;

@Bean

public HelloService helloService(){

    HelloService service = new HelloService();

    service.setHelloPropertie(helloPropertie);

    return  service;
}
}
4 配置spring.factories文件,如下图创建方式
 spring.factories
org.springframework.boot.autoconfigure.EnableAutoConfiguration=\
com.maostarter.mao.helloServiceAutoConfiguration
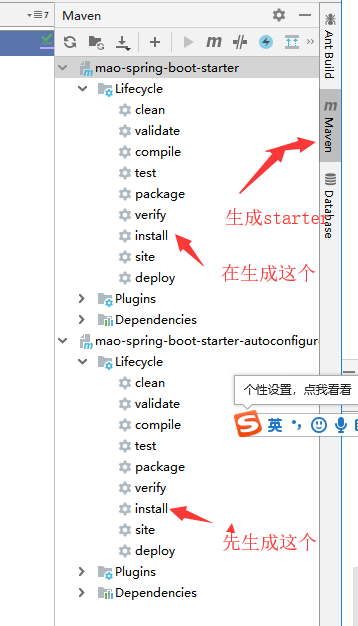
5 如何生成starter,在这个过程有肯能出现各个问题,一般是jdk版本不对,maven版本问题,出现问题首先仔细阅读控制台的信息
不要一出现问题就百度
6 测试刚刚创建的自定义starter创建个springBoot项目
pom.xml如下所示
<?xml version="1.0" encoding="UTF-8"?>
<project xmlns="http://maven.apache.org/POM/4.0.0" xmlns:xsi="http://www.w3.org/2001/XMLSchema-instance"
     xsi:schemaLocation="http://maven.apache.org/POM/4.0.0 http://maven.apache.org/xsd/maven-4.0.0.xsd">

<modelVersion>4.0.0</modelVersion>

<parent>

    <groupId>org.springframework.boot</groupId>

    <artifactId>spring-boot-starter-parent</artifactId>

    <version>2.1.6.RELEASE</version>

    <relativePath/> <!-- lookup parent from repository -->

</parent>

<groupId>com.autostart.test</groupId>

<artifactId>autostart</artifactId>

<version>0.0.1-SNAPSHOT</version>

<name>autostart</name>

<description>Demo project for Spring Boot</description>

<properties>

    <java.version>1.8</java.version>
</properties>

<dependencies>

    <dependency>

        <groupId>org.springframework.boot</groupId>

        <artifactId>spring-boot-starter-web</artifactId>

    </dependency>

    <dependency>

        <groupId>com.mao.starter</groupId>

        <artifactId>mao-spring-boot-starter</artifactId>

        <version>1.0-SNAPSHOT</version>

    </dependency>

    <dependency>

        <groupId>org.springframework.boot</groupId>

        <artifactId>spring-boot-starter-test</artifactId>

        <scope>test</scope>

    </dependency>

</dependencies>

<build>

    <plugins>

        <plugin>

            <groupId>org.springframework.boot</groupId>

            <artifactId>spring-boot-maven-plugin</artifactId>

        </plugin>

    </plugins>

</build>
</project>
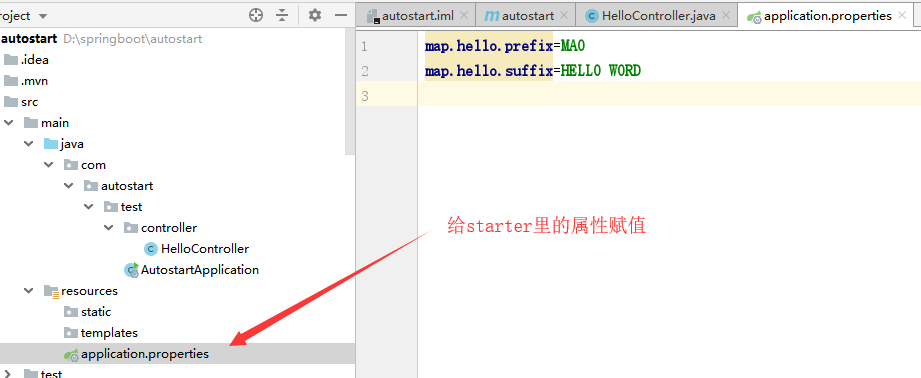
6 给之前配置的属性文件复制 如下图所示
7 创建一个测试用例
@Controller
public class HelloController {
@Autowired

 HelloService helloService;

@ResponseBody

@RequestMapping("/hello")

public String Hello(){

    return helloService.sayHelloMao("haha");

}
}
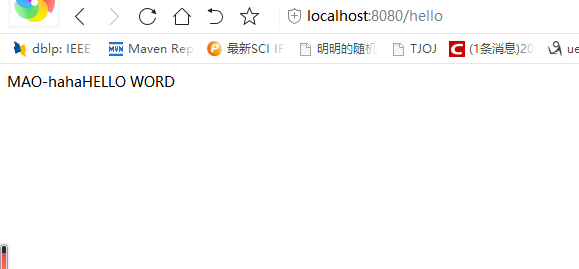
8 测试结果如下图所示
来源:oschina
链接:https://my.oschina.net/u/2511906/blog/3072902