Cat模块

Cat-consumer: 用于实时分析从客户端提供的数据。在实际开发和部署中,Cat-consumer和Cat-home是部署在一个JVM内部,每个CAT服务端都可以作为consumer也可以作为home,这样既能减少整个层级结构,也可以增加系统稳定性。
Cat-core:Cat核心模块
Cat-hadoop : 大数据统计依赖模块。
cat-home:大众点评CAT服务器端主程序,编译安装之后生成 cat-alpha-3.0.0.war 包部署于servlet容器中,我们用的是Tomcat,war包依赖cat-client.jar、cat-consumer.jar, cat-core.jar, cat-hadoop.jar 包,通过web.xml 配置,看到Cat会启动 cat-servlet 和 mvc-servlet , mvc-servlet 是一个类似 spring MVC 的框架,用于处理用户WEB管理平台请求。cat-servlet是CAT服务端监听入口,CAT会在这里开启监听端口,接收处理客户端的日志记录请求,本章主要介绍cat-servlet。


Cat-servlet初始化


public abstract class AbstractContainerServlet extends HttpServlet { public void init(ServletConfig config) throws ServletException { super.init(config); try { if(this.m_container == null) { this.m_container = ContainerLoader.getDefaultContainer(); } this.m_logger = this.m_container.getLogger(); this.initComponents(config); } catch (Exception var3) { ... } } 

public class ComponentManager { private Map<String, ComponentBox<?>> m_components = new HashMap(); private PlexusContainer m_container; private ComponentLifecycle m_lifecycle; private ComponentModelManager m_modelManager; private LoggerManager m_loggerManager; public ComponentManager(PlexusContainer container, InputStream in) throws Exception { this.m_container = container; this.m_modelManager = new ComponentModelManager(); this.m_lifecycle = new ComponentLifecycle(this); if(in != null) { this.m_modelManager.loadComponents(in); } this.m_modelManager.loadComponentsFromClasspath(); this.m_loggerManager = (LoggerManager)this.lookup(new ComponentKey(LoggerManager.class, (String)null)); this.register(new ComponentKey(PlexusContainer.class, (String)null), container); this.register(new ComponentKey(Logger.class, (String)null), this.m_loggerManager.getLoggerForComponent("")); } } 
图2 - plexus IOC容器类配置文件


if(component instanceof Initializable) { try { ((Initializable)component).initialize(); } catch (Throwable var5) { ComponentModel model = ctx.getComponentModel(); throw new ComponentLookupException("Error when initializing component!", model.getRole(), model.getHint(), var5); } } 模块的加载 - 模型模式
init(...)函数最后会调用CatServlet的initComponents()方法初始化Module模块。

initComponents()方法首先创建一个模块上下文 DefaultModuleContext对象,该对象拥有plexus容器的指针,以及server.xml、client.xml配置文件信息 ,服务端配置server.xml中有消息存储路径、HDFS上传等一系列配置,由于cat-home默认是服务端也是客户端,也就是说cat-home自身也会被监控,所以我们在这里看到有client.xml配置,配置文件所在目录由环境变量CAT_HOME指定,如果未指定,默认是/data/appdatas/cat。


<component> <role>org.unidal.initialization.ModuleManager</role> <implementation>org.unidal.initialization.DefaultModuleManager</implementation> <configuration> <topLevelModules>cat-home</topLevelModules> </configuration> </component>


public class CatHomeModule extends AbstractModule { @Override public Module[] getDependencies(ModuleContext ctx) { return ctx.getModules(CatConsumerModule.ID); } }
从cat-consumer的getDependencies看出他依赖cat-core模块,cat-core模块又依赖cat-client模块,这样子我们就从顶层模块引出了所有依赖的其它模块,在实例化模块的同时调用模块的setup方法安装模块。在所有模块安装完成之后,依次调用模块的execute方法完成初始化,但是初始化顺序则是按照安装顺序反着来的,cat-client -> cat-core -> cat-consumer -> cat-home ,Modules之间的设计使用了典型的模板模式。
cat-home的setup
在上一章讲到模块初始化的时候, 讲到setup安装cat-home模块,对于客户端的请求的监听处理,就是在这里完成的。


1、读取 server.xml 配置,装进配置管理器(ServerConfigManager)。
2、创建消息接收器 final TcpSocketReceiver messageReceiver;
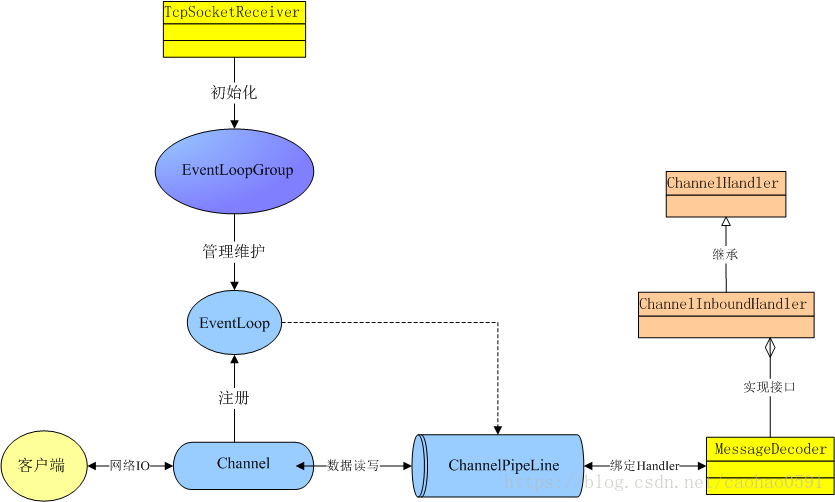
3、messageReceiver.init() 初始化服务,采用的经典的 netty reactor 模型。
4、注册一个JVM关闭的钩子,在进程挂掉的时候,执行一些清理现场的代码。
TcpSocketReceiver--- netty reactor 模式的应用
我们来看看CatHomeModule对TcpSocketReceiver的初始化做了什么,如下源码:


public final class TcpSocketReceiver implements LogEnabled { public void init() { try { startServer(m_port); } catch (Throwable e) { m_logger.error(e.getMessage(), e); } } public synchronized void startServer(int port) throws InterruptedException { boolean linux = getOSMatches("Linux") || getOSMatches("LINUX"); int threads = 24; ServerBootstrap bootstrap = new ServerBootstrap(); m_bossGroup = linux ? new EpollEventLoopGroup(threads) : new NioEventLoopGroup(threads); m_workerGroup = linux ? new EpollEventLoopGroup(threads) : new NioEventLoopGroup(threads); bootstrap.group(m_bossGroup, m_workerGroup); bootstrap.channel(linux ? EpollServerSocketChannel.class : NioServerSocketChannel.class); bootstrap.childHandler(new ChannelInitializer<SocketChannel>() { @Override protected void initChannel(SocketChannel ch) throws Exception { ChannelPipeline pipeline = ch.pipeline(); pipeline.addLast("decode", new MessageDecoder()); } }); bootstrap.childOption(ChannelOption.SO_REUSEADDR, true); bootstrap.childOption(ChannelOption.TCP_NODELAY, true); bootstrap.childOption(ChannelOption.SO_KEEPALIVE, true); bootstrap.childOption(ChannelOption.ALLOCATOR, PooledByteBufAllocator.DEFAULT); try { m_future = bootstrap.bind(port).sync(); m_logger.info("start netty server!"); } catch (Exception e) { m_logger.error("Started Netty Server Failed:" + port, e); } } }
1、创建EventLoopGroup对象, EventLoopGroup是用来处理IO操作的多线程事件循环器,m_bossGroup作为一个acceptor负责接收来自客户端的请求,然后分发给m_workerGroup用来所有的事件event和channel的IO。
3、接下来的channel()方法设置了ServerBootstrap 的 ChannelFactory,这里传入的参数是EpollServerSocketChannel.class (非Linux为NioServerSocketChannel.class),也就是说这个ChannelFactory创建的就是EpollServerSocketChannel/NioServerSocketChannel的实例。
5、initChannel会创建ChannelPipeline对象,并调用addLast添加ChannelHandler。有网络请求时,ChannelPipeline会调用ChannelHandler来处理,有ChannelInboundHandler和ChannelOutboundHandler两种,ChannelPipeline会从头到尾顺序调用ChannelInboundHandler处理网络请求内容,从尾到头调用ChannelOutboundHandler处理网络请求内容。这也是Netty用来灵活处理网络请求的机制之一,因为使用的时候可以用多个decoder和encoder进行组合,从而适应不同的网络协议。而且这种类似分层的方式可以让每一个Handler专注于处理自己的任务而不用管上下游,这也是pipeline机制的特点。这跟TCP/IP协议中的五层和七层的分层机制有异曲同工之妙。
关于netty ,我就讲到这里,网上关于netty框架的文章非常多,大家可以自行去查。

消息的解码


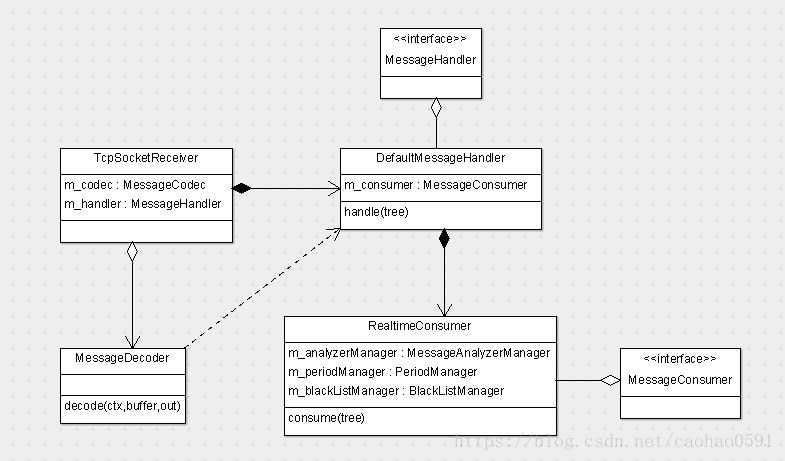
public class MessageDecoder extends ByteToMessageDecoder { @Override protected void decode(ChannelHandlerContext ctx, ByteBuf buffer, List<Object> out) throws Exception { if (buffer.readableBytes() < 4) { return; } buffer.markReaderIndex(); int length = buffer.readInt(); ... ByteBuf readBytes = buffer.readBytes(length + 4); ... DefaultMessageTree tree = (DefaultMessageTree) m_codec.decode(readBytes); readBytes.resetReaderIndex(); tree.setBuffer(readBytes); m_handler.handle(tree); m_processCount++; ... } }
---------------------
作者:曹号
来源:CSDN
原文:https://blog.csdn.net/caohao0591/article/details/80207771
版权声明:本文为博主原创文章,转载请附上博文链接!